02 - Video VBOX Logging
Logging Media
SD cards
When purchasing SD cards, always buy a quality brand such as SanDisk, Kingston or Lexar.
The format used by Video VBOX is FAT32. SD cards between 2 GB and 32 GB can be used straight away, however SD cards with a larger capacity that haven't been supplied formatted in FAT32, will need to be reformatted into the FAT32 file system before they will work with a Video VBOX unit. More information on this can be found here.
USB memory sticks
Dependent on age of unit, contact Racelogic Support for further information.
If data is to be logged to a USB memory device, the optional RLCAB073 cable is required. Racelogic recommend good quality USB sticks - write speeds above 7 MB/s and good USB chip sets are essential.
Video Quality storage requirements
| Quality setting | Storage |
|---|---|
| High | 2 GB per hour |
| Medium | 1.8 GB per hour |
| Low | 1 GB per hour |
Logging Modes
The default filename for Videos and ‘.vbo’ files is VBOX0001.avi and VBOX0001.vbo. You can change this prefix using the Log Settings tab, or choose to use the Time and Date instead. e.g.VBOX_20100803153038_0001.vbo
Which is [Year][Month][Day][Hour][Minute][Second].
The Blue LED will come on when the unit is recording video, this LED will flash when the unit is closing the file. DO NOT REMOVE the SD card if the Record LED is on or is flashing.
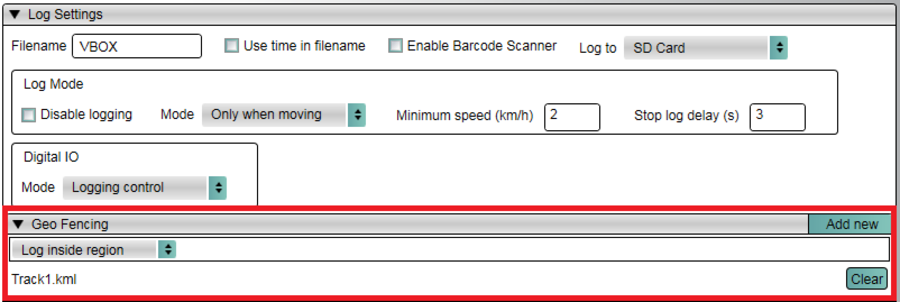
The logging mode can be chosen between Only when moving, Continuous, Manual or via CAN to remotely control logging. Geo Fencing can also be allows the link the logging function of the Video VBOX to a defined geographic location.
Only when moving (default)
The unit automatically starts logging data when the vehicle speed goes above 2.5km/h, and stops when it goes below this value for 3 seconds. The minimum logging speed value is configurable, as is the 'stop log delay' time.
Note: Pressing the REC button will always stop the recording and close the file.
Continuous
When in continuous mode, Video VBOX will start logging as soon as there is power and media present. The unit will not stop recording unless the front panel button is pressed, then the unit will not start recording again until either the media is removed and re-inserted, the front panel button is pushed, or the system is turned off and back on.
Manual logging
Irrespective of the logging mode set within the scene, pressing the REC button on the front of the unit will override any automatic logging functions. The unit will then record until the card is full, the power is removed, or until the user presses the REC button once more.
While this puts the unit into a partially 'manual' mode, to prevent potential loss of video, the unit will revert back to automatic logging after the car has been stationary for over 30 seconds and then starts to move again, or if the SD card is changed.
If a fully 'manual' setting is applied within the software, the unit will never automatically start or stop logging - so the user must push the REC button to start data capture, and again to stop logging before SD removal.
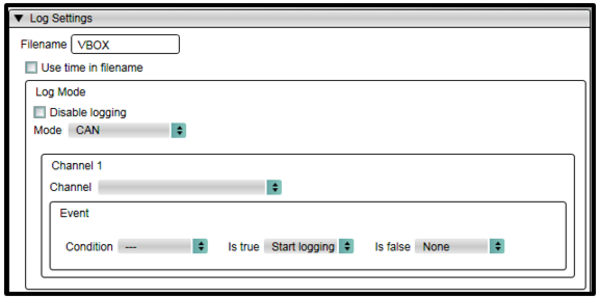
CAN activated logging
Logging can be controlled when a CAN channel is in (or out) of a certain value. Firstly setup a CAN channel in the CAN and module configuration tab, and then select this channel in the logging control.
The conditions for starting and stopping the logging can then be defined.
Geo Fencing
This allows the logging function of the Video VBOX to be linked to a defined geographic location. A Google Earth KML file (with a maximum number of 50 points) can be loaded here.
This will set the Video VBOX to only log inside or outside the defined area.
If the region conditions are not met, the Video VBOX will not log at all – it will not respond to the REC button on the front panel.
Once the geo-fencing conditions are OK, then the unit will use the currently defined logging settings and operate as normal.
.png?revision=1)
Digital IO
Logging Control
This is the default setting. The remote start/stop logging switch (RLACS164) can be used to control logging of the Video VBOX. This is done by grounding the digital input pin within the AUX connector. There are two ways this can be used:
- Grounding the digital input briefly will start the Video VBOX logging, repeating this will stop logging.
- Holding the digital input to ground will cause the unit to start logging, and when the ground is released, logging will stop.
Note: The digital output is used to control the LED on the remote logging switch.
Event Marking
The Digital IO can also be configured so that instead of controlling logging, an event marker will be set in the .vbo file whenever the remote start/stop switch is pressed.
Note: The behaviour of the RECORD button on the front panel of the Video VBOX does not change - this will always control logging.