12 - VBOX Tools - Tools Menu
This drop down menu contains some VBOX functions and VBOXTools software modules. It will also be the location of links to any further software modules released in the future.
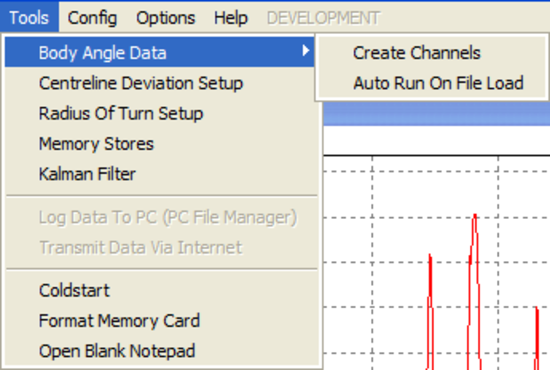
Body Angle Channel Creator
|
Slip angle, Pitch Angle and Roll angle can be calculated in post processing from a file which contains YAW03 or IMU02 data. To do this, a file must contain longitudinal acceleration (‘X_Accel’), lateral acceleration (‘Y_Accel’) and/or yaw rate (‘YawRate’).
Simply load the file into the VBOXTools software as normal, then select ‘Body Angle Channel Creator à Create Channels’ from the Tools menu. The additional channels can then be added to the graph screen and can be used in the Report Generator screen as normal. These channels can also be saved by selecting them in the CAN tab when saving the file. |
.png?revision=1) |
Automatic Channel creation
If the ‘Auto Run on file load’ option is ticked then the Body Angle Channels will be automatically created when a file is loaded, provided that the file has the required channels.
The method used for calculating these angles works by comparing the GPS calculated Longacc and Latacc and comparing these with the Latacc and Longacc measured using the sensor. Any differences in these results is from the roll or pitch angles of the vehicles, and the software uses the following equations to calculate them:
If f = acceleration measured using sensor and y = acceleration calculated from GPS, then
Angle = cosˉ¹ { f * y + √ {(y² - f² + 1) / (y²+1)} }
Note that the method used to calculate these angles is good for steady state tests only, if you have a high dynamic test, then you will not get accurate results during the transitions. This is due to the smoothing which is applied to the GPS Longacc and Latacc when compared with the measured Longacc and Latacc from the sensor.
Centre Line Deviation Set-up
Click this option to enter the set-up screen to allow configuration of the centre line deviation reference heading value. See ‘Centre Line Deviation tests’ chapter for more details.
Radius of Turn set-up
|
Click this option to open the Radius of Turn setup window, in which the smoothing level and maximum radius value can be set. Setting a maximum Radius and Smoothing level in this window is primarily to apply smoothing to the live Radius of Turn data that can be shown in Live windows or used in Report Generator.
This window also applies to the Radius of Turn channel that is created in post processing when a file is loaded. This smoothing would therefore be on top of the smoothing that can be applied in the Graph window for the Radius of Turn channel. |
|
.png?revision=1)
The Radius of Turn channel is also available as an input parameter in the Maths Channel and Generate New Channel facilities.
Memory Stores
Click this option to view or edit a current memory store name or value.
Kalman Filter
This selection runs the Kalman Filter module; please refer to the ‘Kalman Filter’ chapter of this manual.
PC File Manager
Clicking this option opens the PC File Manager window, which is used to control the disk logging. A facility is available within this section for Auto filtering of results; please refer to the ‘PC File Manager’ chapter of this manual.
Transmit Data Via Internet Connection
NB: The VBOX Internet Link requires each of the two computers involved to be set-up using the following instructions.
PC connected to the VBOX (server)
|
To set-up the Internet link on the VBOXTools software, you need a VBOX connected to a PC, either via the serial cable, USB, Bluetooth, or the Telemetry Link. Once the link is established, go to "Tools" on the main toolbar, and click "Internet connection". Then choose "Server", and then enter a Port number (for example you can use 996, as this is not used by any other service). Now click "Ok".
This PC is now acting as a server, and you will need to know what the IP address of this server is to connect via a remote PC.
If you are not sharing an Internet connection with any other computer (ie. directly connected via dial up, ISDN or ADSL) do the following: |
|
.png?revision=1)
To check the IP address of this machine, go to the Windows Start bar, and click on "Run", then enter "cmd" and press enter. A DOS style window will now appear, Type ipconfig and hit enter. You will then get a number of results, one of which will be the IP address of your computer. Make a note of this IP address (Note this will probably change every time you drop your connection to the internet).

For this to work, you must have the firewall disabled on your computer, or the Port number (996) opened up to allow communication. To check for this, go to "Control panel" ->"Network connections", then right click the network that connects to the Internet, and select "Propeties". Click on the "Advanced" Tab, and make sure the box "Protect my computer and network..." is un-checked. If you are sharing an Internet connection with a number of other users via a server and a router then do the following:
Go to the website www.whatismyip.com and you will be given your IP address. Make a note of this. You will also need to have an open port on your router that is mapped to your PC. You will need to ask an IT technician to open one up for you (you can use 996), make a note of this as well.
Setting up the Remote PC(Client)
|
To set up the remote PC that will do the monitoring, run the VBOXTools software, and go to "Tools"->"Internet connection" and select "Client". You will now need to enter the IP address of the Server computer, and the Port number (996). This is the IP address that you found from the instructions above.
Now click "Ok" and the text in the top blue bar of the main screen of the VBOXTools software should show connected. If this appears, but no data comes through, the it may be because the sample rate is too high. To reduce this go back into "Internet connections" and select "Client" and click the "Advanced" tab. A skip count option then appears which allows the sample rate to be divided down by the number selected. If 2 is selected then the sample rate will be halved, reduce the sample rate down by half (skip count 2), and try again. |
|
.png?revision=1)
Providing the Server computer is set-up and connected to a working VBOX, your VBOXTools software main screen display will now be displaying as if it was connected directly to the VBOX. You will now be able to create and use Live windows to display data from the available display channels. The VBOXTools ‘source detail’ window should indicate the current VBOX status as normal.
If the Server computer is not set-up then you will receive the message stating ‘Ensure Server software is running’.
If you cannot get a connection at all, then make sure you have ability to output to Port 996 on the server by running the VBOXTools software, and setting up the server connection, and entering Port 996, and clicking ok. Then go to the website: http://grc.com/x/ne.dll?rh1dkyd2 , and click proceed.
https://www.grc.com/x/ne.dll?bh0bkyd2
You will be given a table of coloured results; check the 996 is coloured red or green. If it is not, then you need to contact your IT technician and ask him to allow you to use this port (or another if this is in use). This facility enables the VBOX live data to be sent over the Internet from one PC connected to a VBOX to another PC running the VBOX software. To use this software see the main section Internet Connection.
Cold Start
The ‘ColdStart’ option is also known as a GPS Cold Start, as it forces the GPS engine in the VBOX to reset the downloaded almanac of current satellite positions. This can be used if a VBOX is having trouble locking onto satellites, which can be caused by the VBOX not having been used for a period of time or if it was last used in a very different location.
Every time a VBOX is used it downloads a new almanac, which takes about 10-15 minutes of continuous exposure to the same satellites. A downloaded almanac is usually relevant for about four weeks, providing the satellites have not been forced into very different orbits by their operators.
After performing a ColdStart leave the VBOX powered up in a situation where the antenna has a good clear view of the skies, for 15 minutes. Once the VBOX has downloaded the almanac it is much quicker to re-acquire satellites in noisy situations such as near trees, buildings and bridges.
Notepad
Click this option to open a windows Notepad window.