16 - VBOX Tools Kalman Filter
Introduction
Post processing via VBOX Tools provides a superior level of improvement to noisy data than the VBOX’s built-in Kalman filter (but not better than the IMU). It is superior because it is applied in post processing, allowing it to analyse the data both forwards and backwards. To get the best results from the Kalman filter software the Kalman filter in the VBOX must be disabled.
 |
 |
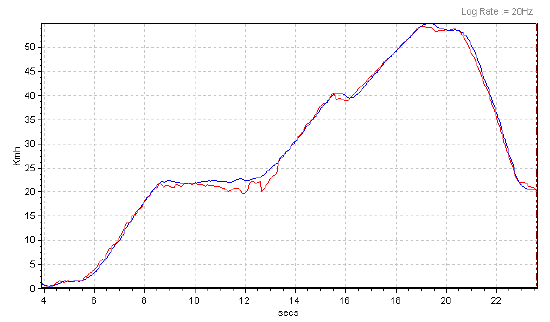
Two VBOXs in an area of poor satellite coverage (close proximity to buildings), one with the Kalman filter enabled (blue trace) one without (red trace)
Using the Kalman Filter Software
|
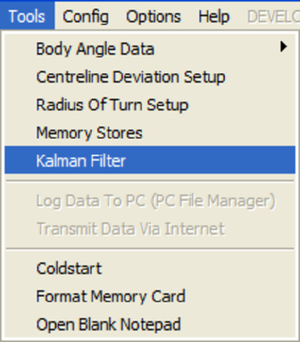
The Kalman filter module is accessed from the ‘Tools’ icon in the main toolbar of the VBOX Tools software.
Selecting ‘Kalman Filter’ from the drop-down menu displays the screen below right.
When a file is loaded into the VBOX Tools software selected information about the file will then appear in the File Statistics window of the Kalman filter module. |
|
.png?revision=1)
DropoutsAt this stage check to see if there are any lost sample points due to satellite loss by checking the number of ‘Dropouts’ reported in the file. Repairing a FileIf there are any reported dropouts, click the ‘Repair’ icon. This will then scan through the file to find these dropouts and use linear interpolation to temporarily fill the gaps.
If the file still shows dropouts after repairing, then the file cannot be further repaired using the software and the available data. You can still proceed to the Kalman filter stage. |
.png?revision=1) |
Filtering the File
To process the data further click on ‘Filter’ in the filter screen.
To adjust the smoothing levels you can drag the Speed and Position filter sliders independently. It is sometimes useful to keep the speed only mildly filtered to retain the transient dynamics (for example a gear change), but smooth the position data more heavily to get a smooth trajectory. It may take a bit of trial and error with these settings to get the desired results.
Saving the File
To save the new filtered and/or repaired file click on the ‘Save’ icon in the main VBOX Tools toolbar. This can be done after the file has been either repaired, filtered or both.
Converting the Log Rate of a VBOX File
|
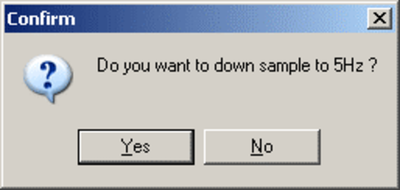
The Kalman filter software module can also be used to convert a file to either 5 Hz, 20 Hz or 100 Hz. For example, a 20 Hz file can be converted to a 5 Hz file or interpolated to a 100 Hz file. To save a file with a different log rate load the file into the VBOX Tools software using the ‘Load All‘ icon. Run the Kalman filter module, but then without using any repair or filter options click on the ‘Interpolate/Subsample’ icon at the top of the Kalman Filter window. A small window will appear prompting you to choose accept or eliminate the log rate you wish to use. |
|
.png?revision=1) |
.png?revision=1)
For example if a 20 Hz file is loaded, the first prompt screen will be a 100 Hz option.
.png?revision=1)
If you choose ’No’ at this first log rate option then another box will appear offering the other log rate.
.png?revision=1)
If a 100 Hz file is loaded, only one prompt will be shown.
.png?revision=1)
If 'No' is selected, the software will assume 5 Hz is the desired frequency.
After confirming a log rate, the standard VBOX file save window will remain to allow selection of a filename and location.