Quick Start Guide
You can find the full User Guide for the NTRIP Base Station here.
Package Contents
Product Overview

Front
The front panel of the NTRIP Base Station has a display that provides feedback about the boot sequence and the operating status.
When the boot sequence has been completed, the display will switch to a sequence of status screens that automatically scroll on a 5-second timer. The display will show the latest information available for:
- Wi-Fi SSid & IP Address / Basestation SSid & IP Address (10.10.10.1 default)
- Position: Position status / saved location name (if using) / NTRIP status / Satellites
- Location: Saved location name (if using) / Latitude & Longitude of base station's surveyed position
- Battery Status: Percentage value between 0 and 100% and text which says charging battery or fully charged.
If the unit is performing a survey, it will replace the position status with:
- Surveying: Time remaining / Estimated Error / Satellites
Left Side
On the left side of the NTRIP Base Station, you will find the following:
The power button
Press the power button to power on the NTRIP Base Station.
The power button LED will indicate if the unit is on or charging.
The antenna port
You can use the antenna port to connect external antennas (VBNBS-NRG) or Radio Antennas (VBNBS-24).
The Hirose connector
The Hirose connector is the serial and power port for the NTRIP Base Station.
This is where you:
- Connect the power supply to power/charge the NTRIP Base Station unit.
- Connect the external radio with the serial/power connection cable to broadcast the RTK corrections via an external radio.
The Status LED
The Status LED will provide indication of the current status of the NTRIP Base Station as described in the LED behaviour section of this User Guide.

Right Side
The right side of the NTRIP Base Station has a compartment door fixed to the unit with 4 screws (M3 Hex).
- This compartment is where you find the SIM card slot if you want to use the internal 4G modem via a Standard SIM card to acquire the NTRIP correction messages from the server.
Note: If you want to use the internal 4G modem, you must use your own Standard data SIM card.
- This compartment also has a USB port that you can use to connect to a PC to upgrade the firmware.

Bottom
Bottom
The bottom of the unit has the mounting point for the NTRIP Base Station, a 5/8" UNC point, that you can use to mount the unit during installation.

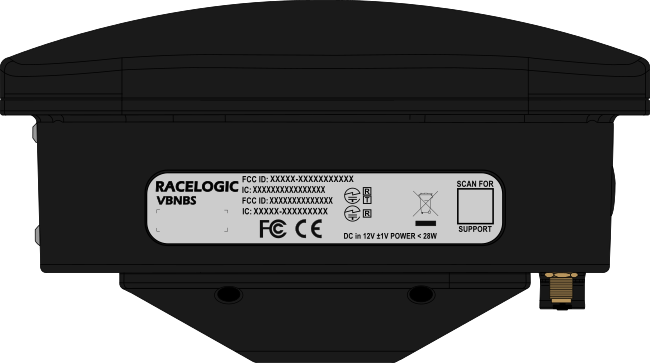
Rear
Rear
The rear of the NTRIP Base Station has the product label, which will provide the information about the product, such as the product code, which indicates the product name/type and variant, compliance, access to user documentation, voltage information, etc.
Hardware Setup
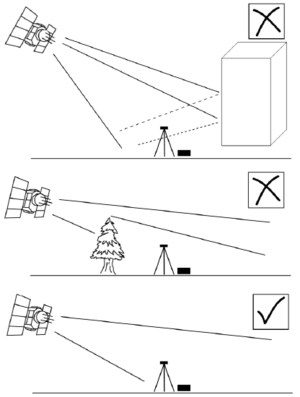
The unit/GNSS antenna must be placed in a position away from any buildings, trees, walls, high-wire fences or any other obstacles that could block or reflect satellite signals.
| Note: You should even avoid solid objects below the height of the GNSS antenna, as they can also cause reflection of the satellite signals. |
Place the unit/GNSS antenna at the highest available spot and/or on a tripod to ensure the best possible satellite reception. Make sure the legs of the tripod are fully extended to give maximum height.
If you intend to install the NTRIP Base Station in a permanent rooftop location, you must ensure that the unit/GNSS antenna is not shadowed by any other parts of the building or nearby objects.
.png?revision=1) |
.png?revision=1) |
If you are using an external antenna, it should be connected before you power on the NTRIP Base Station.
Radio Antenna
The radio antenna for the NTRIP Base Station must be placed in the highest available position to realise the maximum possible transmission range. Where possible, the position should be close to the centre of the area over which the system is to be used.
Example:
If the system is to be used at a test or race circuit, mount the antenna tripod in the centre of the circuit to give equal radio coverage to all points on the circuit.
If your NTRIP Base Station is used in temporary locations, we recommend that you use a telescopic mast to raise the radio antenna as high as possible.
Hardware Configuration
Power ON
ON
The NTRIP Base Station will power on when you press and hold the Power button for 1 second when the unit has sufficient charge and/or is connected to an external power source.
OFF
The unit will power off when:
- You press and hold the Power button for 3 seconds
OR
- The unit is not connected to an external power source AND it has not seen a valid satellite signal for X minutes.
- ►Charging and Battery Information
-
LED
When the NTRIP Base Station is charging, the Power button LED will be illuminated.
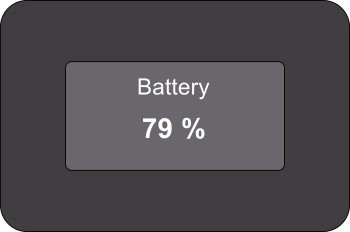
LCD Display
The LCD display will cycle through different information, including the current battery level:
Configuration Page
When you have connected to the NTRIP Base Station via Wi-Fi, you can find the Battery Status information in the Configuration portal for the connected unit.

Battery Charge Status
The available Battery Charge Statuses are:
- Not Charging
The battery is not charging.
- Charging
The battery is charging.
Relative State of Charge (%)
The Relative State of Charge field displays the percentage of charge currently in the battery.
Run Time to Empty
The Run Time to Empty field displays the estimated time until the battery is depleted.
When the unit is charging, the Run Time to Empty will display N/A.
- Not Charging
Connect the NTRIP Base Station
The NTRIP Base Station configuration is done via an HTML browser and, as such, it requires a Wi-Fi-enabled device.
- Identify the NTRIP Base Station SSID on the list of available Wi-Fi networks on your device.
This will be “RL Basexxxxxx” where xxxxxx is the serial number of the NTRIP Base station.
- Click Connect.
- The NTRIP Base Station's Wi-Fi network is password-protected. When prompted, enter “racelogic” as the network security key / password.

-
Connect to the network.
-
Once connected, open an HTML browser and enter the IP address displayed on the front panel of the NTRIP Base Station (default IP is 10.10.10.1) to access its configuration page.
Configure the Network Settings
(If required)
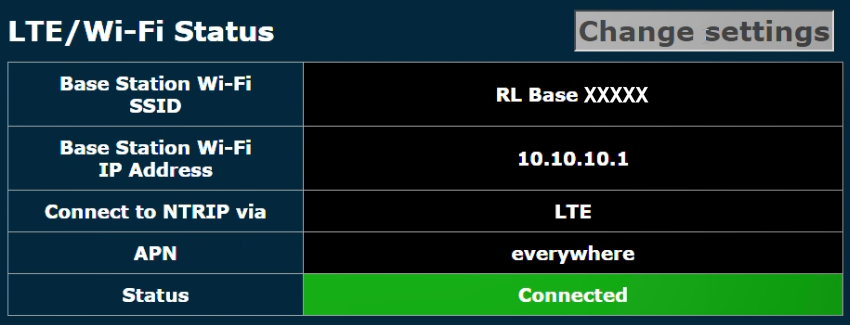
The LTE/Wi-Fi Status area displays the LTE or Wi-Fi status for the NTRIP Base Station, depending on the configuration.

Click the Change Settings button to configure the LTE or the Wi-Fi settings of the unit:

SSID
The SSID of the NTRIP Base Station's Wi-Fi network.
This is the name that the unit will display when you select it from the available Wi-Fi networks on another device.
IP Address
The IP address of the NTRIP Base station that must be entered in the HTML browser's address bar to access the configuration page.
Corrections via
You can also choose to have the NTRIP corrections sent via an LTE or Wi-Fi connection.
LTE
When you select LTE, you must enter the following information to configure the network for the NTRIP Base Station:
-
The APN of the LTE Network.
-
The username for that network.
-
The password of that network.
Wi-Fi
When you select Wi-Fi, you must enter the following information to configure the network for the NTRIP Base Station:
-
The SSID of the Wi-Fi network
-
The password for the Wi-Fi Network (this can be left blank if the network is not password protected).
| Note: Changing any of these settings will force the unit to restart before taking effect. |
Configure the NTRIP Settings
(If required)
To configure the NTRIP Corrections, you must add the relevant information in the NTRIP Corrections Settings.
- Press the Change settings button next to the NTRIP Corrections heading to open the NTRIP Corrections settings.
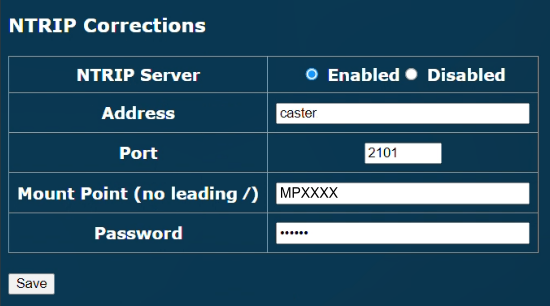
- Enable the NTRIP Server.
- Enter the Server Name/IP Address, Port, Mount Point (correction data stream) and Password information (if required).
Note: These details will be provided by your NTRIP Caster provider. - Click the Save button.
The NTRIP Base Station will attempt to connect to the NTRIP server using the provided details.
- If there is a problem with the server details, the unit will briefly display an Invalid Caster Credentials message.
- When it has connected to the NTRIP server, the unit will briefly display the RTCM Streaming message.
- The Configuration Page will be updated with the new settings and a connection status indication. The front display will also provide this information.
| Alternatively, you can set up your own NTRIP Caster using a Base Station and a caster service (such as SNIP). |
The NTRIP Base Station can either use the internal 4G modem via a Standard SIM card or use a Wi-Fi connection to acquire the NTRIP correction messages from the server.
 |
- ►SIM Card
-
If you want to use the internal 4G modem, you must use your own Standard data SIM card.
Insert the SIM card into the SIM card slot in the compartment on the right side of the unit.
Note: Make sure that the SIM card has been activated before you insert it into the unit. The easiest way to activate it is to put it into a USB 4G dongle and go through the steps to activate it on a computer before you insert it into the unit.
IMPORTANT
If the SIM card can be broken down into a Micro/Nano SIM, make sure that it is stable when you insert it into the unit as the Micro/Nano SIM could become detached from the card inside the unit.When the unit is first powered on, it will automatically start as a configuration access point.
The LCD on the unit will display a Wi-Fi hotspot name and an IP address that you must use to connect to and configure the unit.
- Use a mobile device or a computer with Wi-Fi.
- Navigate to the Wi-Fi settings on the device and select the NTRIP Base Station's hotspot (this is the serial number of the unit you wish to connect to.)
- Enter the Wi-Fi password: racelogic
- Use a phone or computer to open an internet browser and enter the IP address from the unit LCD into the address bar to open the unit's Configuration Page.
- Navigate to the bottom of the Configuration Page and the LTE/Wi-Fi Settings section.
- Click the Change settings button next to the section heading to open the LTE/Wi-Fi Settings for the unit.
- Select LTE to add the credentials for the network you want to use for the corrections.
- Click the Save and restart button.
Note: The settings are retained after power cycles and the unit will always attempt to auto-connect to a configured Wi-Fi hotspot when it powers up.
The unit will reboot and connect. When it is connected, the LCD will briefly display Wi-Fi Connected.
- ►Wi-Fi
-
When the unit is first powered on, it will automatically start as a configuration access point.
The LCD on the unit will display a Wi-Fi hotspot name and an IP address that you must use to connect to and configure the unit.
- Use a mobile device or a computer with Wi-Fi.
- Navigate to the Wi-Fi settings on the device and select the NTRIP Base Station's hotspot (this is the serial number of the unit you wish to connect to.)
- Enter the Wi-Fi password: racelogic
- Use a phone or computer to open an internet browser and enter the IP address from the unit LCD into the address bar to open the unit's Configuration Page.
- Navigate to the bottom of the Configuration Page and the LTE/Wi-Fi Settings section.
- Click the Change settings button next to the section heading to open the LTE/Wi-Fi Settings for the unit.
- Select Wi-Fi to add the credentials for the network you want to use for the corrections.
- Click the Save and restart button.
Note: The settings are retained after power cycles and the unit will always attempt to auto-connect to a configured Wi-Fi hotspot when it powers up.
The unit will reboot and connect. When it is connected, the LCD will briefly display Wi-Fi Connected.
Notes:
- Only a 2.4 GHz Wi-Fi signal is supported; 5 GHz is not supported.
- If it cannot connect to the configured Wi-Fi hotspot on power-up, it will automatically restart and become a configuration access point again.
If you need to connect your phone/ PC to the NTRIP Base Station after changing the LTE/Wi-Fi Settings, you can use the same hotspot and enter the new IP address (displayed at the bottom of the screen). The page will update with the new settings and provide a connection status indication. If the NTRIP Base Station cannot connect to the configured Wi-Fi hotspot on power up, it will automatically restart and become a configuration access point.
Note: If you have configured the internal modem, it will attempt to connect to this first.
Survey Location
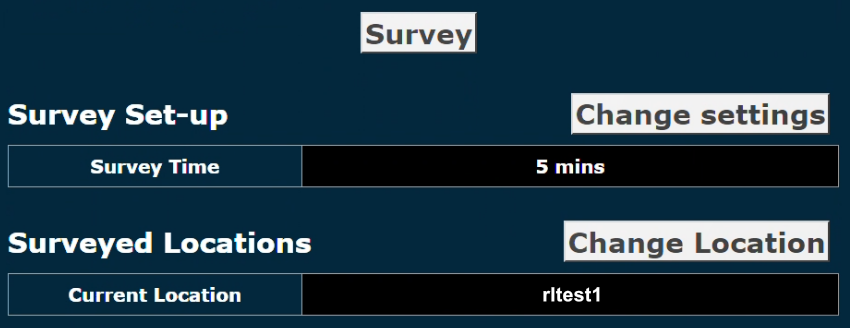
Before the NTRIP Base station can begin to transmit RTK correction messages, it must have a set reference location, either through a live survey or by loading a previously surveyed location.
Live Survey
- Click the Change settings button to open the Survey Settings.
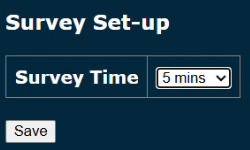
- Select the survey duration:
- 24 Hours
- 12 hours
- 1 Hour
- 5 minutes
- instantaneously
- Click Save.
- Before the survey can start, you will be prompted to enter a name for the upcoming survey.

-
Click Start Survey to start the surveying process.
When the survey has been completed, the Current location will update to the new survey.
You can load this survey at a later time via the Change Location option.
Loading a Location
- Click the Change Location button to choose a previously surveyed location for the NTRIP Base Station.

- Select the required location from the list of Surveyed Locations and click the respective Use button.
Edit Surveyed Locations
You can view the surveyed locations on the map (if the device has a valid internet connection), rename the location, and delete it if you no longer need it by using the respective Map, Rename and Delete buttons for the relevant location.
Add Location Manually
Click the Add new location button to create a new location by manually entering latitude, longitude and altitude.
Corrections Output
The Corrections Output area displays how the RTK correction messages are being transmitted.
| Note: These settings do not affect the output of the NTRIP Modem. |

Click on the Change Settings button to access the following settings:

Correction Type
Set the RTK correction messages to either MSM4 or MSM7.
Corrections via
Set the RTK corrections to be sent via:
- the external serial port
OR
- the internal radio (NBS24 variants only)
Ext. Serial Baud Rate
Set the baud rate of the serial port.