RACELOGIC Support Centre

05 Settings – Perfomance Box Touch V1

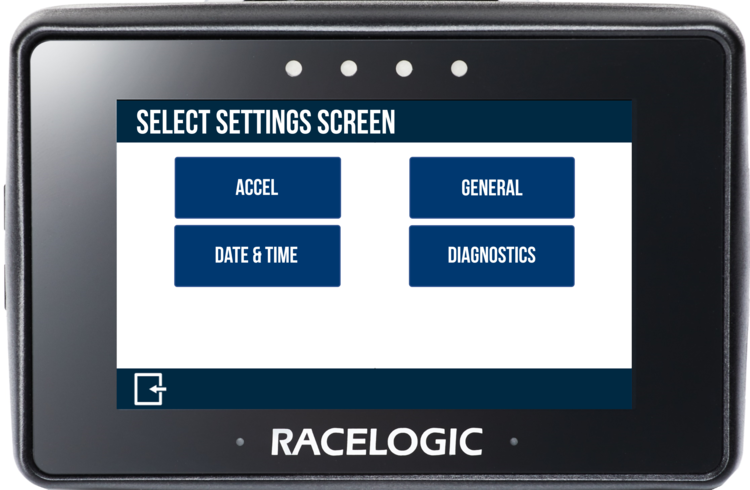
You can access the Settings menu on Performance Box Touch by selecting the Settings button on the bottom left of the screen when in a mode. You will see a Select Settings Screen with 4 Settings options: Mode settings, General Settings, Date & Time settings and Diagnostic settings.

Settings.png
PB Touch Select Settings.png
When you have selected a menu, you can access other settings by pressing the Forward and Back arrows at the bottom right of the screen or by swiping left or right. Backwards arrow.png  Forward Arrow.png
You can change Settings by pressing the corresponding button next to an option.  
To return to the Select Settings Screen, press the Exit button on the bottom left. Pressing it again will return you to the main screen. Exit Screen.png

Mode Settings

The mode-specific settings option presented in the Settings screen depends on the Display Mode you have selected, Accel, Decel, Lap Timing or Speed.
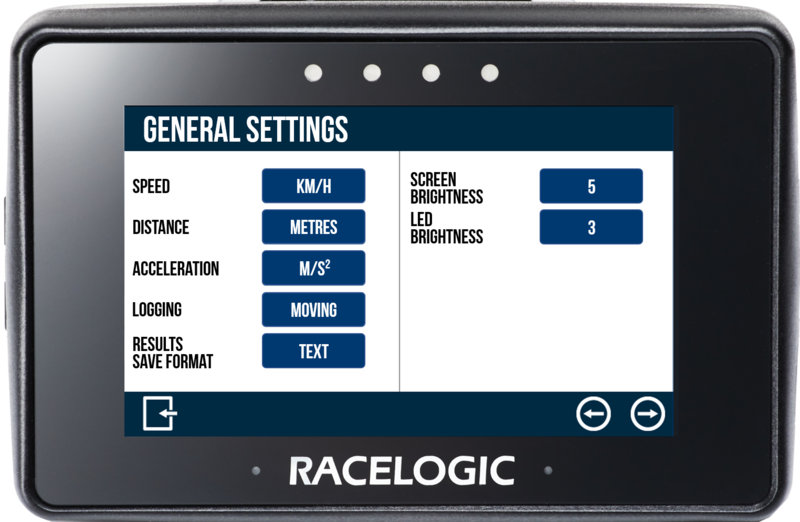
General Settings

This menu has settings for units, logging mode, format for saving and the screen and LED brightness.
PB Touch General Settings.png
  • Speed: Changes the speed units between km/h and mph. Changing the speed units will affect all visual speed parameters on all screens. The unit labels will change and all speed values will automatically be recalculated accordingly. Tap the button to toggle between the units.
  • Distance: Changes the distance units between metres and feet. Changing the distance units will affect all visual distance parameters on all screens. The unit labels will change and all distance values and results will automatically be recalculated accordingly. Tap the button to toggle between the units.
  • Acceleration: Changes the acceleration units between m/s² and g. Changing the acceleration units will affect all acceleration references on all screens. The unit labels will change and all acceleration values and results will automatically be recalculated accordingly (except the PK G acceleration and deceleration test values). Tap the button to toggle between the units.


  • Logging: Tap the button to toggle between the 2 logging modes:
    • Continuous: The Performance Box Touch will start logging as soon as an SD card is inserted and initialised.
    • Moving: The Performance Box Touch will start logging as soon as it detects a speed of more than 0.5 km/h after an SD card has been inserted. The logging will pause when it detects that the speed has been less than 0.5 km/h for 3 seconds, and will recommence once the speed is greater than 0.5 km/h again. During this mode, the Performance Box Touch will append the data in the logging file when the logging stops and starts. 

      Note: By pressing the SD Card Icon, you can start and stop the logging manually, regardless of which logging mode the unit is set to. However, a new data file is created every time the Performance Box Touch starts/stops the logging, the data is not appended to an existing data file.


  • Results Save Format: Changes the data format of saved results (to inserted SD card) from the test history screens. Your options are .txt (text format) or .csv (comma-separated values format)


  • Screen Brightness: This setting lets you adjust the screen brightness manually. It has 5 levels, 1 is the dimmest and 5 is the brightest. You can also select the 'Auto' setting, which uses the internal ambient light sensor to automatically adjust the screen brightness. In dark conditions, the screen brightness will dim, and in light conditions, the screen will brighten. Tap the button to toggle through the available options.
  • LED Brightness: This setting lets you adjust the LED brightness manually. It has 5 levels, 1 is the dimmest and 5 is the brightest setting (this is extremely bright!). Alternatively, you can turn off the LEDs. Tap the button to toggle through the available options. The LEDs will preview the brightness level as you select them.

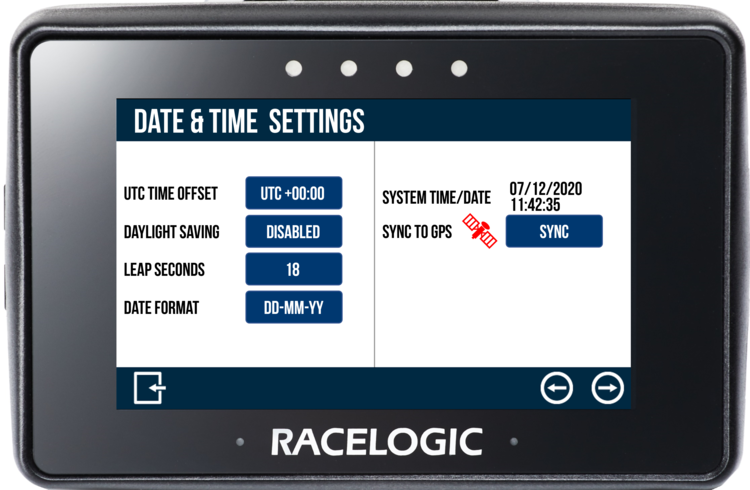
Date and Time Settings

This menu contains date and time settings.
PB Touch Time Settings.png
  • UTC Time Offset: The UTC offset value is set to '+00:00' by default but you can change it if required on the screen that is presented when you press the UTC Time Offset button. Use the Plus (+) and Minus (-) buttons to select the desired time zone offset values (including 30 and 45-minute offsets). If you press and hold the button it will fast-scroll through available valid time settings. Minimum: -12:00; maximum: +14:00.

To save your selected offset, press the Confirm button at the bottom right of the screen. If you want to return to the Time Settings screen without saving, press the Cancel button at the bottom left of the screen.

Note: You cannot change this setting when the unit is moving or logging. If you try to do so anyway, you will see a warning message. 

Confirm Button.png  Cancel Button.png

VBOX Touch Time Settings UTC.png
UTC Offset Selector Example
  • Daylight Saving: When 'Enabled', this setting will add +1:00 hr to the local time setting. This setting is disabled by default.
    Note: You cannot change this setting when the unit is moving or logging, if you try and change the setting, a warning message will appear.
  • Leap Seconds: The leap second value is set to '18 s' by default. You can change it if required by using the keypad presented when you press the Leap Seconds button. The Leap Second value was increased to 18 seconds in December 2016 - you can find more information on this here. 
    Note: You cannot change this setting when the unit is moving or logging. If you try to do so anyway, you will see a warning message. 

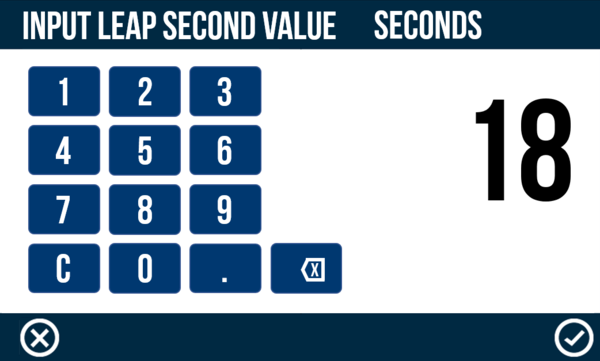
To save your selected Leap Second value, press the Confirm button at the bottom right of the screen. If you want to return to the Time Settings screen without saving, press the Cancel button at the bottom left of the screen.

Note: The maximum input value is 99.

Confirm Button.png Cancel Button.png
VBOX Touch Time Settings Leap.png
Example of the Leap Second Keypad
  • Date Format: Changes the date format between DD-MM-YY and MM-DD-YY.


  • System Time/Date: This setting shows the current time and date that the system is using. This data is displayed in the .vbo header file, file date created timestamp, the session header in the acceleration history results, the session header in the deceleration history results, and the laps history filename and the gates file (.spl) header.
    Note: The time/date displayed by the unit may be inaccurate until it has achieved a valid satellite lock. The unit will then update to the correct time/date as long as the unit is not currently logging.
  • Sync to GPS: This setting will synchronise the internal real-time clock (RTC) to GPS time as long as the unit has obtained GPS time (no GPS time is indicated by a red satellite icon), and is not currently moving or logging. When you pressed this button, you will see a synchronisation progress screen.

Diagnostics

The Diagnostics menu displays basic information about the GPS receiver and the VBOX unit.
PB Touch Diagnostics Settings.png
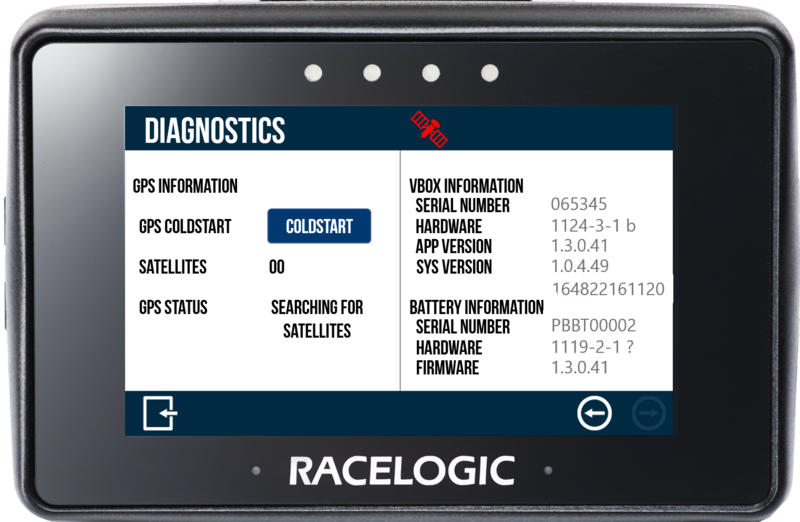
The satellite icon at the top of the screen is the quickest way to determine if the unit has a valid satellite lock. When it has acquired a lock, it will display as solid green.  When there is no satellite lock, the icon will flash red.

VBOX Touch Sats Lock.png VBOX Touch No Sats.png

GPS Information

  • Coldstart: Press this button to perform a cold start on the Performance Box Touch. The receiver will clear any data currently stored in its internal memory. It may be necessary to do this when the GPS engine has locked up or the Performance Box Touch is struggling to acquire a satellite lock.

    When you press the button, the unit will make an audible alert and you will see a ‘PLEASE WAIT’ message displayed on the screen, counting down from 3. The number of satellites will then be displayed as '00' and the GPS status will show ‘SEARCHING FOR SATELLITES’ until the unit has acquired a satellite lock. It will take approximately 25 to 30 seconds for the unit to re-acquire the satellite lock.
  • Satellites: Displays how many satellites the receiver is currently using. The unit can use up to 12 satellites.
  • GPS Status: This indicates the current GPS lock/RTK status of the unit. When the unit is searching for a valid satellite lock, it will display ‘SEARCHING FOR SATELLITES’. When the GPS receiver has acquired a satellite lock, it will display one of the following:
    • STANDALONE - The position has been computed from GNSS only.
    • CODE DIFF - The position has been computed from assisted SBAS corrections.

VBOX Information

This section displays the device serial number, hardware version number of the unit as well as the version and system version currently used on the unit. This information is useful in the event of troubleshooting a potential issue with the Performance Box Touch device.

Battery Information

This section displays the serial number, firmware version number and hardware version number of the connected battery. This information is useful in the event of troubleshooting a potential issue with the Performance Box Touch battery.
  • Was this article helpful?