Video VBOX - Logging RPM feed using Micro Input Module
Below are a set of instructions on how to acquire the RPM signal using your Video VBox Lite. Please note, these instructions were intended for a Mazda MX5, however the same principle applies.
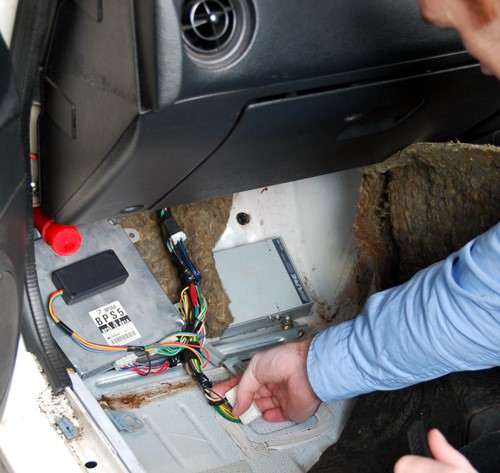
1. Find the wire that carries the RPM signal: you may need to refer to a wiring diagram to find the correct wire, or consult an auto-electrician who can scope for the correct signal:
.jpg?revision=1)
In this Mx-5, we’re connecting to the ECU to tachometer wire:


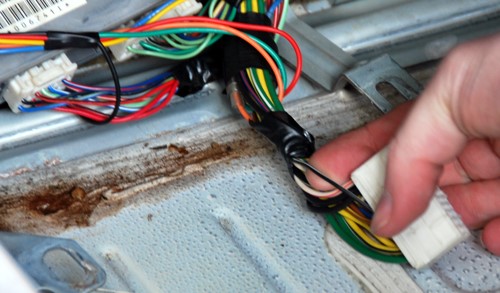
2. Pare back some of the wire sheathing:
.jpg?revision=1)
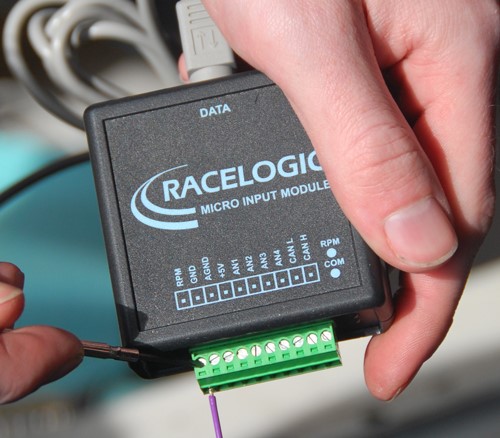
3. Wrap a connecting wire onto the RPM Signal wire:
.jpg?revision=1)
Then screw this connecting wire into the RPM slot of the Micro Input Module’s screw terminal:

4. Connect the Micro Input Module to your data logger using a RLCAB094-C cable.
5. In Video VBOX Setup, under scene properties click CAN and module configuration / Micro Input Module / Log All.
.jpg?revision=1)
6. Insert a new element on to your scene. In this case I’ve added a new text element. Click on the element and select ‘Text’ under Text properties. Change the first drop down menu under ‘Parameter’ to Micro Input Module and the second drop down to Freq. Under ‘Format’ I’ve selected 4 integer places and 1 decimal place. Please see image below.
.jpg?revision=1)
To set this up in for a Gauge element, select the RPM gauge you wish to use and set the parameter to the channel you have chosen to log. Make sure the min and max values are correct and match the text on your gauge image.
.png?revision=1)
7. At this point, it may be a good idea to upload your scene to your Video VBOX Lite to check if you’re receiving a signal. Rev your engine to check that the value changes, confirming the correct wire.
8. Your RPM signal on your Video VBOX Lite scene should not match with the RPM read by your tachometer on your dash board. This is because the input signal must be scaled. If you select the Scene tab then under Scene Properties / CAN and Module Configuration / Micro Input Module, Click ‘Freq’ which should bring up the box, pictured below.
.jpg?revision=1)
9. Enter the scale value, in the scale box, required to correct the displayed RPM value. To do this, compare the vehicle’s actual RPM with the un-scaled value on your Racelogic data logger. The vehicle’s RPM divided by the un-scaled value is equal to the scale factor required. The scale factor for RPM is usually 120 divided by the number of cylinders your vehicle has.
To use our scale and offset calculator, click here.
This is because the Micro Input Module gives pulses per second which we need to convert into revolutions per minute.
So, for example the calculation for 1 pulse per second would be as shown below.
1 pulse per second x 60 = pulses per minute (60) x 2 (because 2 revolutions of crankshaft per combustion of spark plug) = 120 divided by the number of cylinders (4) = revs per minute (30)
So, for a four cylinder engine it would be 120 divided by 4 = 30
A six cylinder engine would be 120 divided by 6 = 20
So therefore, setting your scale to 30 for a four cylinder engine in these scenes should cause the RPM to work normally.
4 Cylinders: 120 / 4 = Scale factor 30
6 Cylinders: 120 / 6 = Scale factor 20
8 Cylinders: 120 / 8 = Scale Factor 15
12 Cylinders: 120 / 12 = Scale Factor 10
Therefore in the 4-cylinder MX-5, we set the scale to 30, which displayed the correct RPM.
Also make sure you modify the value in the Maximum value box. In this case this represents maximum RPM. I would choose the maximum value displayed on your Tachometer on your dash.
10. Check the RPM values are correctly represented. If so, insert an SD card into the unit. RPM data will now be logged into any files you create!
