06 - Configuring TC8V2 for Video VBOX

VBOX Setup
Connect TC8 to VBOX Setup software as described here.
To allow the TC8 to communicate with the Video VBOX it must be set into Timed Mode.
In this mode, the TC8 will send CAN data at intervals determined by the timer value.

The parameters highlighted below must be configured as follows:

Baud Rate
Make sure that this is set to 500 kbit/s.
The Baud Rate sets the bit rate of the CAN messages.
Timer
Set the required time intervals for the output data.
A smaller Timer value means data will be sent more frequently, a larger value means data will be sent less frequently.
You can enter a value between 0 and 65535, however, the minimum value that should be used is 10. If you set a lower value, data values may be repeated on successive cycles. If you enter a value of 0, the module will change it to 1 when it is power-cycled next.
You can calculate the frequency output as follows:
Freq = (1/Timer) * 1000
The Timer value for a required frequency can be calculated as follows:
Timer = (1/Freq) * 1000
Below are some example Timer values against the frequency output:
| Timer Value | Frequency |
|---|---|
| 10 | 100 |
| 50 | 20 |
| 100 | 10 |
| 400 | 2.5 |
| 1000 | 1 |
Pack Data
Make sure that the Pack data option is unticked so that the data is sent with separate CAN IDs for each of the 8 channels.
Byte-packing can is used to reduce the number of CAN messages required to transmit the data.
When this is disabled, each of the eight channels will be sent using a separate CAN Identifier message with a Data Length Code (DLC) of 4 bytes.
When this is enabled, channels will be combined into pairs for transmission over CAN, each message will have a DLC of 8 as shown in the table below:
| CAN ID | First 4 Data Bytes | Last 4 Data Bytes |
|---|---|---|
| CAN ID set for Channel 1 | Channel 1 Data | Channel 2 Data |
| CAN ID set for Channel 3 | Channel 3 Data | Channel 4 Data |
| CAN ID set for Channel 5 | Channel 5 Data | Channel 6 Data |
| CAN ID set for Channel 7 | Channel 7 Data | Channel 8 Data |
Video VBOX Setup
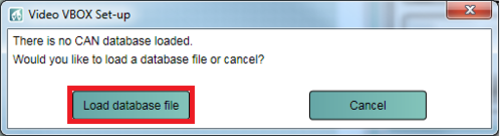
To log data from a module, you need to load in the CAN database file relevant to the module that you're using. The .DBC files for RL modules can be downloaded from our VBOX Automotive website.
Note: In order to communicate with Video VBOX units, Racelogic modules must be set into Timed CAN mode. For more information on how to do this, please see the user guide for the module in use.
Within 'CAN and Module Configuration' expand the 'Mode' section and ensure that 'VCI' is selected, and the 'Send Acknowledge' box is ticked.

Within the same CAN and module configuration section, now expand the Inputs section.
Please download the relevant CAN file for your Racelogic module from the Racelogic website.
Once you have the correct CAN file, to setup a CAN channel for your vehicle, click on Load under Inputs.
.png?revision=1) |
|
.png?revision=1)
When you have opened the relevant .dbc file, select the channels you wish to log.
To do this, you simply expand and then tick the desired channels. When you have selected all the channels you need, click ‘Apply’.
.png?revision=1)
You will now see the selected channels appear under the ‘Inputs’ section under the ‘CAN and module configuration’ in scene properties. These are now loaded and will be logged to the VBO file. They can also now be assigned to an element.
PLEASE NOTE: You cannot log from the vehicle CAN Bus at the same time as using a Racelogic Input Module.
For further information on working with elements and creating scenes, please see the Video VBOX User Manual here.