03 - LabSat3 Wideband Media
File Formats
LabSat 3 Wideband uses a Linux EXT4 formatted drive for data storage. Recorded data consists of two separate files with the same name but with different extensions. The RF signal data is stored with the extension '.LS3W' and is a raw binary file. The configuration used to record and replay the RF data is stored in the '.ini' file. When copying files to or from the Labsat 3 Wideband SSD, both the '.LS3W' and '.ini' files must be copied together.
SD Card
The 4 GB SD card included with the LabSat 3 Wideband system is used for firmware upgrades and includes the following:
- SatGen simulation software video
- LabSat 3 Wideband demonstration files description
- Quick Start pdf
Solid State Drive (SSD)
Supported Media
The LabSat 3 Wideband currently supports a range of SSD’s with various capacities. The following SSD’s are compatible for use with LabSat 3 Wideband:
- Samsung QVO 870 1TB
- Samsung EVO 850, 860 & 870 1TB
- Samsung EVO 850, 860 & 870 2TB
- Samsung EVO 850, 860 & 870 4TB
- Samsung 7.68TB (MZ7LH7T6HMLA-00005)
Supplied 1 TB SSD
The LabSat 3 Wideband 1 TB SSD includes the following:
- LabSat 3 Wideband sample files:
- 1 x UK dynamic file - 20 mins
- 3 x UK static files - 20 mins each
- 1 x Korea static file - 20 mins
- 1 x India static file - 20 mins
SSD Access
The Solid State Drive is removable. To gain access to the LabSat 3 Wideband internal SSD the systems lid must be removed. To remove the systems lid, the locking pin at the rear must be depressed while the lid is push back towards the catch. The SSD can then be removed by gently lifting the attached tag.
The system must be powered down while the SSD is being removed or reinserted.
The system lid can be reattached by positioning the locating lugs with the mounting holes and the LabSat logo facing forward. The lid will automatically lock by pressing down and sliding forward.
Note: Due to the high sustained data rates required for wideband recording, not all SSD devices are compatible with LabSat 3 Wideband. Only drives supplied by Racelogic are supported.
SSD Format
To format an SSD with LabSat 3 Wideband, the user should select the following options:
MENU > File > Format SDD > Yes, as shown below.

Note: Firmware version 1.0.414 and higher support formatting SSDs from other settings to Linux EXT4.
File Transfer
Network Security
You can enable/disable Network Security in the LabSat 3 Wideband ‘LAN’ menu (menu > setup > LAN). When network security is enabled, you will be prompted to enter a username and password to gain access to the ‘Scenarios’ folder in Windows file explorer.
The username is generic for all LabSat units, however, the password is unit-specific. The password will always use the prefix ‘labsat_’, and will be followed by the unit’s serial number (without the leading zero) creating the following format: 'labsat_xxxxx'.
Note: If you are using a Windows-based PC, you will need to put a \ before the username (\labsat).
Ethernet Transfer
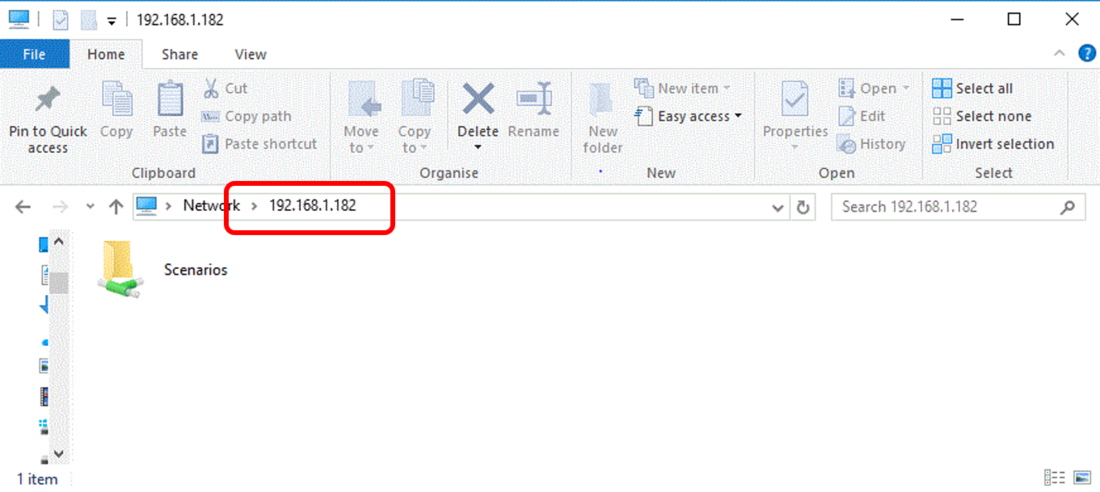
To connect LabSat 3 Wideband to a PC, connect an Ethernet cable between the system and the PC. Ensure that a static IP address or DHCP is set within the LAN menu, enter the ‘About’ menu to view the allocated IP address. Open a file explorer window on the PC and enter \\ followed by the IP address. See the example below.

USB and SD Media Transfer
Files can also be copied from the LabSat 3 Wideband internal SSD via SD or USB media. The user can do this by following the steps below.
- Connect/insert SD or USB media
- Highlight the file requiring transfer
- Press 'OK' and then 'OK' again to enter the 'File' menu
- Select 'Copy' and choose the media location
Note: Any SD card used for a file transfer must be in exFAT format. USB media being connected can be in any Linux format that supports files larger than 4GB, alternatively, exFAT formatting can also be used.
Paragon Software Transfer
Linux File Systems for Windows by Paragon is a unique software tool which gives you full access to Linux volumes within Windows. By removing the LabSat 3 Wideband SSD and connecting it to the PC using the supplied USB to SATA cable, you can instantly work with the Linux partition.
Once the SSD is connected to the PC via the supplied USB to SATA cable it should automatically display within Paragon software (this may take up to 30 seconds). When the SSD has been mounted by the Paragon software it is possible to view and manage the files on the SSD with Windows File Explorer by selecting the folder icon in the top right of the paragon software window.

