Recording and Replaying RS232 Data
LabSat 4 Record & Replay variants (LabSat 4 and LabSat 4 Core) can record and replay RS232 data in addition to GNSS signal data.
|
Model Limitations LabSat 4 Lite models cannot record or replay RS232 data. |
There are two methods you can use to record RS232:
- A digitized mode where LabSat 4 samples the raw logic level transitions of the RS232 data and reconstructs the signal during replay
- The log file mode, where LabSat 4 receives each RS232 data byte and stores the data in a readable text file.
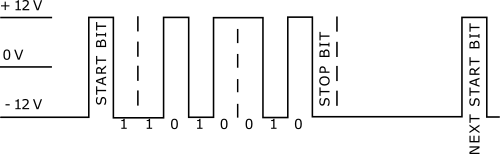
In either mode, the RS232 signal is converted from the normal signal levels of approximately ± 12 V down to 3 V logic levels to match the internal logic of LabSat 4.
You can use log file mode and digitize mode simultaneously to record data and then choose whether to replay it as digitized or as logged data.
You can see the differences between the Digitized mode and the Log File mode below:
| Strengths | Weaknesses | |
|---|---|---|
| Digitized Mode |
|
|
| Log File Mode |
|
|
Digitized
Recording
- Connect the RS_Rx and GRN ports of the expansion connector to the appropriate wires/cable.
- Connect the expansion connector to Expansion port on the rear panel of LabSat 4.
- Power up LabSat 4.
- Navigate to the Digital section of the menu. Select the RS232 option.
Menu -> Setup -> Digital -> CH1/CH2/CH3/CH4 -> RS232
- Exit the menu.
- Press the REC button on the front of LabSat 4 to start the recording.
LabSat 4 will record all available serial messages.

Replaying
- Connect from the RS_Tx and GRN ports on the LabSat 4 expansion connector to the relevant wires/port on the device under test.
- Connect the expansion connector to the Expansion port on the rear panel of LabSat 4.
- Select the previously recorded RS232 scenario file and press the Play button on the front of LabSat 4 to start the playback.

Log File
Log File mode is suitable for recording ASCII text-based message data. As data is received, a new time-stamped line is created in a log file which has the same name as the GNSS signal data but with a .ser extension. Each byte of incoming data is added to the line until LabSat 4 recognises a carriage return [CR] or a line feed [LF] character. On receiving a CR, LF or both characters together, a new line is started in the text file with a new timestamp for the next received character.
| ASCII | Hex | Dec | Use |
|---|---|---|---|
| <CR> | 0x0d | 13 | Carriage return |
| <LF> | 0x0a | 16 | Line feed, end delimiter |
An example of an ASCII formatted message would be NMEA data from a GNSS module:
$GPGGA,123519,4807.038,N,01131.000,E,1,08,0.9,545.4,M,46.9,M,,*47
Because Log File data is received and processed by LabSat 4, you must configure the correct data or baud rate on LabSat 4. The standard rate for NMEA is 4800 bit/s, but it is not uncommon for systems to use other rates such as 9600 or 115,200 bit/s.

Example of a log file
The first section of the log file contains details such as the serial number of LabSat 4, the date and time of recording and the baud rate settings. After the [TIME] and character heading, the received data will appear along with the timestamp of the start of each line.
When you replay a recording with logged RS232 data, LabSat 4 uses the timestamp in the file to replay each line at the corresponding time.
|
Note: There will be some variation in data output timing when compared to the record timing. |
Once a Log File has been created, you can modify the log file by using a text editor application such as Notepad to change the replayed output.
Recording
- Connect the RS_Rx and GRN ports of the expansion connector to the appropriate wires/cable.
- Connect the expansion connector to Expansion port on the rear panel of LabSat 4.
- Power up LabSat 4.
- Navigate to RS232 Log File option.
Menu -> Setup -> RS232 -> Log File
- Press the OK button with Log File highlighted to enable it.
- Exit the menu.
- Press the REC button on the front of LabSat 4 to start the recording.
LabSat 4 will record all available serial messages.
Replaying
- Connect from the RS_Tx and GRN ports on the LabSat 4 expansion connector to the relevant wires/port on the device under test.
- Connect the expansion connector to the Expansion port on the rear panel of LabSat 4.
- Power up LabSat 4 and navigate to the RS232 menu:
Menu -> Setup -> RS232 -> REPLAY Log File
- Press the OK button with REPLAY Log File highlighted to enable it.
- Exit the menu.
- Highlight the required scenario file and press the Play button on the front of LabSat 4 to start the playback.