06 - Turntable Video Synchronisation
A unique feature of LabSat 3 is the ability to synchronise GNSS data recording with video from the optional Racelogic Video VBOX GPS data logger. To record video, the Racelogic Video VBOX is simply placed in the test vehicle at the same time as LabSat. The Video VBOX contains its own high performance GPS engine for time stamping the video so that the RF data can be synchronised with the video when replayed on the bench. Not only is the video perfectly synchronised, but GPS data can be graphically superimposed on the image during recording.
.jpg?revision=1)
Synchronous replay is made possible because LabSat contains an internal GNSS engine which is connected to its RF output channel. Therefore, during a replay, this GNSS engine tracks satellites contained in the original recording, with the time-stamp from this GNSS engine sent over a separate serial connection to a PC. The PC automatically synchronises the video with the UTC time embedded in the Video data. A range of Video VBOX products are available from Racelogic, all of which will enable the recording of GNSS time stamped video.
| Order Code | Description |
|---|---|
| RLVD10P2P | Video VBOX Pro 10Hz with 2 cameras |
| RLVD10P4P | Video VBOX Pro 10Hz with 4 cameras |
| RLVBVD10LT1 | Video VBOX Lite – 1 camera option |
| RLVBVD10LT2 | Video VBOX Lite – 2 camera option |
Recording video using a Racelogic Video VBOX
To use the video synchronization feature, put the Video VBOX and the LabSat into the test vehicle at the same time. The Video VBOX should be set to ‘Log continuously’ by pressing the front panel button after it has booted. Please refer to the Video VBOX manual, for full details on how to set up your Racelogic Video VBOX.
To record GNSS data on the LabSat, please refer to the LabSat 3 Quick Start guide. By using manual mode both the LabSat 3 and video VBOX can be started at the same time. It is advisable to record a stationary period prior to moving off. This allows for both devices to download all the available satellite data and maximised acquisition performance. The Video VBOX is now recording the video, and the LabSat is recording the GNSS data for the duration of the journey.
A new video (AVI) and data (VBO) file are created in a ‘media’ folder on the SD card or USB device every time the ‘REC’ button is pressed on the video VBOX.
The current files are closed when the ‘REC’ button is pressed again. The filename format is as follows: VBOX####.VBO, and VBOX####.AVI, where #### represents an incrementing number. Both files are required to play back the recorded video, synchronised to the LabSat GNSS data.
The Video VBOX system is connected directly and configured to log data from the IMU. The IMU should be mounted securely and level in the centre of the vehicle.
Configuring the IMU and Video VBOX
IMU
Connect the CAN/SER port on the IMU04 to your PC using an RS232 cable (RLCAB030-S). Note that the IMU04 must be powered up - this can be done via connection to a powered Video VBOX unit (RLCAB120).
Run VBOX Setup Software and select the correct COM port to connect to the IMU04 (check PC device manager if unsure).
Within the settings tab, set the CAN mode to Timed. Check that the other options are configured correctly for your specific setup. The settings for most common use cases can be seen below.
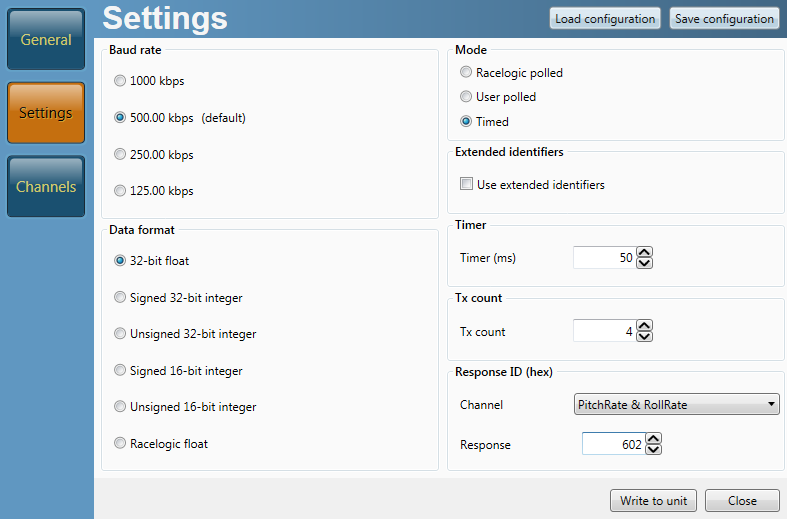
Video VBOX
Open Video VBOX Setup software and load in your desired video overlay. Expand the CAN and Module configuration section and click the 'Load' button within the 'Inputs' section.
.png?revision=1)
|
Load in the CAN database files (.dbc) for the IMU module and select the desired channels to log. This example setup is not using the extended ID’s. Check that the baud rate of the Video VBOX matches the modules (and your connected vehicle) in this case; it is the default of 500 kbit. Now, upload the scene to the Video VBOX. This will allow you to connect the module as shown below, and log data successfully. |
|
.png?revision=1)
|
Option 1 - using CAN/KF port on IMU04 |
Option 2 - using CAN/SER port on IMU04 |
.png?revision=1)
.png?revision=1)