Software Overview
SatGen 4 will load the default view upon start-up:

| Note: You must have an internet connection so that SatGen 4 can download the map and almanac details automatically. |
The Toolbar
The toolbar contains the following options:
- File
You can use the File menu to start a new scenario, open and save existing scenario files, manage the software updates, see recent files, find software information and exit the software.
- Import
You can import 4 different types of files into SatGen 4: Google Earth KML files, NMEA files, VBOX files and CSV files.
- Map
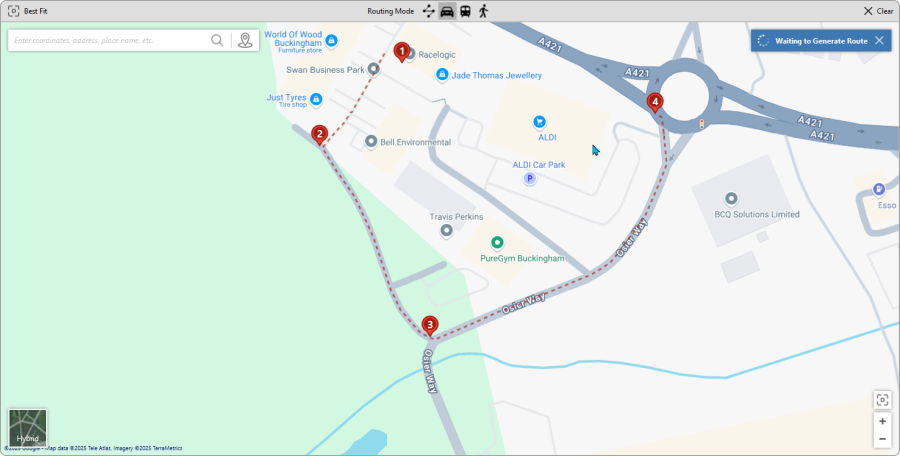
The Map button selects Map Mode as the method to add or edit waypoints to create the route. The Route Area will display a map of the chosen area.
You can search, or zoom and pan to find your required area, select a Routing Mode, and click on the map to set waypoints for your scenario's route.
- Script
You can build a simple list of commands to create a route. Click the Preview button in the top left corner of the script mode view to display the output of the script.
- Advanced
Configure the atmospheric model and leap seconds for your scenario.
- Help
The Help button will take you to the user documentation relevant to the section/mode you are in.
The Route Area
This is where you can preview your route as you create it. This area will appear differently depending on whether you are using Map Mode or Script Mode.
 |
 |
| Route Area - Map Mode | Route Area - Script Mode |
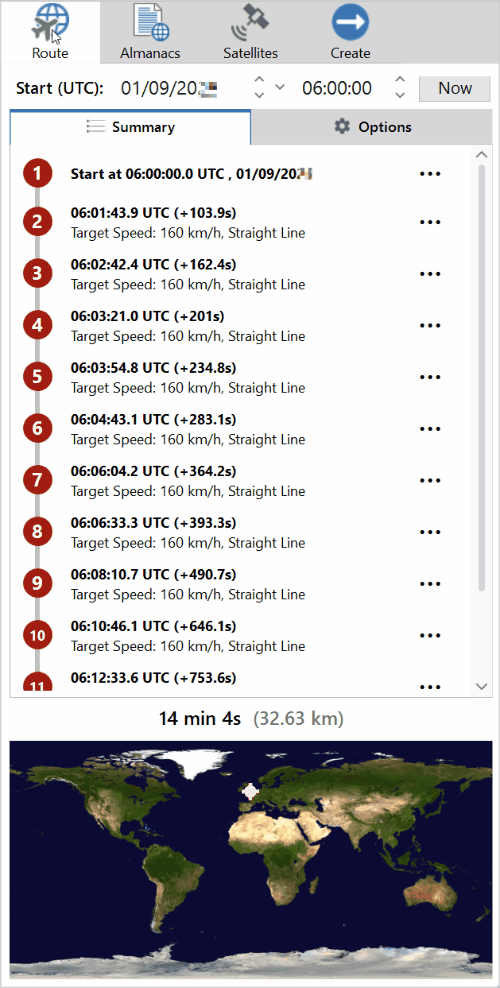
The Graph Area
The graph area will display relevant data based on the selected graph type and the route in your scenario.

The graph will be updated with each new waypoint added to the route.
You can change the graph type by clicking on the graph name and selecting one of the following options:
- Speed (km/h) over Time (s) w/ Active Satellites
- Altitude (m) over Time (s) w/ Active Satellites
- Speed (km/h) over Time (s)
- Altitude (m) over Time (s)
- No. of Active Satellites over Time (s)
The yellow line on the graph indicates active satellites. You can see the satellite count indicated on the right-hand side of the graph when your graph type includes active satellites.
| Note: The graph is pinned to the default view, but you can change this if required by clicking on the pin icon in its top right corner. This will minimise the graph. You can maximise the graph again by clicking on the Graphs tab at the bottom left-hand corner of the SatGen 4 window. |

The Settings Area
Route
This tab is where you will find options to further configure your route, such as the map provider, dynamics, altitude, height geoid, default target speed, apex distance limit, delays, elevation mask and true horizon. It will also display a summary of the configured route or examples of route options if you are using Script Mode.
The displayed route options will change based on your configuration.
Almanacs
This tab will display the used almanacs, and provide options for you to manually set almanacs for the different constellations.
Satellites
This tab will show you a list of the available satellites in the different constellations based on the UTC time or the waypoints in your route. You can see the satellites that are visible above the set elevation mask, the satellites' PRN number, azimuth in degrees and elevation in degrees, as well as an ascension/descension indicator for each satellite.
Create
This tab includes the output settings for your scenario file. Select the file format, directory and name for your output file and choose the signals you wish to include, along with quantisation and scenario attenuation. You can create the file directly or add it to a queue of files to be generated.
The Waypoint Tab
|
When you click on a waypoint in either the Map or in the Route Summary, the Waypoint tab will appear in the Settings Area. The bar at the top will have the following information and options:
Waypoint Information The top half of the Waypoint Tab view contains information about the waypoint, such as Latitude and Longitude and the applied Delay. You can edit this information manually by typing the latitude and longitude values in the respective value boxes and increasing/decreasing the delay time. Route Options The bottom half of the Waypoint Tab view contains information about the specific parameters between the selected waypoint and the previous and next waypoints.
|
 |
The Queue
The Queue is where your simulations are created from your scenarios.
When you click on the Create File button at the bottom of the Create tab, the queue will automatically open, and you will see the progress bar for the creation of the file.
When you click on the Add to Queue button at the bottom of the Create tab, the queue will automatically open with the current scenario configuration in it, but the scenario file will not be created until you manually tell the application to start the creation process.
You can find more information about the controls for the queue and the simulations in the queue below.
-
The number in brackets in the Queue header displays the number of scenario configurations that are currently in the queue.
You can click on the Pin button in the top right of the Queue to make it stay open and pin it to the left side of the SatGen 4 window.
Click on the large Play button in the top toolbar of the queue to start the process of creating all the simulations in the queue.
Click on the Stop button to cancel the creation of the file currently in progress.
Click on the red cross with the green tick mark to remove all completed or cancelled simulations.
Click on the red cross to clear the simulation queue.
Each scenario in the queue will have its name, progress bar and control buttons.
Click on the grey cross in the top right corner to remove the simulation from the queue.
Click on the Play/Pause button to start/stop the file creation process.
Click on the Stop button to cancel the file creation process.
Click on the Folder button to open the output folder in Explorer.
Live Output Mode
If you select to simulate real-time scenarios or stream NMEA output, a Live Output Tab will appear next to the Create Tab.

The information and settings in this tab will differ depending on the type of stream. You can find more information about this on the Playing Simulations page.