How to Create a Purchase Order
- Click on Purchases.
- Select Purchase Orders.
- Click on the Purchase Orders tab.
- Click on the blue Add Purchase Order button.
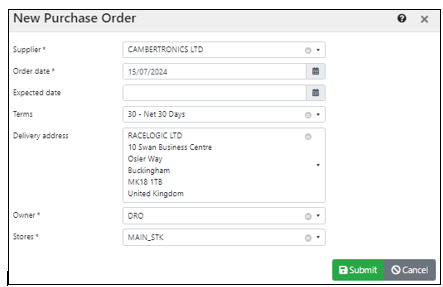
New Purchase Order Modal
- Complete all required/desired fields. Click in the boxes for drop down lists.
- Terms - will be added automatically once a Supplier is selected.
- Expected date - leave this blank, the expected date is entered when adding individual stock codes.
- Stores - Leave as the default of Main_STK.
|
IMPORTANT:If the Supplier is not listed follow the process Creating Supplier Accounts. |
- Click Submit.
- Click the blue Add item button to add stock codes.
New Purchase Order Line Modal
- Complete all required/desired fields. Click in the boxes for drop down lists.
- Click in the Expected date box to select a date from the calendar.
- Enter a quantity. Mandatory field.
- Click the Add extra description box to add further information if required or when selecting non stock (NS) items.
- Enter the amount excluding VAT.
- A group code should be chosen from the drop down list if the stock code is NS4 and NS48, otherwise do not edit. This ensures correct Accounting against projects.
- Click Submit.
| IMPORTANT: Continue to add all stock codes, remember to add a DELIVERY line if applicable. |

- Click the blue View PDF button to check the purchase order.
- Click the (anonymous) x to come out of the PDF.
- Click in the green Confirm Order button once checked. The status will change from Order Open' to 'Confirmed'
- Email the Purchase Order to a Supplier by following the process Emailing a PDF.