1 Target Vehicle ‘Duplex Mode’ (Splitters)
To configure the telemetry radios to calculate the Vehicle Separation parameters at the Target Vehicle as well as the Subject Vehicle for 1 Target ACC, AEB, BSD or FCW tests when using splitter modules, please follow the steps below:
IMPORTANT - These instruction only apply if you are using splitter modules, if you are using a CAN Hub, please follow the instructions here.
|
In this mode, all of the Vehicle Separation parameters are also calculated at the Target Vehicle. This is facilitated by creating a ‘Duplex’ ADAS radio link between the Subject and Target Vehicle. This is NOT possible in '2 Target' mode. The channels calculated in the Target Vehicle are the same as the channels calculated by the VBOX in the Subject Vehicle. They are not new channels calculated in opposite respect; Target to Subject. Duplex Mode Benefits
|
|
|
|
Hardware ConfigurationThe hardware at the Subject Vehicle should be connected as per the Subject Vehicle hardware configuration diagram, except from the following important change.
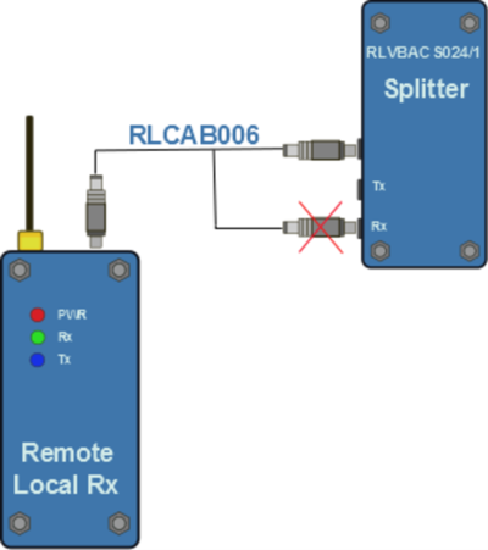
The ADAS link radio needs to be unplugged from the ’RX’ socket and plugged into the unlabelled socket on the RLVBACS024/1 splitter. This will allow a full Duplex link to exist between the Subject and Target VBOX’s.
You should now see that the RX and TX lights of both ADAS radios will now be flashing. |
VBOX Manager Configuration
Data at Target
To activate Duplex mode (1 Target only), ensure that the 'Data at Target' option under the ADAS ‘Subject' menu using VBOX Manager is 'Enabled'.
- Connect VBOX Manager to the VBOX within the Subject Vehicle.
- Enter the 'SETUP' menu of VBOX Manager.
- Select the 'ADAS' option from the 'SETUP' menu and ensure '1 Target' is selected.

- Ensure that 'Subject' is selected within 'ADAS Function'.

- Scroll to ‘Data At Target' and ensure that 'Enabled' is selected.

Sync To Target
When in Duplex mode, the target VBOX has to understand which contact points have been set in the subject vehicle. To do this, the user must have a valid radio link between the two VBOXs and then select the ‘Sync To Target' option under the ADAS ‘Subject' menu using VBOX Manager.
- Repeat steps 1 – 4 in section ‘Data at Target' above.
- Scroll to ‘Sync To Target' and press to confirm.

Selecting this option will transmit all the subject vehicles settings to the target vehicle, allowing live data to be displayed in the target vehicle.
Logging
It is possible to synchronise the logging of both VBOX’s in this Duplex mode.
- Connect VBOX Manager to the VBOX within the Target Vehicle.
- Enter the 'SETUP' menu of VBOX Manager.
- Select the 'VBOX' option and scroll to 'Log Mode'. Ensure that 'LOG CONTINUOUSLY' is selected, if it is not, select the menu and choose the option.
 |
 |
- Repeat steps 1 – 4 in section ‘Data at Target' above.
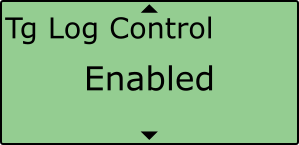
- Scroll to ‘Tg Log Control' and ensure 'Enabled' is selected.

- VBOX Manager can then be used to start and stop the file logging.
- Alternatively, to disable the logging control, select 'Disable' within the 'Tg Log Control' menu.
The logging of data at the Target vehicle will stop and start in sync with the VBOX Manager control.
Note: If you stop the logging with the ‘LOG’ button on the Target VBOX, you will overwrite this auto-logging control.
Pre-Test Configuration
The Duplex Radio link allows any configurations that are set in the Subject VBOX to be instantly communicated to the Target VBOX, so that both boxes produce the same values for all Vehicle Separation parameters.
On power up and during the first communication between each VBOX there will also be a synchronisation of configurations between each VBOX.
Moving Base
It is possible to use Moving Base mode when in Duplex mode. However the extra amount of 2.4 GHz radio in close proximity can degrade the ADAS radio link, which can result in more dropouts and reduced range.


