My OLED Display Has Faded
This page has information about the equipment to use and the steps to follow to fix the OLED Display when the screen has faded.
If the OLED screen on your OLED Display seems to have faded or gone dim, you can purchase an OLED Replacement Screen and replace it yourself.
To see the screen replacement instructions for your OLED unit, select the relevant OLED Display name below:
- ►VBOX OLED Display - DSP04
-
Equipment:
- Hex screwdriver (2 mm)
- Pozi screwdriver
- Sharp blade to separate the screen from PCB (optional)
- Tweezers (optional)
- Alcohol cleanser
- New OLED screen
- Double-sided adhesive tape (included with new screen)
- Lens cloth or similar
- Air Duster or similar (optional)
Removing the old OLED screen
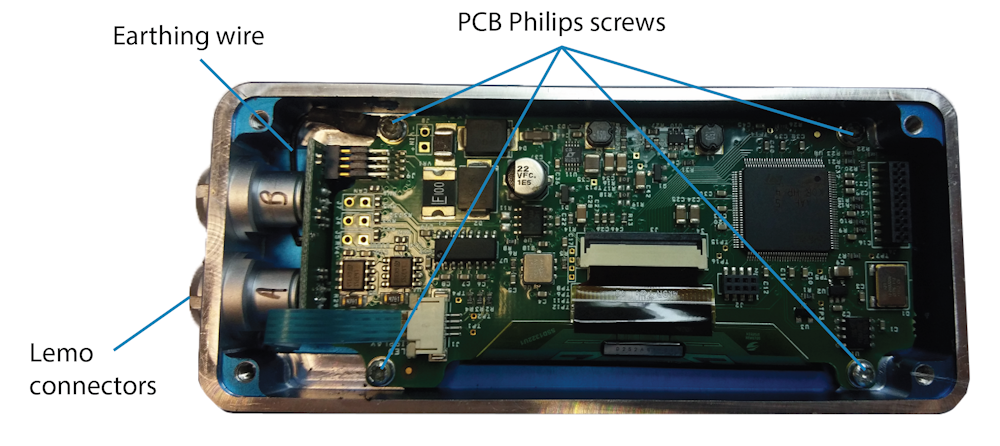
- Use the Hex screwdriver to remove the 4 external screws in the rear panel of the case.
- Remove the 4 internal Philips screws, one in each corner of the PCB (note the position of the earth wire).
Note: Make sure you keep the anti-vibration washers safe until you install the PCB again.
- Lift the end of the PCB that is furthest away from the Lemo connectors and slide the PCB away from the connectors. The PCB should lift out with the OLED screen attached.
- Disconnect the keypad ribbon cable by pushing back the 2 locking tabs and pulling out the connector.
- Disconnect the OLED ribbon cable by flipping up the back locking tab and carefully pull the cable connector out. You may wish to use tweezers for this step.
- Insert a knife or similar between the screen and the PCB to cut the adhesive and prise them apart. Move the knife around the edge and lift the display off.
Note: You can use a sharp blade that is large enough to apply pressure to when you are loosening the OLED screen from the PCB. You can also use an alcohol cleaner fluid to loosen and remove the adhesive tape that secures the OLED to the PCB. Use a small brush to apply the alcohol cleaner between the PCB and the OLED. WARNING
Be careful when you remove the display. It is made of glass and can shatter when you remove it. These shards of glass are sharp and can be a hazard.
Installing the New OLED Screen
- Clean the surface of the PCB thoroughly to remove ALL traces of the old adhesive tape left.
- Clean the REAR of the new OLED screen thoroughly with alcohol cleaner and apply the double-sided adhesive tape to the rear of the OLED as shown in the image below. The tape must fit inside the outer edges.

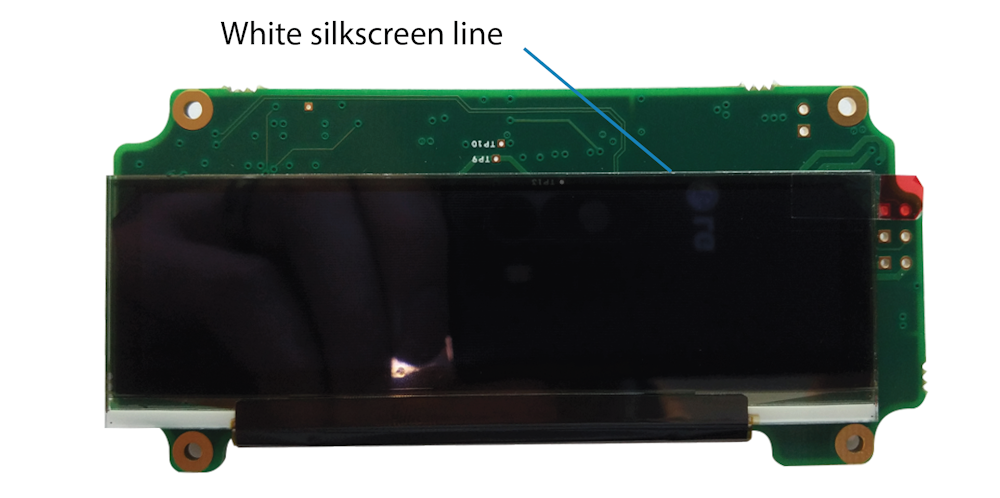
- Peel off the adhesive backing to reveal the mating surface of the adhesive tape. Slowly and carefully affix the OLED to the PCB. Line it up with the back of the PCB and make sure that the bottom of the OLED Screen (the long edge without the cable ribbon) lines with the white silkscreen line.
Note: You must align the new OLED so the edge rests ON the white silkscreen line - NOT UNDER OR OVER.
- Remove the protective film on the new OLED screen.
- Use a soft cloth (e.g. lens or mobile screen cloth) to clean the inside of the clear screen filter on the front panel and the front of the OLED right before you reassemble the unit. If you have access to a can of Air Duster (or a similar product) you can use this to blow away particles and dust from the area before the reassembly.
- Place the clean and fingerprint-free OLED back in the front panel of the case and fix it in place with the 4 internal Phillips screws and anti-vibration washers, one in each corner.
- Reconnect the OLED ribbon cable by pushing the ribbon cable end into the connector on the PCB and push the lock tab back down.
- Reconnect the keypad cable ribbon. Make sure that the lock tabs are open and insert the cable into the connector on the PCB. Close the lock tabs.
- Once it is all reconnected and you are confident that all the ribbon cables are seated correctly, push the case back together and close it with the 4 external Hex screws on the front panel.
- Power the display up to test the unit after the screen replacement.
- ►VBOX OLED Display - DSP05
-
Equipment:
- Hex screwdriver (2 mm)
- Philips screwdriver
- Sharp blade to separate the screen from PCB (optional)
- Tweezers (optional)
- Alcohol cleanser
- New OLED screen
- Double-sided adhesive tape (included with new screen)
- Lens cloth or similar
- Air Duster or similar (optional)
Removing the Old OLED Screen
- Use the Hex screwdriver to remove the four screws that are holding the case together and carefully flip the front panel up from the connector side. Note that the ribbon cable will be acting as a hinge. You want to keep this intact, so make sure you do not add tension to it.
- Place the front panel down on a flat surface, giving you access to the PCB.
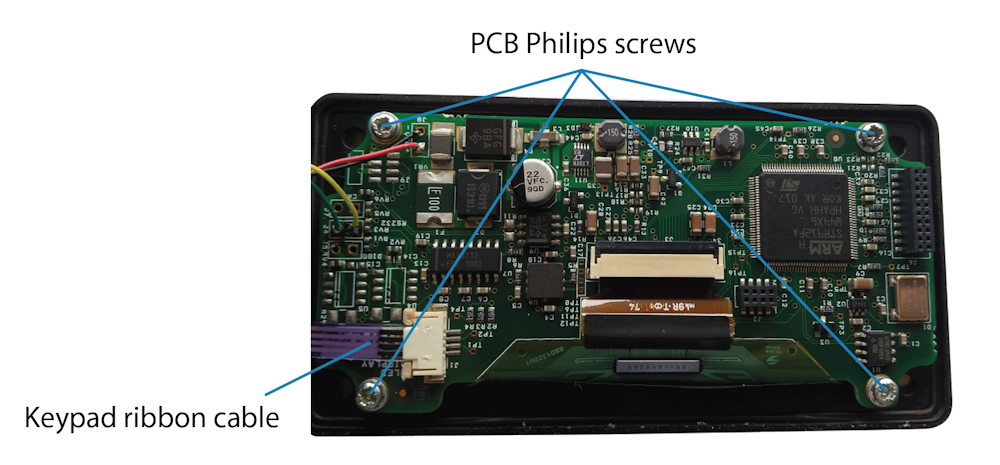
- Remove the 4 internal Philips screws, one in each corner of the PCB attached to the back of the front panel.
Note: Make sure you keep the anti-vibration washers safe until you install the PCB again.
- Disconnect the keypad ribbon cable by pushing back the 2 locking tabs and pulling out the connector.
- Disconnect the OLED ribbon cable by flipping up the back locking tab and carefully pull the cable connector out. You may wish to use tweezers to pull the cable out.
- Insert a knife or similar between the screen and the PCB to cut the adhesive and prise them apart. Move the knife around the edge and lift the display off.
Note: You can use a sharp blade that is large enough to apply pressure to when you are loosening the OLED screen from the PCB. You can also use an alcohol cleaner fluid to loosen and remove the adhesive tape that secures the OLED to the PCB. Use a small brush to apply the alcohol cleaner between the PCB and the OLED. WARNING
Be careful when you remove the display. It is made of glass and can shatter when you remove it. These shards of glass are sharp and can be a hazard.
Installing the New OLED Screen
- Clean the surface of the PCB thoroughly to remove ALL traces of the old adhesive tape left.
- Clean the REAR of the new OLED screen thoroughly with alcohol cleaner and apply the double-sided adhesive tape to the rear of the OLED as shown in the image below. The tape must fit inside the outer edges.
- Peel off the adhesive backing to reveal the mating surface of the adhesive tape. Slowly and carefully affix the OLED to the PCB. Line it up with the back of the PCB and make sure that the bottom of the OLED Screen (the long edge without the cable ribbon) lines with the white silkscreen line.
Note: You must align the new OLED so the edge rests ON the white silkscreen line - NOT UNDER OR OVER.
- Remove the protective film on the new OLED screen.
- Use a soft cloth (e.g. lens or mobile screen cloth) to clean the inside of the clear screen filter on the front panel and the front of the OLED right before you reassemble the unit. If you have access to a can of Air Duster (or a similar product) you can use this to blow away particles and dust from the area before the reassembly.
- Place the clean and fingerprint-free OLED back in the front panel of the case and fix it in place with the 4 internal Phillips screws and anti-vibration washers, one in each corner.
- Reconnect the OLED ribbon cable by pushing the ribbon cable end into the connector on the PCB and push the lock tab back down.
- Reconnect the keypad cable ribbon. Make sure that the lock tabs are open and insert the cable into the connector on the PCB. Close the lock tabs.
- Once it is all reconnected and you are confident that all the ribbon cables are seated correctly, push the case back together and close it with the 4 external Hex screws on the front panel.
- Power the display up to test the unit after the screen replacement.
|
|