09 - VBOX Mini Laptiming Mode

VBOX Mini units can be used to measure lap times by storing the position of a virtual gate and using this to trigger the start and end of a lap. Further locations can be added to represent split and dedicated finish lines.
- Start/Finish Line: Defines the point at which one lap ends and another starts. It also defines the start of a test that ends in a different location, such as a sprint or slalom stage.
- Split Line: Defines a point on the track or stage at which intermediate time and speed measurements are displayed.
- Finish Line: Used only in point-to-point tests (such as sprint or slalom tests), to mark a finish point that is in a different location to the start point.
Measuring Lap times
There are two ways of measuring lap times as you drive round a circuit: by setting the start/finish and split points through the VBOXMini menu screens, or by using the ‘Simple Lap Timing’ option. The latter is useful if the user is in a situation where several button presses are difficult to achieve, such as during a qualifying run.
Simple Lap Timing
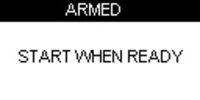
This method of lap timing requires just one button push to set up a start/finish line. With the VBOXMini in Lap Timing mode, press either the up or down arrow key as you drive over the desired start/finish point. The screen will then display the following message:
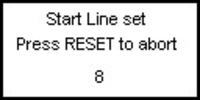
The screen will then count down to 0 and revert to the normal lap timing screen:
If an arrow button has been pressed in error this count down allows you to abort the setting of the start finish line, whereupon the lap times will be calculated according to any previous start/finish points that may have been set.
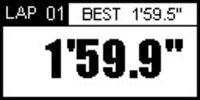
As soon as the start / finish line is crossed again, lap timing will begin. The lap time will be displayed at the end of the second lap along with the current best time in the top right and the lap count in the top left of the screen.
Lap Count
A count of the number of completed Laps is displayed in the top left corner of the Lap timing screen.
To reset the Lap count and the Best Lap time, press the RESET button.
Lap Timing Including Split Points
This method allows for the setting of a start/finish line, up to six split points, and a separate finish line if the course being driven is of a sprint or hill-climb type. Due to the fact that it requires several button pushes it is best employed in a non-race session.
- Firstly set the start/finish line and splits or load a previously saved set from the SD card (see Setting Start/finish and Split Lines below).
- If you want to save your lap times to a file, insert an SD card.
- Drive around the circuit, your times will automatically appear on the VBOX Mini display:

Big Speed @ Split display
There is a choice of what is displayed in the main area of the Lap timing screen, either your Lap/Split time, as shown above, or the Vehicle speed as it crosses a split point or start/finish line; with the current lap in the upper left and the split time in the upper right of the window:
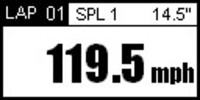
If Split points are placed at the exit of corners then this mode displays the corner exit speed, which is a very easy way to help you improve your speed out of a particular corner. To display the exit speed at the last split instead of the time press the MENU button and change the ‘BIG SPEED @ SPLIT’ option.
| LAPTIMING MENU |
|---|
| UNITS |
| SET START & SPLITS |
| CLEAR ALL |
| LOAD SPLITS |
| SAVE SPLITS |
| ONE SHOT MODE |
| ✓ BIG SPEED @SPLIT |
Split to Split time
There are two different ways of measuring split times. The default is from the start of the lap to the split, the other method is from one split to another. To change between these options, tick or untick the option ‘SPLIT TO SPLIT TIME’ in the LAPTIMING MENU.
Split Widths
When setting a start / finish or split line, the VBOX Mini unit will set the width of the line at a default value of 25 m (12.5 m either side of the point at which the OK button was pressed.) However this can be changed by selecting the Split Widths function and altering the value using the ▲▼ buttons. This feature is useful if the VBOXMini is being used on a track where separate sections pass closely by each other, and eliminates the possibility of going through a split line in the wrong direction.
Clearing your Best Lap time
Press and hold the RESET button for 1.5 s.
One Shot Mode
By default, the VBOXMini unit starts the lap time from a start / finish line. If you want to start the lap time from the moment you start moving, then you need to select ‘One Shot Mode’. To set this mode:
- Press the MENU button to enter the LAP TIMING menu.
- Highlight ‘ONE SHOT MODE’ and press OK to activate.
- Bring the car to a halt at the start point (previously set using either set start/finish method.)
- After two seconds the following screen will appear:
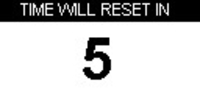
- The screen will count down from 5 to 1 after it reaches 1 the following screen will appear:
- When this screen shows you can then start your lap. Timing of your lap will start as soon as you pull away and will then stop as you cross the start / finish line at the end of your flying lap.
Start / finish and split lines
Before the VBOXMini can measure and display times, you will need to either load previously recorded start / finish lines or create new ones in your VBOXMini. This is done using either Simple Lap Timing, mentioned above, which sets only a start / finish line or by setting a start / finish Line AND split points. In order to set a start / finish as well as split points, follow the instructions below.
Setting start / finish lines
- Press the MENU button to display the Lap Timing Menu.
- Highlight ‘SET START & SPLITS’ and press OK
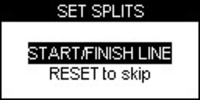
- As you drive across the start / finish line press OK
- This will set the start / finish line and the screen will now show the SET SPLIT1 screen.
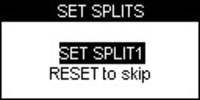
- To set the first Split, press OK when you pass this point or press RESET to skip.
- If you wish just to place a separate Finish line, press the ‘RESET’ button to skip all the split points and scroll to the SET 2nd FINISH screen.
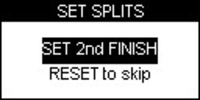
- Press OK to set a separate finish line as you drive over it.
Note: you must be moving to be able to set virtual lines.
Saving start / finish and Split Lines
After creating start / finish, Splits or Finish lines you can save them to a file on the SD card which can be loaded back into the VBOXMini at a later stage, or used in the VBox Tools software. The file created is called DBOX.DSF and is saved into the ‘DATA’ directory on the SD card. If a DBOX.DSF already exists the file will not be created; this is to prevent existing start and split lines being accidentally overwritten.
To Save the lines you have created:
- Ensure the SD card is inserted.
- Press the MENU button to enter the Lap timing menu.
- Highlight the SAVE SPLITS option and press OK
Loading start / finish and split Lines
Loading single files
- Re-name the DSF file you wish to use to 'DBOX.DSF' and place this in the 'DATA' folder on the SD card.
- Press the MENU button to enter the Lap timing menu.
- Highlight the ‘LOAD SPLITS’ option and press OK.
- A 'LOADING' bar should show and beep when completed.
Loading multiple files
- Make sure there is no DBOX.DSF file within the DATA folder, as this will stop the multiple-load working.
- Create a new folder on the card named DSF.
- Place up to 26 DSF files into the folder (no specific names).
- Press the MENU button to enter the Lap timing menu.
- Highlight the ‘LOAD SPLITS’ option and press OK.
- Highlight the file you wish to load and press OK.
- A 'LOADING' bar should show and beep when completed.
Clearing start / finish and split Lines
This option will erase the split line information from the VBOXMini memory, not from the SD card. Split line information remains in the units memory until they are either cleared or re-entered, even if the unit is power cycled.
- Press the MENU button to enter the Lap timing menu.
- Highlight the ‘CLEAR ALL’ option and press OK
Recording and Reviewing Lap and Split Times
To record your run data and lap and split times, simply insert a SD card into VBOXMini, the run data will be recorded in a ‘.dbn’ file on the SD card and the Lap Time information will be recorded in a text file e.g. ‘Laps-01’.txt’
Using VBOX Mini to review lap times
To review a ‘Laps-xx.txt’ file with lap and split time data:
- Enter Lap Timing Mode and then press the OK button.
- VBOX Mini will then display any Lap Timing files stored on the card:
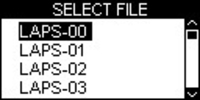
- Press the ▲▼buttons to scroll to the required file, then press the OK button to select it. The file will then be displayed in VBOX Mini:
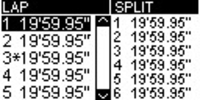
In each file, the best lap is indicated with an asterisk. To change the lap for which split times are displayed, use the▲▼ buttons to scroll between the laps; the split times will update automatically. Pressing the OK button in this screen will return you to the Lap Timing Mode’s main screen.
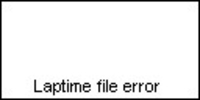
Laptime File Error
If a file that does not contain any valid lap data, for instance if the car has only moved a few metres, then VBOX Mini will display this screen:
Using a computer to review lap times
Any of the ‘Laps-xx.txt’ files can be opened using a text editor program such as notepad. The files have the following example format:
.png?revision=1)