Configure the Audio Sensor Input to the VBOX
VBOX 4 ADAS
After you have configured the Audio Sensor with the Audio Sensor Setup software, you can connect it to your VBOX unit and complete the configuration with the VBOX Setup software.
Click on the relevant heading below to see the setup for your connection.
- ►Configure as Analogue Input with VBOX 4 and VBOX Setup
-
When you have wired the Audio Sensor into the connector and connected it to the Analogue Input connector on VBOX 4 ADAS, you must configure the relevant Analogue input channel.
- Open VBOX Setup and connect to the relevant COM port for your VBOX 4 unit.
- Go to the Channel Setup Menu and click on the Internal A/D section header.

- Select the input channel you connected the audio sensor to by clicking on it.
Take note of the channel number where the sensor was wired into the connector or trigger the Audio Sensor to identify the active channel in the preview column.
- Update the channel settings to make the channel more identifiable during the test and in the report.
Give it a recognizable name, for example, Audio.

- Trigger the Audio Sensor to confirm that it is connected and working.
You will see the signal in the graph at the bottom of the settings area.
- Update the Scale and Offset as required to make the signal display logically in the graph.
You can find more information about how to configure your VBOX 4 unit in your unit's user guide.
Note:
- You can choose any name for the channels. The important thing is that you can easily identify the accessory connected to the channel.
You can find more information about how to configure your VBOX 4 unit in your unit's user guide.
- ►Configure as CAN Input with VBOX 4 and VBOX Setup
-
After you have finished setting up the Audio Sensor with the Audio Sensor Setup software, you can connect it to your VBOX 4 unit and complete the configuration with the VBOX Setup software.
- Download the ADAS Audio Sensor's .DBC file.
- Open VBOX Setup and connect to the relevant COM port for your VBOX 4 unit.
- Go to the Channel Setup Menu and click on the CAN Input section header.
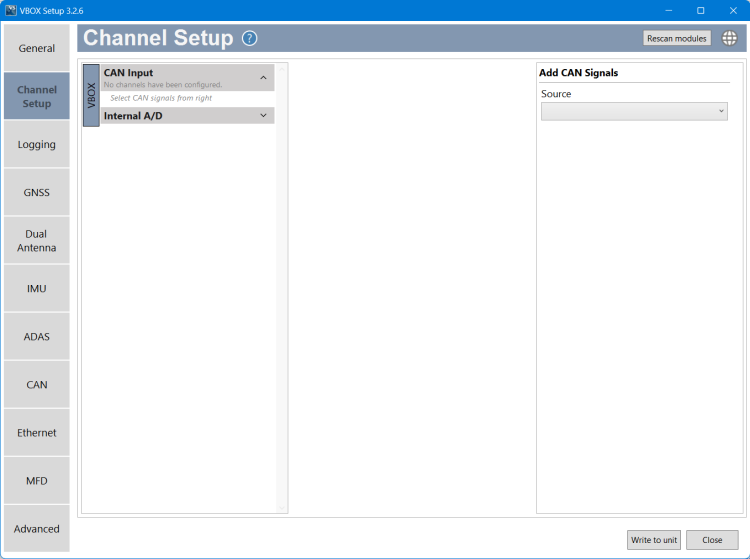
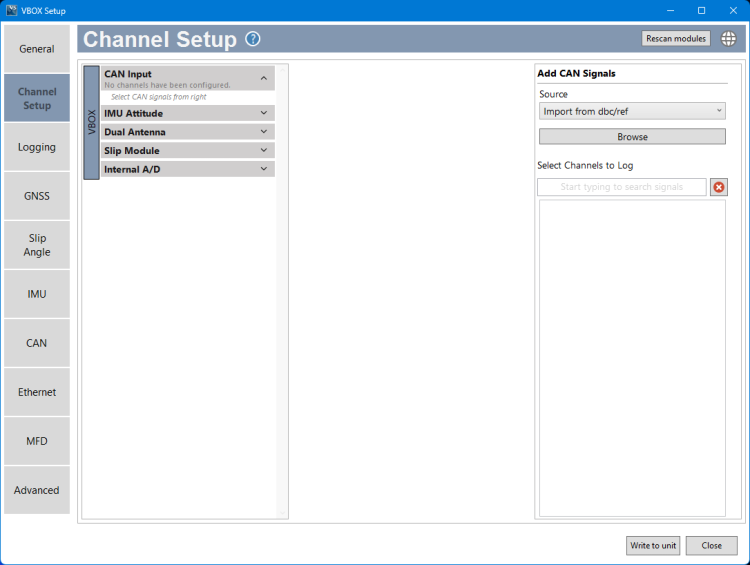
- You will see an Add CAN Signal section on the right-hand side of the window. Click the Source dropdown and select Import from dbc/ref.
- Click Browse and navigate to the location of the downloaded DBC file.
- Load the file to import the channels.
- Select the signals you want to assign/view/log on the VBOX unit from the list that populates underneath the Browse button, such as Trigger_system or Signal_Delay.
The selected channels will be added to the CAN Input section on the left-hand side, where you can see the channel preview and click on a channel to edit it.
You can find more information about how to configure your VBOX 4 unit in the VBOX 4 user guide.
VBOX 3i
After you have configured the Audio Sensor with the Audio Sensor Setup software, you can connect it to your VBOX unit and complete the configuration with the VBOX Setup software.
Click on the relevant heading to see the setup for your connection.
- ►Configure as Analogue Input with VBOX 3i and VBOX Setup
-
After you have finished setting up the Audio Sensor with the Audio Sensor Setup software, you can connect it to your VBOX 3i unit and complete the configuration with the VBOX Setup software.
- Open VBOX Setup and connect to the relevant COM port for your VBOX 3i unit.
- Go to the Channel Configuration Menu and click on the Internal A/D section header.
- Click on the channel name for the channel that was used to wire the Audio Sensor into the Analogue input connector.
This will open the channel settings where you can update the name, units, scale and offset for the selected channel.
- Rename the channel.
Use a recognisable name, such as "Audio".

- Trigger the Audio Sensor to confirm that it is connected and working.
You will see the signal in the graph at the bottom of the settings area.
- Update the Scale and Offset as required to make the signal display logically in the graph.
Note: If you are using a VBOX 3i unit with firmware version 2.8 or earlier, you can find the equivalent settings in the Channels Menu on the Internal CAN Input tab. You can find more information on configuring your VBOX 3i unit in your unit's user guide.
- ►Configure as CAN Input with VBOX 3i and VBOX Setup
-
After you have finished setting up the Audio Sensor with the Audio Sensor Setup software, you can connect it to your VBOX 3i unit and complete the configuration with the VBOX Setup software.
- Download the ADAS Audio Sensor's .DBC file.
- Open VBOX Setup and connect to the relevant COM port for your VBOX 3i unit.
- Go to the Channel Configuration Menu and click on the CAN Input section header.

- Click on the Add channel button to open the CAN Channel Properties window and configure the CAN input for the Audio Sensor.

- Select User under CAN Database and click on the Load button.
- Navigate to and select the Audio Sensor .DBC file that you downloaded.
You can now see the list of available messages in the CAN Database area.

- Select the message you want to assign/view/log on the VBOX unit, such as Trigger_system or Signal_Delay.
- Click Apply to assign the message and preview the live result. You can cause the Audio Sensor to trigger and review the live value in the Value box under Channel properties by clicking on the magnifying glass next to it.

- Click OK to add the currently selected channel to the CAN Input channels.
- Repeat this process with all the channels you wish to view/log.
Note: If you are using a VBOX 3i unit with firmware version 2.8 or earlier, you can find the equivalent settings in the Channels Menu on the Internal CAN Input tab. You can find more information about how to configure your VBOX 3i unit in its user guide.