05 - VBOX Micro Configuration
Configuration of the VBOX Micro is performed using VBOX Setup software. With the supplied USB cable, connect the USB port on the VBOX Micro to one of the computers USB ports. When connecting to VBOX Setup use the drop down list to select the COM port assigned to the VBOX Micro. Once this is selected VBOX Setup will connect to the unit automatically.
.png?revision=1)
General
.png?revision=1)
- Connection - Selected COM port, refresh and disconnect buttons.
- Units - Specify the distance, acceleration & velocity units.
- VBOX Information - Serial number and installed firmware version of connected unit.
- Load/Save Configuration - Load/Save settings from/into a Racelogic setting file (.RSF).
- Language - Select an operating language.
- Diagnostics - Live preview of satellites, latitude, longitude, velocity & accumulative distance.
- GPS Information - Reports the internal GPS engine type and allows user to coldstart the unit.
- Write to unit - After making changes to setup, the write to unit button must be selected to upload settings.
Log settings
To adjust the logging mode and the log rate of the VBOX Micro, open the ‘Logging’ tab in VBOX Setup.
Once the logging mode and rate have been set, click the ‘Write Settings’ button to program the new configuration into the VBOX Micro.
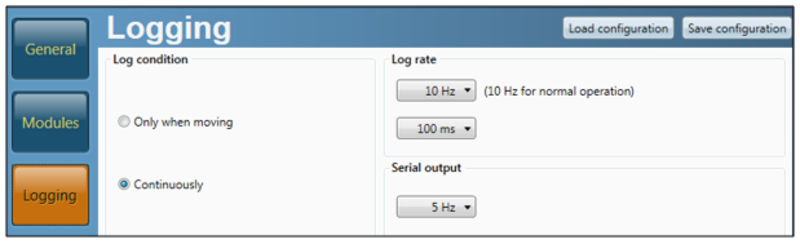
The log rate is shown as a frequency (in Hz) and also as a time period (in ms). Both options are linked so if one is altered the other setting will automatically reflect the change.
Time/Date
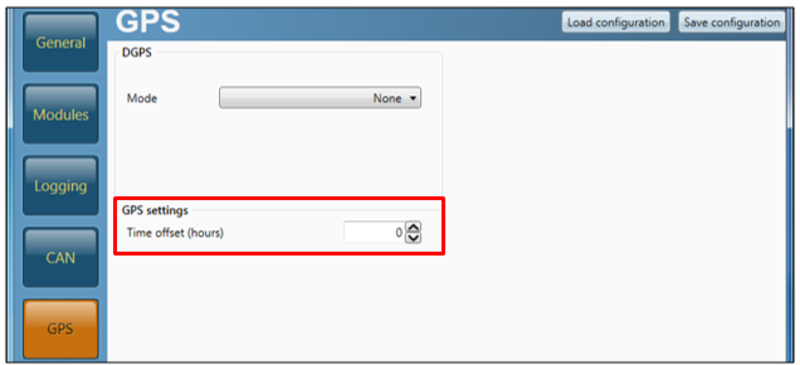
The VBOX Micro uses time and date information available from GPS satellites. This time is based around UTC (approximately equal to GMT) so if the VBOX Micro is used in a different time zone the local time should be set inside the VBOX Micro for ease of use.
As the time and date are critical to the creation of file names in the VBOX Micro, it is recommended that the local time is correctly set.
Adding or subtracting an offset on the GPS page of VBOX Setup adjusts the local time.
Once the offset has been set click the ‘Write Settings’ button to program the new time and date into the VBOX Micro.
NOTE: In order to obtain UTC time, the VBOX Micro must have attained satellite lock.
Configuring and using the VCI input
The VBOX Micro has the ability for its CAN port to be used as a 16 channel vehicle CAN interface.
NOTE: When the VBOX Micro is configured in VCI mode it is not possible to connect and log data from Racelogic input modules.
Cables required
| Description | Product Code |
|---|---|
| 5-way Fischer to 9 way ‘D’ connector (female) – 1 m (CAN cable) | RLCAB019F |
| 9-way ‘D’ connector (male) to OBDII connector – 1.2 m | RLVBCAB20 |
Enabling VCI Mode
- Connect the VBOX Micro to the computer via the USB cable
- Run VBOX Setup.
- Select the appropriate COM port.
- Click on the CAN tab to display the CAN page.
- Select the ‘Enable VCI’ option.
The screen shot below displays the CAN page when the VCI is enabled. Displayed are the 16 CAN channels, which in this case have all been configured to read CAN data from other Racelogic products.
For a VCI channel to be included in the logged file it must be ‘Ticked’ as shown on all the channels in the screen shot, below.
.png?revision=1)
Baud Rate
The VCI CAN bus’ baud rate is configured by selecting the desired baud rate from the right hand side of the VBOX Setup CAN tab.
.png?revision=1)
Configuring a VCI channel
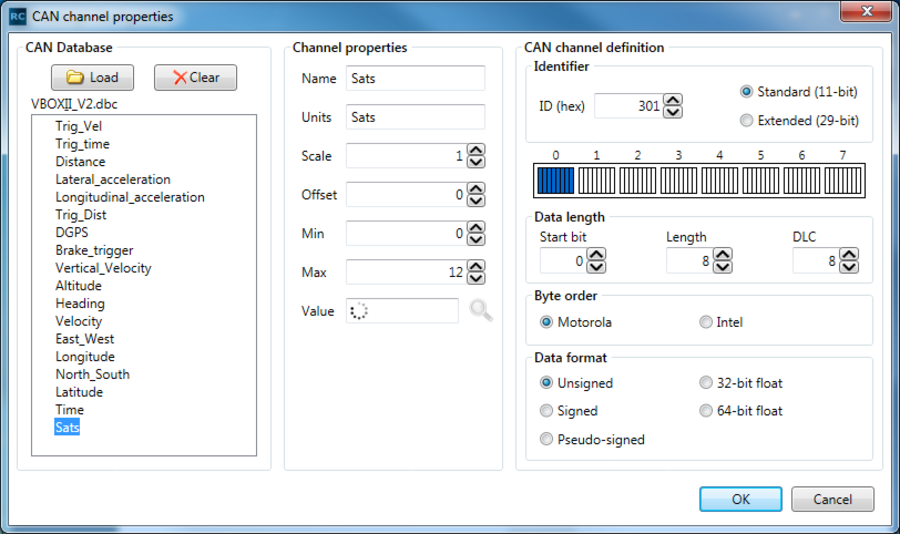
To configure a VCI channel click on the channel box that needs to be setup, this will open a new configuration window.
All CAN attributes for channel configuration can be manually configured from within this window, shown below.
.png?revision=1)
Loading a CAN database file
Each of the 16 CAN channels can be configured from a CAN database file. From each channels setup window a CAN database file can be loaded by clicking the ‘Database’ button. Clicking the ‘Database’ button allows a CAN database file to be opened and then a signal from the Database can be selected. This will then automatically configure the channel with the correct CAN settings.
DATA Base format types
- .VCI - Racelogic CAN database file
- .REF - Racelogic Encrypted database file
- .DBC - Database file