RACELOGIC Support Centre

01 Screen Layout – VBOX Touch 1.4

 As the name suggests, VBOX Touch is controlled by using the capacitive touch screen.

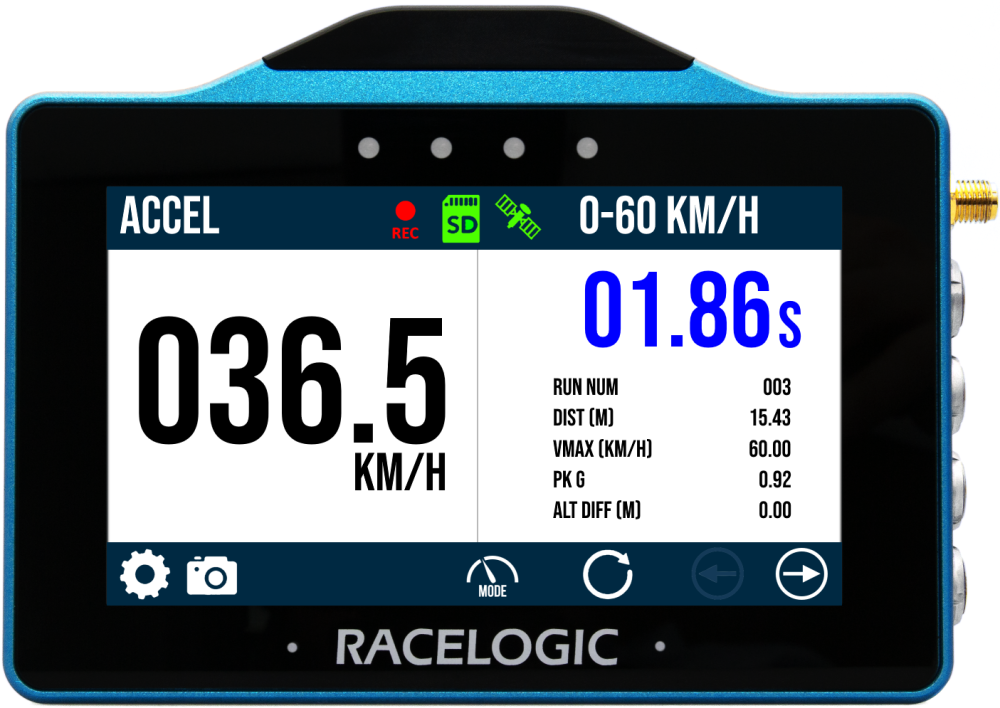
Generally, the different areas of the screen contain the following:

  • Top of the screen – indicative status information 
  • Centre of the screen – mode and settings information (navigate by pressing the forward and back arrows or by swiping left or right) 
  • Bottom of the screen – function buttons


VBOX Touch v1.4 Accel Screen (1000x708).png


LEDs

VBOX Touch has 4 LEDs above the display. These can flash in different colours and different frequency patterns depending on the process being performed. You can learn more about the behaviour of the LEDs on VBOX Touch here.

Logging Status

The red Record Icon will show when the unit is logging data to the SD card. VBOX Touch Recording Button.png
If the icon appears white after you have initiated logging, it means that the unit is primed for logging and is in the process of synchronising the internal real-time clock (RTC) to GPS time. The logging will not start until this synchronisation process is complete. PB Touch Recording Button White.png
IMPORTANT
Do not remove the SD card when the Record Icon is red. You may lose data or damage the SD card if you remove it while the unit is logging.

SD Status

The SD Card Icon displays the status of the recording media. When an SD card has been inserted and has free space, the icon will be green. By tapping on the icon when it is green, you can manually start or stop the data logging and override the Configured Logging Strategy. VBOX Touch SD OK.png
If the unit cannot detect an SD card or the media is full or corrupted, the icon will be red. VBOX Touch SD Not OK.png

Satellite Status

The Satellite Icon illustrates whether the unit has a valid satellite lock.  
When a lock is acquired, this icon will be solid green VBOX Touch Sats Lock.png
If there is no satellite lock, the icon will flash red. GNSS Red Flashing.gif

Display Mode

The header shows which Display Mode is currently selected.

Mode Data

This area will contain information that relates to the currently selected Display Mode.

Settings Button

The Settings Button will open a Settings area, which contains menus for Display Mode Settings, General Settings, Serial Port SettingsDiagnostic Settings and Date & Time Settings

The Display Mode settings shown on the Settings screen depend on which mode has been selected. You can find information about the settings for each mode in the specific mode areas.

Settings.png

Screenshot Button

By pressing the Screenshot Button you can save a full image of what is currently shown on the screen. This screenshot will be saved to the inserted SD card as a 1.5 MB bitmap image, orientated at 90° to the original screen image and with the prefix 'screenshot'.The LEDs will illuminate yellow in sequence from left to right to display the progress of writing to the SD card. When the screen capture is complete, VBOX Touch will emit an audible confirmation notification. If the screenshot could not be saved, for example, no SD card is inserted or the card is full, the SD Card Icon at the top of the screen will flash 3 times and VBOX Touch will emit an audible error notification.


IMPORTANT
NEVER remove the SD card while a screenshot is captured and saved as it could cause the unit to crash!

Screenshot.png

Results Button

You can view the test results history by selecting the Results button at the bottom of the current test screen.

These test results will be displayed until you choose a new test type or you press the Reset Button.

Results.png

Mode Button

The Mode Button lets you choose between the 4 Display Modes available. Mode.png

Reset Button

Depending on which screen you are on, the Reset Button will reset mode results and/or history. When pressed, the LEDs will briefly flash green twice and the unit will emit an audible confirmation notification. If you press the Reset button while in Lap Timing Mode, you will see a cancel timeout screen giving you the opportunity to cancel the reset within 5 seconds by pressing anywhere on the screen. Reset.png

Forward/Back Arrow Buttons

You can use the Forward and Back arrow buttons to navigate through the Display Mode and Settings screens. Alternatively, you can also swipe left or right on the screen when these buttons are visible. Forward Arrow.png Backwards arrow.png

Exit Button

You can use the Exit button to return to the previous menu or page.  VBOX Touch Exit Button.png


  • Was this article helpful?