06 - Coastdown SW Configuration and Test setup
Prior to performing the Coastdown test, you will need to configure the software and set-up the test parameters to your requirements. This is done by using the menu / set-up buttons in the top left corner of the screen.
.png?revision=1)
- File - Contains options concerned with saving / replaying results files and allows you to load a .vbo file, set the log file location and choose the replay speed.
- View - Allows you to see the graph of the data from the optional IMU, plus change the time base of the IMU data trace and the speed vs. time trace.
- Options - Allows you to configure the PC COM port, the Custom test range(s), the IMU usage and the speed units
- Help - Provides a shortcut to this user manual and gives details of the software version, etc.
The functions in these menus are described in more detail below
File Menu
In the file menu, you can recall a saved Coastdown test and replay this. This is explained in section ‘Replaying Saved Results’
Configuring a Log File Location
To define the folder into which you wish the software to save the results.
Select : File
►Log file location
.png?revision=1)
This will then bring up the directory structure, where you can choose the folder where you wish to save your results to. In the example opposite, the results are required to be saved in the folder “Coastdown”.
Highlight the required folder and click OK
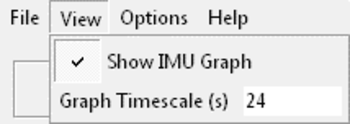
View Menu
There are two options in this menu – “show IMU graph” and “graph timescale”
If an IMU is not to be used, ensure the “show IMU graph” is ticked. This will then include a graph of IMU data and a graph of the GPS speed data. If you are not using an IMU, you can untick this graph option and the software will only show the GPS speed graph.
.png?revision=1)
.png?revision=1)
You can also adjust the time base of the graph(s) by entering a different number into the Graph Timescale box. For example, if you enter 10 this will place the graph graticules 10s apart, but if you enter 100 into this box, this will place the graticules 100s apart, therefore allowing you to see more history on the screen. However, this will place a little more demand on your computer and could potentially cause a slight delay in the updating of this graph so, depending upon the specification of this, you may need to reduce this setting. The default software setting for the graph timescale is 24s.
NOTE: The live data displayed on screen in the Coastdown software can suffers large delays, this is due to the processor power of the PC. If this delay is unacceptable firstly disable the IMU Graph window. If a large delay is still present then try to reduce the timescale of the main graph window.
Options Menu
The options menu contains four functions:
.png?revision=1)
COM Port
To enable communication between the PC and the VBOX, you will need to define the appropriate communications port to allow the devices to “talk” to one another. Select:
Options
►COM Port
►then choose appropriate COM port – E.g. COM 4
Custom Test Range – Splitting the test into sub-ranges makes it easier to perform the test where you don’t have a very long test track – it takes some considerable time and distance to coast from 125km/h to 5km/h – and so the entire range can be split into sub-ranges, as follows:
Options
►Custom Test Range
The following dialogue box will appear:
.png?revision=1)
Simply define the start speed and end speed for each sub-range.
For added resolution and for further data processing (if required), you can define the Coastdown time in each sub-range to be reported at intermediate speed steps as opposed to just the start and end speeds. These speed steps are user definable.
In the example given above, the software is set-up to perform the entire test from 125km/h to 5km/h in 4 parts: 125km/h to 95km/h, 95km/h to 65km/h, 65km/h to 35km/h and 35km/h to 5km/h. In each sub-range, the coast down time will be reported at each 10km/h interval. For example, in the range 125 to 95.
IMU
This allows you to enable the use of the optional Inertial Measurement Unit (IMU), for supplementing the GPS data with accelerometer data
Here you can enable the IMU for use and then use the alignment aid function to ensure that the IMU is set correctly. This is described in more detail in section 8 - GPS only and GPS + IMU
.png?revision=1)
Speed units
This function allows you to switch the basic speed units The chosen speed unit will be applied to both GPS and IMU (if used) data.
To choose the required speed units, select:
Options
►Speed Units
►then tick either km/h or mph
.png?revision=1)
Help menu
The help menu contains two options, one to access the online version of this user manual and another to access the version details of the software, with contact details for Racelogic
.png?revision=1)