RACELOGIC Support Centre

Quick Start Guide - OLED Display DSP07-L

This page contains important and useful information about the VBOX OLED Display (DSP07-L).
Registration 

Please register your VBOX unit so that we can provide you with notifications about the latest software releases and firmware upgrades for it and offer technical support.

Register your device here.

DSP07_500px.png
Box Content

When you purchase an OLED Display DSP07-L (RLVBDSP07-L), you will find the following items when you open the box:

Product Code Quantity Descriptions
VBDSP07-L 1 OLED Display Unit with Lemo Connector
RLACS287 1 Suction Mount
OLED Display Unit
Buttons
Navigation buttons.png

Depending on which mode is currently active on the screen, the function of the OK button will change. The splash screen shown when scrolling through the menu describes the function of the OK button in each mode.
 

You can also find the complete list below.

4th button.png The large button on the left side of the display will act as a shortcut between settings and display modes. 


Display Mode Function
Menu Access the Menu
Speed Start and stop logging
Max Speed Reset max speed value
Predictive Lap Timing
  • Single Press fixes the reference lap according to your settings in Fixed Lap Mode
  • Press and hold for >4 s to clear the stored reference lap and all lap timing data
Lap Timing Set a new start/finish line
Lap Count No action
Lateral G Reset max g reached
Longitudinal G Reset max g reached
No Media

If you do not have an SD card inserted in your VBOX data logger, the OLED Display will show a No Media message while the vehicle is moving at speeds of 5 mph or less. This makes it easier for you to make sure that you have an SD card inserted before you start your logging.

This page contains information relevant to installing and connecting a VBOX OLED Display (DSP07-L) to a VBOX unit.
Mounting 
Antenna Placement 

Appropriate placement of the GNSS antenna is crucial to the quality of the data that is being recorded.

You can find information about how to mount the antenna here

Mounting Options
RLACS287-suction-mount-hanging.jpg

Standard Accessory - RLACS287

The RLACS287 Lightweight Windscreen Suction Mount is made to be attached to the windscreen in the driver's field of view to make it easy to take in information at a glance.  

RLACS286-roll-cage-mount-only.jpg

Optional Accessory - RLACS286

An alternative mounting option is the RLACS286 Roll Cage Camera Mount with Thumb Nut. 

The roll cage mount has a solid aluminium body, connected to a curved mounting plate that is bolted to the bar via a pair of jubilee clips (2 supplied) or worm drive hose clips (four supplied). 

You can find more information about this roll cage mount on our website.

3M Dual Lock.jpeg

Optional Mounting - 3M Dual Lock

You can purchase and use Dual Lock tape to attach the Pit Lane Timer to a dashboard.

Not sold by Racelogic

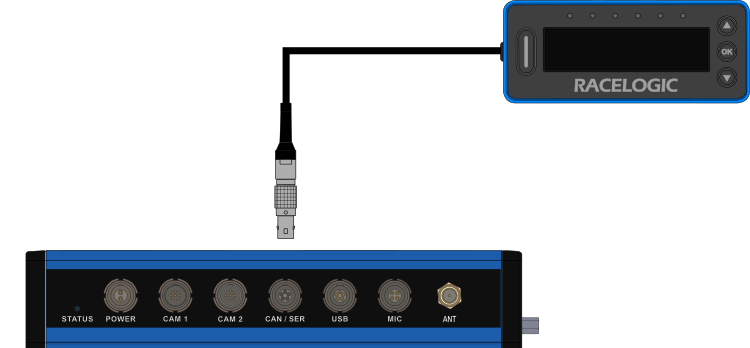
Hardware Connections
VBOX Video HD2

Connect the display cable to the CAN/SER port on the VBOX Video HD2 unit. 

DSP07 with HD2 V12.png

This page contains information about the different LED behaviours of the OLED Display (DSP07-L).
Delta-V LEDs

The LEDs on the front of the OLED Display indicate the Delta-V of your vehicle. 

Red LEDs indicate that the speed is slower than the reference point and green LEDs indicate that the speed is faster than the reference point. When the LEDs are off, they indicate that you are matching the reference lap speed. 

Note: Each of the LEDs on the unit represents 33% of the selected Delta-V range. 0 delta time is in the centre of the unit's LED array. 

When the VBOX unit calculates that your current speed is slower than the reference lap, the 3 LEDs on the left will gradually light up red from the centre and out, 1 LED per 33% of the Delta-V Range set in the Predictive Lap Timing settings. 

When the VBOX unit calculates that your current speed is faster than the reference lap, the 3 LEDs on the right will gradually light up green from the centre and out, 1 LED per 33% of the Delta-V Range set in the Predictive Lap Timing settings.


DSP07_PredictiveLapTiming.png
DSP07_Delta_V.png
Combo-G LEDs

While the screen still displays the Delta-T for each lap, you have an optional mode that takes over the function of the LEDs when you are using predictive lap timing.

If the Combo G is greater than a selected minimum threshold (50 % LED minimum %, 0.5 g default), the LEDs will light up various colours dependent on the maximum g threshold selected (1.0 g default).

  • The LEDs will show red where the Combo G has reached the LED minimum % selected (50% by default).
  • Above this minimum value, the LEDs will show a colour gradient between red and greengiving a changing yellow/orange colour, dependent on the live Combo G value.
  • The LEDs will show green where the Combo G is equal to or greater than the selected maximum g threshold.

You can change the settings for the Combo-G LED behaviour in the Predictive Lap Timing Menu


DSP07_ComboG_1.png
DSP07_ComboG_2.png

You can read more about the available display modes and settings and the technical properties of the DSP07 OLED Display in the User Guide

    • Was this article helpful?