Quick Start Guide – VBOX LapTimer
01 Getting Started – VBOX LapTimer
Registration
Please register your VBOX LapTimer so that Racelogic can continue to provide you with notifications about the latest software releases and firmware upgrades for your Racelogic product, and offer technical support.
Register your device here.
What is in the box?
When you purchase a VBOX LapTimer, you will find the following items when you open the box:
.png?revision=1&size=bestfit&width=592&height=345)
| Product Code | Quantity | Description |
|---|---|---|
| VBLAP01-V2 | 1 | VBOX LapTimer |
| RLACS313 | 1 | 8 GB Class 10 SDHC Card |
| RLACS287 | 1 | Lightweight Display Suction Mount with Thumb Nut |
| RLCAB010LE | 1 | 2-way LEMO to 12 V Cigar Lighter Power Cable |
| RLACS284 | 1 | External GNSS antenna (2 m) |
Features |
|
|---|---|
|
|
|
|
|
|
|
|
|
|
|
|
Compatible media
The VBOX LapTimer can record to MMC, SD, SDHC and SDXC media cards formatted in a FAT or FAT32 format.
SDXC cards will be formatted as exFAT by default, a format type not supported by VBOX LapTimer. You can still use them, as long as you reformat them to FAT32 first. There are various free third-party applications available online to format SDXC cards.
Memory Usage
|
If the SD card you use has less than 10 MB of space available you will see a warning symbol flashing periodically indicating the amount of memory available. |
 |
Square Button Function
|
Depending on which mode is currently active on the screen, the function of the square button will change. The splash screen shown when scrolling through the menu describes the function of the square button in each mode. You can also find the complete list below: |
 |
| Mode | Function |
|---|---|
| Speed | Start and stop logging |
| Max Speed | Reset max speed value |
| Speed Bar | Set centre speed and speed display range |
| Predictive Lap Timing | Single press fixes the current or stored lap as the reference lap, depending on the chosen settings. |
| Predictive Lap Timing | Pressing for >4 s clears the stored reference lap and all lap timing data |
| Lap Timing | Set a new start/finish line |
| Lap Count | No action |
| Lateral G | Reset max g reached |
| Lateral G Bar | Set min g and max g (targets) |
| Longitudinal G | Reset max g reached |
| Longitudinal G Bar | Set min g and max g (targets) |
| Menu | Access the Menu |
No Media
| If you do not have an SD card inserted in your VBOX LapTimer, it will show a "No Media" message while the vehicle is moving at speeds of 5 mph or less. This makes it easier for you to make sure that you have an SD card inserted before you start your logging. |
02 Installing VBOX LapTimer in Your Vehicle
Obtaining the Best GPS Quality
|
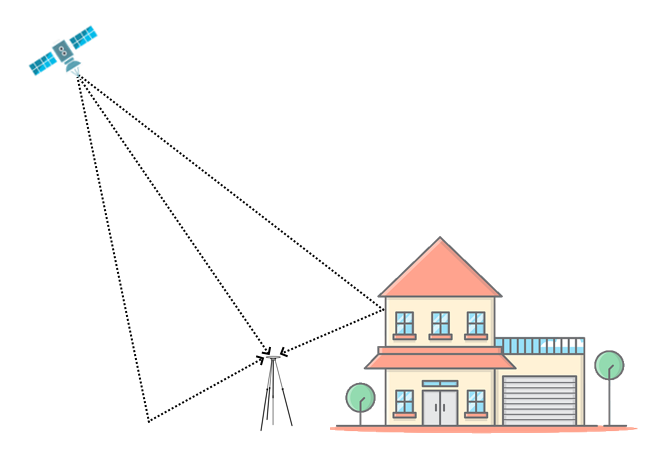
Appropriate placement of the GNSS antenna is crucial to the quality of the data that is being recorded. Be aware of objects that can shadow the antenna or block the signal to the antenna. Some objects can also reflect signals which can send weaker GNSS signals to the antenna. This is called multipath, and these reflections can disturb the signal in an unpredictable way. If an antenna is not mounted on a large enough ground plane, multipath reflections can also come from the ground beneath the antenna. If you are using the antenna without a sufficient ground plane (such as on a bike or carrying the unit by hand), you can put a sheet of metal underneath the antenna (this can for example be copper or aluminium foil) or use an antenna with strong multipath-rejection properties (ACS320). Antennas, such as the ACS320, are much larger and more expensive than the standard antennas that come supplied with a VBOX unit, but you can mount them on a pole to get them higher from the ground and away from shadowing items. On a motorbike, you should place the antenna as far from the rider as possible to reduce the rider's shadowing effect. The best place is usually at the back of the bike. |
Illustration showing multipath reflections from the ground and surrounding buildings. |
You can find more information about optimal antenna placement here.
Acquiring satellite lock
Tall buildings or trees can block GPS signals, causing a reduction in the number and quality of satellites being tracked, leading to inaccurate position measurements and a noisy velocity signal.
 |
GPS works best in open areas/ Avoid tree-lined roads
GPS Coldstart![]()
If your VBOX LapTimer is struggling to acquire a satellite lock, you may have to perform a GPS coldstart. This may be necessary if the unit has not been in use for a number of days or it has moved location dramatically since its last use. You can perform a coldstart by selecting MENU > GNSS OPTIONS > COLDSTART.
 |
Note: You cannot access the GPS Options menu when you use the LapTimer in OLED mode. In this instance, you must perform the coldstart on the connected device.
Hardware Connections
Standalone
 |
With VBOX Video HD2
.png?revision=1) |
With Video VBOX Pro
 |
With Video VBOX Lite
 |
With Video VBOX Waterproof

03 Display Mode Overview – VBOX LapTimer
The VBOX LapTimer has several different display modes, which you can scroll through with the up and down buttons on your unit.
Note that the data displayed on each screen is always calculated by the unit at all times, even if you choose not to display it. Click on the name of each mode to find relevant setup information.
|
|
|
|
| Predictive Lap Timing | Lap Timing | |
|
|
|
|
| Speed | Speed Bar | |
|
|
 |
|
| Max. Speed | Lap Count | |
|
|
 |
|
| Longitudinal G | Longitudinal G Bar | |
|
|
 |
|
| Lateral G | Lateral G Bar | |


Logging
|
If the VBOX LapTimer is logging, you will see a scrolling bar across the bottom of the screen (except in Predictive Lap timing mode). To start or stop the data logging on VBOX LapTimer, press the square button when in Speed Display mode. |
|
|
|
06 LED Behaviour – VBOX LapTimer
Delta-V LEDs
The two front panel LEDs are used in predictive lap timing mode. They indicate if the current vehicle speed is faster or slower than the speed was at the same position in the reference file.
The LEDs will show red if the current speed is slower than the reference, or green if the current speed is faster.
The value defined within the ‘Delta-V range’ setting dictates the min. and max speed values to full brightness.
.png?revision=2)
The two LEDs act as a gauge, filling up from the left to right. Once the current speed is slower or faster than the reference, the left LED will illuminate. Once the current speed is above 50% of the defined positive or negative range, the LED on the right will also illuminate.
Combo G LEDs
While the screen still displays the Delta-T for each lap, you have an optional mode that takes over the function of the LEDs in the predictive lap-timing screen.
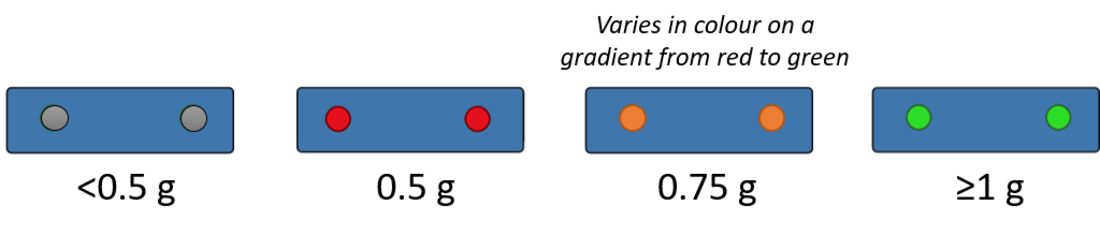
If the Combo G is greater than a selected minimum threshold (50 % LED minimum %, 0.5 g default), the LEDs will light up various colours dependent on the maximum g threshold selected (1.0 g default).
- The LEDs will show red where the Combo G has reached the LED minimum % selected (i.e. 50% by default).
- Above this minimum value, the LEDs will show a colour gradient between red and green, giving a changing yellow/orange colour, dependent on the live Combo G value.
- The LEDs will show green where the Combo G is equal to or greater than the selected maximum g threshold.
Default settings example:
.png?revision=2)
Additionally, the LEDs on the front of the VBOX LapTimer indicate Delta-V. Red indicates that velocity is slower than the reference point and green indicated that it is faster. The brightness indicates how much slower or faster velocity is relative to the same point in the reference lap. The range over which this brightness will change can be defined in the 'Predictive Lap Timing Settings' menu.