Live Streaming
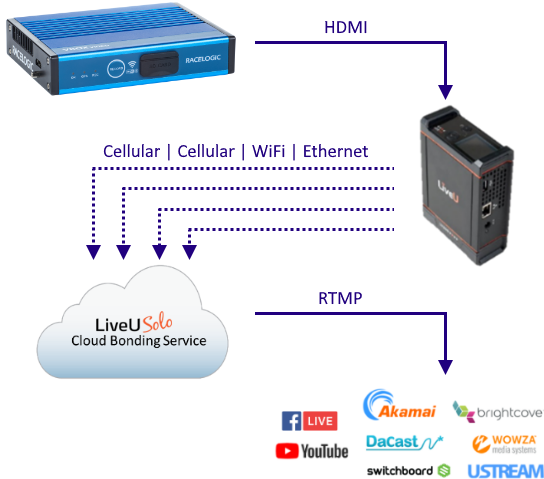
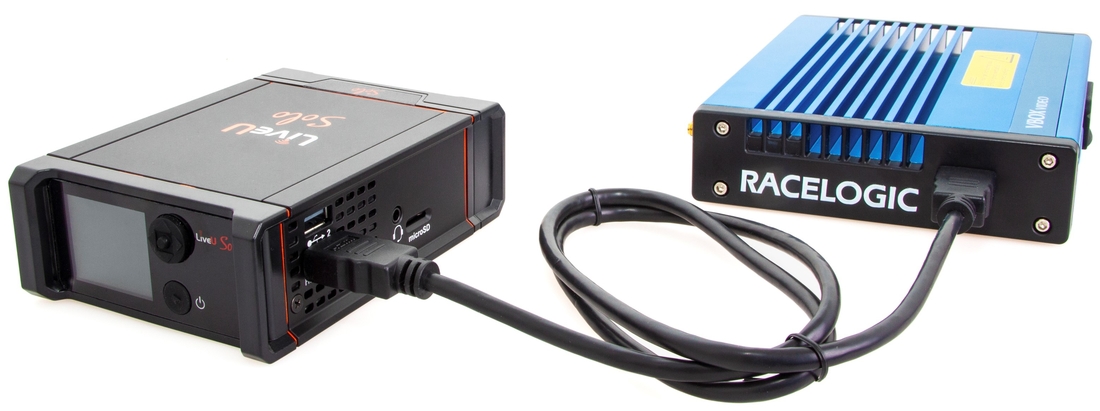
A VBOX Video HD2 HDMI (RLVBVDHD2-H) connected to a LiveU Solo HDMI (RLACS298) can live stream the video output directly to Facebook, YouTube and other popular online platforms and CDNs. LiveU Solo HDMI is available to purchase on the VBOX Motorsport Store.
LiveU Solo HDMI Overview
LiveU Solo HDMI is a professional-grade wireless video encoder offering one-touch streaming to Facebook Live and YouTube, as well as other popular social media networks and online channels. The light and compact Solo is perfectly suited for any type of mobile use allowing you to stream live video from anywhere.
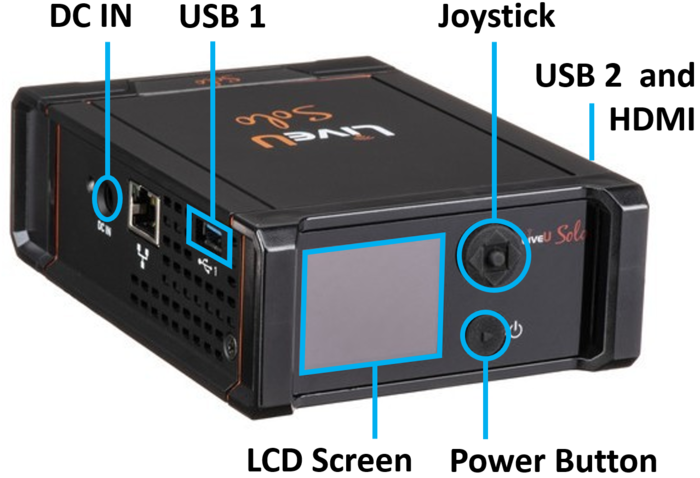
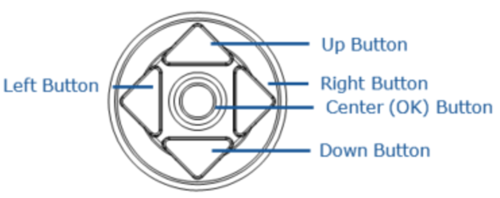
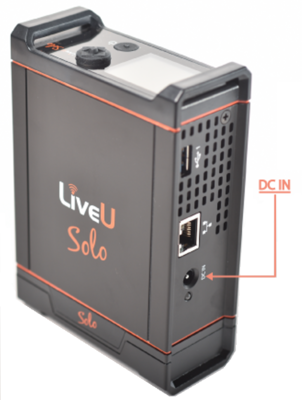
The input ports, such as USB and HDMI are situated on the sides of the unit. The front panel consists of an LCD display screen used for configuration, a joystick for navigating the screen and the Power button, which can also be used to start and stop live streaming.
 |
|
LiveU Solo tutorials are available on the VBOX Motorsport website. For full LiveU Solo HDMI specifications and manual information, consult the LiveU Solo literature from the https://gosolo.tv website.
Features
- Start streaming within seconds - just connect to VBOX Video HD2 HDMI and go live at the push of a button (once configured).
- Keep more viewers engaged with a reliable, high-quality stream.
- Send a high-quality stream from remote locations or in congested network environments such as heavy crowds.
- Deliver HD live videos to all popular online platforms such as Facebook Live, YouTube and Twitch.
- LiveU Solo can incorporate LiveU’s patented video protocol LRT™ (LiveU Reliable Transport), a unique video transmission method. It deploys smart algorithms like adaptive bit rate adjustment and automated error correction to deliver rock-solid live streams with superior video quality. LRT™ combines the bandwidths of up to four internet sources (2 x cellular networks, 1 x WiFi, 1 x Ethernet) to create a single, strong upstream line.
- Stop/start, preview video, monitor connectivity status and battery life on both unit and in web-based portal.
Specifications
- Bit rate: Up to 8 Mbit/s based on resolution and destination.
- Internal battery: Lithium ion providing a minimum of 2 hours of streaming.
- Size: 95 mm x 132 mm x 43 mm.
- Weight: 518 g.
- Operating temperature: -5 to +45°C.
IMPORTANT - Do not immerse the unit in water!
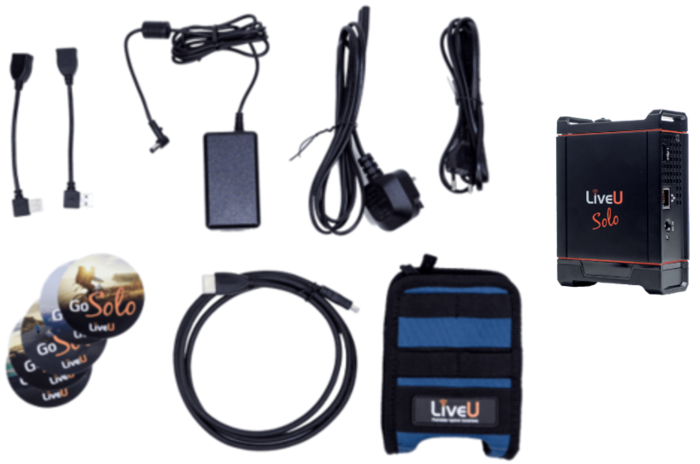
Package Contents (RLACS298)
| Description | Quantity | Product Code |
|---|---|---|
| LiveU Solo HDMI, including video encoding unit, carry pouch, left and right angle USBs, country specific power cord, HDMI to mini HDMI cable, setup card and Go Solo! stickers. | 1 | LU-SOLO-HDMI |
| High speed HDMI lead with ethernet, 1 m, black | 1 | C-HDMI1 |
Optional Accessories
| Product Code | Description |
|---|---|
| RLACS300 | Dual power Supply Cable for VBOX Video HD2 Notes:
|
| RLCAB158 | LiveU Solo power adaptor (30 cm) |
| RLCAB010LE |
Cigar Plug Power Supply for HD2 (2 m) |
| RLCAB014LE | Unterminated Power Supply for HD2 (2 m) Note: RLCAB158 is also required |
| RLCAB010D | Cigar Plug Power Supply for LiveU Solo (2 m) |
| RLACS333-L | Li-ion Battery Pack for HD2 Note: RLCAB158 is also required |
How Does LiveU Solo HDMI Work
LiveU Solo HDMI has an HDMI video input and a number of ways to connect to the internet: 2 x Cellular network connections via 4G USB dongles, 1 x Ethernet port for LAN connections and 1 x WiFi connection.
- When the encoder is switched on, it will try to connect to the internet via the strongest or bonded (LRT™) connection method.
- When the transmission is started, the encoder sends packets of data over all interfaces that it can connect to the internet via to the Cloud server.
- The Cloud server then sends back rate control information to LiveU Solo HDMI.
- LiveU Solo HDMI then knows in real-time what the jitter, packet loss, latency, round trip delay, and all the parameters of each individual connection are, and then it uses algorithms to decide how to send the video to the server; such as bitrate and resolution, and then which connections to use.
- Once the packets arrive at the Cloud server, they are pieced back together to make up the video. The encoder will adjust which connection to use to send the data packets to ensure the highest consistent quality.
If you are intending to use video streaming in a location where there is no Ethernet or strong and stable WiFi connection, it will be necessary to use 4G USB dongles.
Compatible USB Dongles
Due to user preferences and regional variances we do not supply a modem with the LiveU Solo, this will need to be arranged separately from a third party, but they are readily available. There are a variety of options for the telecom providers and services that can be used, please consult the LiveU Website for more information on compatability.
USB modems will need to include the option to change the IP address in order to avoid conflicts which could result in them not working correctly. It is recommended to buy two 4G data SIM cards from two different providers (e.g.Vodafone and EE). In total you could need up to 2.5 GB/hour for maximum quality, so make sure you have enough data to cover this amount between the two SIM cards.
Charging LiveU Solo HDMI
|
 |
Configuration
Before live streaming from VBOX Video HD2 HDMI, it is necessary to configure the following:
- Configure VBOX Video HD2 HDMI for HDMI output
- Configure USB dongles
- Configure LiveU Solo HDMI
- Connect VBOX Video HD2 HDMI and LiveU Solo HDMI
You can find the instructions for each step below:
Configuring VBOX Video HD2
To output video via the HDMI port, the setting must be enabled within VBOX Video Setup Software or the VBOX Video App.
IMPORTANT - HDMI output is only available when frame rate is selected as 30 fps within the Video Settings.
VBOX Video Software
- Open VBOX Video Setup Software, this can be downloaded from here.
- If required, create or upload a scene.
- Press the Settings button at the top left of the screen.
- Click on the HDMI Output tab and use the dropdown menu at the bottom of the screen to choose to output from Camera 1 (without graphics), Camera 2 (without graphics) or Camera 1 and 2 (with graphics).
- If you would like audio included within the HDMI output, select Enable Audio.
Note: Only available if Camera 1 and 2 (with graphics) are selected.
- Save the scene to an SD card or USB stick using the Save to SD button on the Top panel.
- Power up the VBOX Video HD2 unit with cameras connected.
- Load the SD card or USB stick into the front panel - the OK LED will flash green fast as the scene is loaded.
- The HD2 will double beep when the upgrade is complete - the OK LED will change to solid green.
VBOX Video App
- Power up the VBOX Video HD2 unit with cameras connected.
- Ensure the phone is connected to the unit via Wi-Fi.
- Open the VBOX Video App and press the Settings button at the top left of the screen.
- Click on the HDMI option and choose to output from Camera 1 (without graphics), Camera 2 (without graphics) or Camera 1 and 2 (with graphics).
- If required, Enable Audio.
- The settings will be written to the unit.
Configuring USB Dongles
- Activate the 4G data SIM cards (consult the SIM card provider's literature for instructions).
- Insert one USB dongle with an installed SIM card into a computer and change the IP address of the dongle (consult the USB dongle manufacturer's literature for instructions).
- Repeat for the other USB dongle, making sure the IP address is different so they don’t clash.
|
For example, if you are using a Huawei E8372H-153 dongle:
|
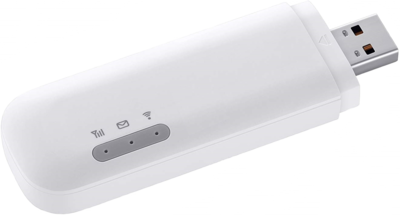 Huawei E8372H-153 |
Configuring LiveU Solo HDMI
It is important that the LiveU Solo HDMI has the most up-to-date firmware installed, new firmware upgrades are automatically sent 'over the air' once you have an internet connection.
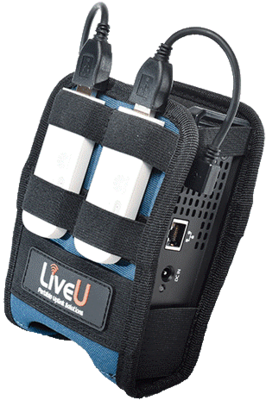
Hardware Setup
Once the unit is turned on, LiveU Solo HDMI will automatically dial and connect the dongles. |
 |
Creating a Solo Web Portal Account
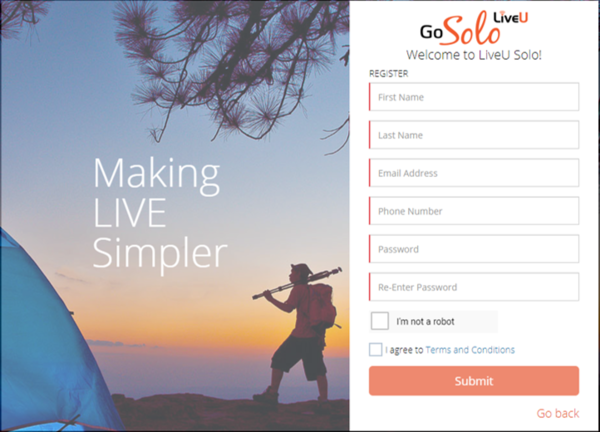
If you haven't previously registered for a Solo Web Portal Account, you will need to sign up following the instructions below:
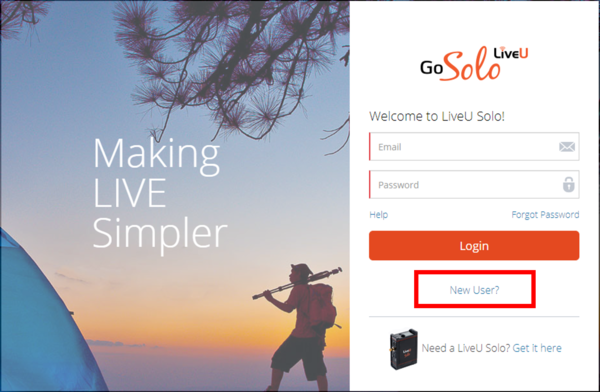
- Open a web browser on a computer or mobile phone and go to https://solo.liveu.tv/login.
- Click on New User?.
- Fill in the details.
- Read the Terms and Conditions and tick the box if agreed to.
- Click on Submit.
- An email will be sent asking you to verify your account.
Note: One Solo Web Portal Account can have up to five LiveU Solo HDMI encoders registered to it.
 |
 |
Registering LiveU Solo HDMI
|
Once you have a LiveU Web Portal Account, it is then necessary for you to register the LiveU Solo HDMI unit following the instructions below:
|
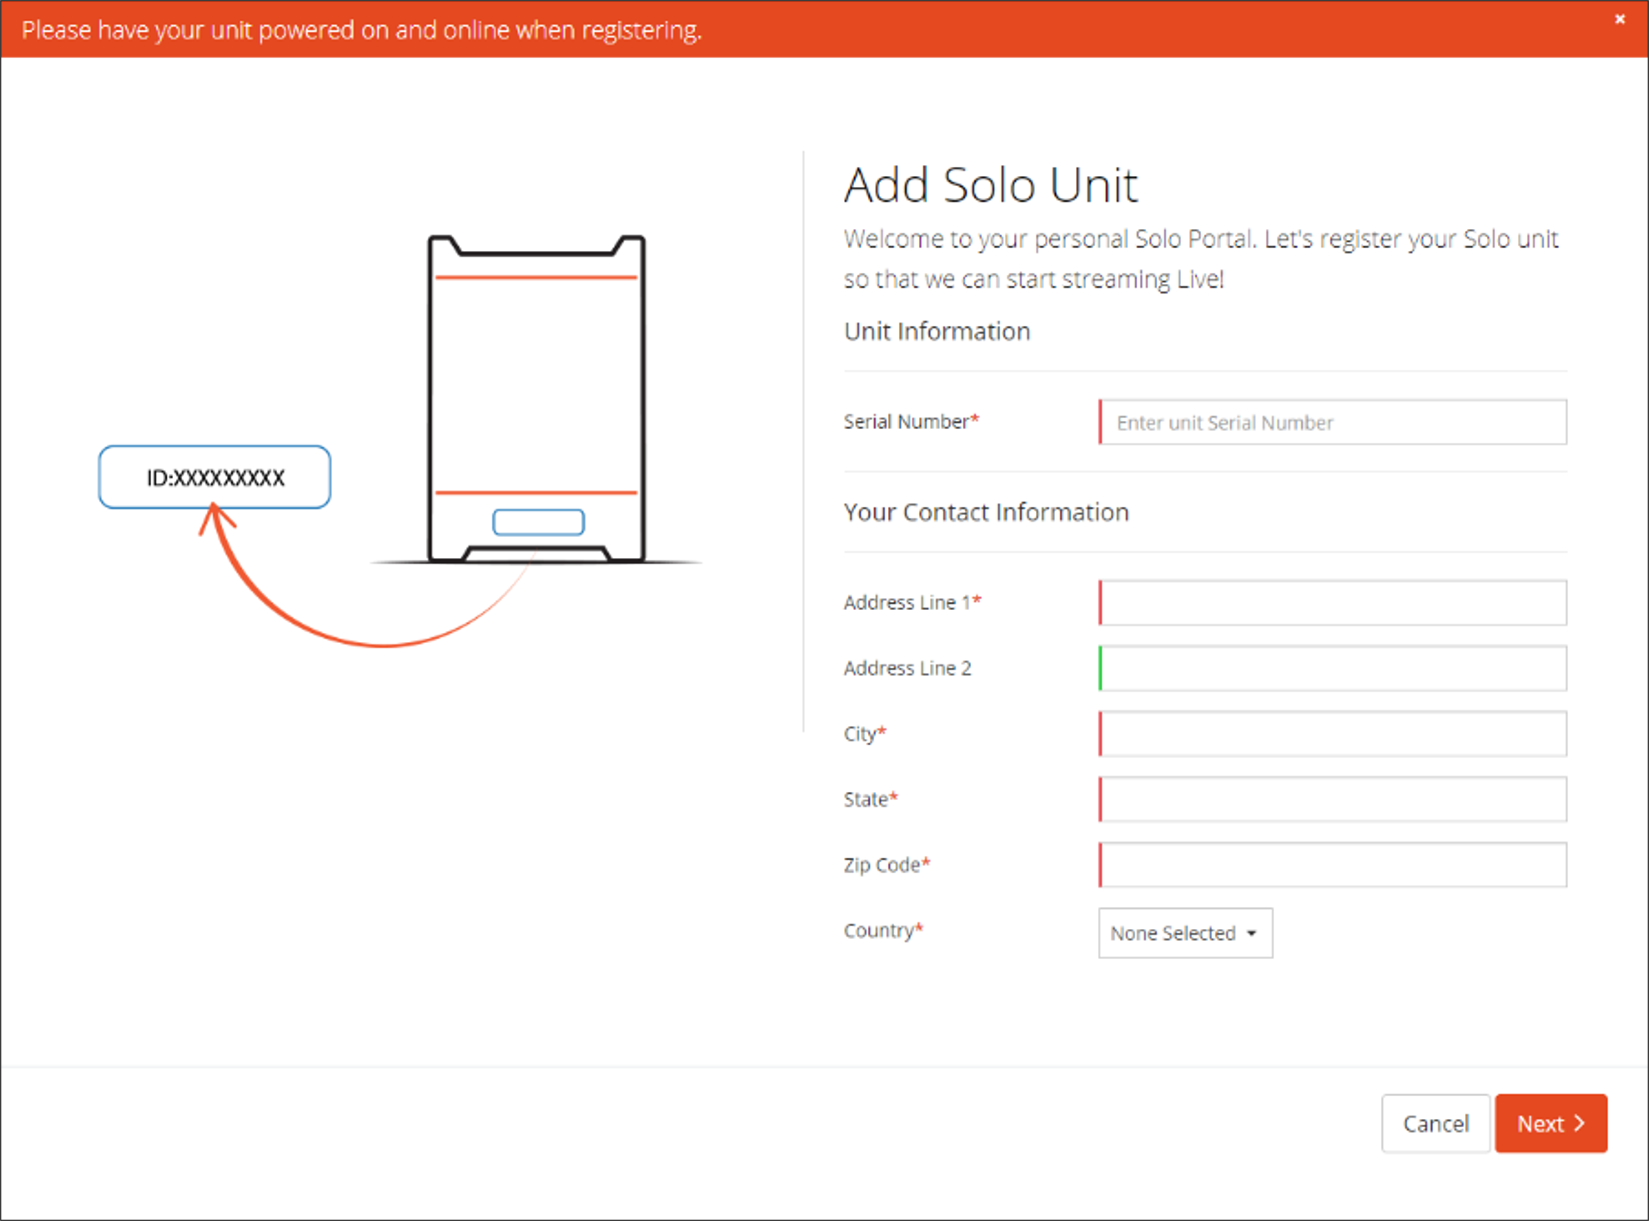 |
Note: LiveU Solo HDMI can only be registered to one account.
Once registered, the LiveU Solo HDMI unit will be displayed at the top of the Solo Web Portal along with status information, such as whether the unit is online (turned on with an active connection) and the remaining battery. It is possible to change the name of the unit by pressing the cog icon above the image of the unit.

Once online, it is also possible to review and configure the connections to the unit by clicking on the Connections button. The USB dongle connections shouldn't require any additional configuration, as once they inserted, the unit will automatically dial and connect the dongles. However, you can configure an Ethernet or WiFi connection here if you wish.
Note: You cannot connect to a WiFi network that has a landing page.
LRT™ Subscription
|
LiveU Solo HDMI can incorporate LiveU’s patented video protocol LRT™ (LiveU Reliable Transport), a unique video transmission method. It deploys smart algorithms like adaptive bit rate adjustment and automated error correction to deliver rock-solid live streams with superior video quality. When the encoder is switched on, by default it will try to connect to the internet via the strongest connection method available. However, if LRT™ is enabled from within the LRT tile on the Solo Web Portal, the encoder will combine the bandwidths of up to four internet sources (2 x cellular networks, 1 x WiFi, 1 x Ethernet) to create a single, strong upstream line. By transmitting the video data over multiple connections, LiveU Solo ensures reliable live streaming even if one network degrades or drops out completely. LRT™ is not included as standard, it is an additional subscription cost, with Monthly and Yearly subscription options. If you do not have an LRT™ subscription and attempt to turn the feature on, you will be directed to the subscription area. Please note, LRT subscriptions take up to 1 hour to activate. |
 |
Once LRT™ has been activated, you then need to make sure that the correct Zone is selected, this will ensure the correct bonding cloud server is used for your location, reducing any potential latency. For example, customers within the UK, should use the EU_Ireland server.
Low Delay Mode
If LRT™ has been enabled, a Low Delay Mode is available which reduces the delay to the cloud bonding service. This is particularly suitable for content that is time sensitive, such as motor racing. However, multiple bonding connections should be used with this setting to ensure that the video packets get correctly delivered to the cloud. Please refer to the Solo Knowledgebase for more information on delay times.

Note: The total delay is dependent on the incorporated streaming service delay, consult the streaming service literature for information.
Streaming Destination
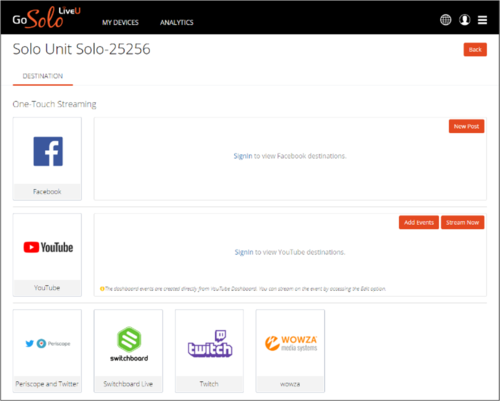
Once you have registered the LiveU Solo HDMI unit, it is then necessary for you to set up a streaming destination for live video. With the Solo Web Portal open click on Select New Destination from within the Destination tile.
The next screen displayed is split into two sections:
- One-Touch Streaming
- Streaming Destinations
For help on specific destinations, please refer to the Solo Knowledgebase. When you have all the information in place, select Save Destination.
One-Touch StreamingLiveU has integration using APIs with the most common live-streaming platforms within the portal. The APIs make it seem like you are going live and setting up the stream in the same way as the streaming platform. While each one-touch destination may behave somewhat uniquely, each one is similar in that there is some integration between that destination and the LiveU Solo Web Portal. In many cases, you need only log into the destination in question (for example Youtube) through the LiveU Solo Web Portal and then follow the guided steps to create a new live video post. The stream key is copied automatically, you don't need to log in to it at the YouTube end. everything can be done from within the LiveU Solo Web Portal. In other cases, you may need to navigate to the destination’s web user interface and find a token or key you paste into LiveU Solo to link your Solo account to the destination site. |
 |
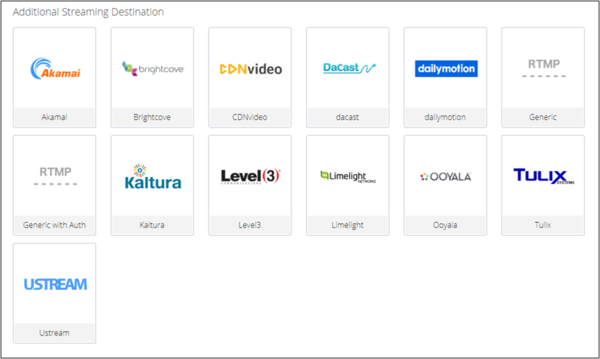
Streaming DestinationsOther destinations require a few additional steps to configure - copying and pasting in information such as the ingress URL and the stream key (sometimes called stream name). For each of these types, find this information on the destination service web page, and copy it to the LiveU Solo Web Portal.
|
 |
Connection
The connection between VBOX Video HD2 HDMI and LiveU Solo HDMI is simply achieved using the supplied HDMI cable (C-HDMI1) in to the respective HDMI ports.
Once both units are powered, LiveU Solo HDMI is connected to the internet and video is being received from VBOX Video HD2 HDMI, a preview will be displayed on the LCD display screen. The Solo Web Portal Status tile will also display the video input type, which in the case of VBOX Video HD2 HDMI is 1080p30.
Stream Video
Once VBOX Video HD2 HDMI and LiveU Solo HDMI are correctly configured and connected, you are now ready to go live!
To start streaming, either press the GO LIVE button  within the LiveU Solo Web Portal or briefly press the Power button on the front of the unit.
It is recommended that you always Go Live from the LiveU Solo Web Portal! Some services need supplemental services started, such as transcode engines or rendering engines. In these cases, the Solo Web Portal manages those supplemental services for you, but can only do so when you start the stream from the Go Live button inside the portal.
Once streaming to the selected Streaming Destination has been started, the Solo Web Portal will notify you that the unit is Streaming next to the product name, along with stating Now LIVE below the image of the unit. The Status tile will also visually represent the total current bandwidth of the streamed video and a bandwidth breakdown of the individual connection methods.
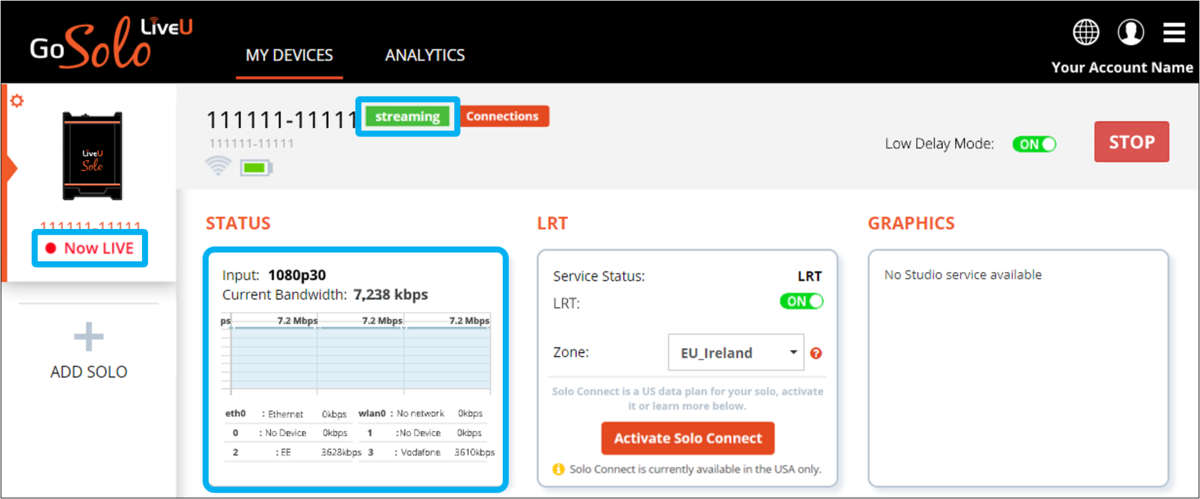
The live streaming status will also be displayed on the LCD display screen, along with total current bandwidth information.
To stop the live stream, either press the STOP button  within the LiveU Solo Web Portal or briefly press the Power button on the front of the unit.
To turn LiveU Solo HDMI off, press and hold the Power button on the front of the unit for 5 seconds.