09 - VBOX Video General Settings - Windows

The general area includes settings for logging conditions, filenames, video quality, audio behaviour, serial and Bluetooth settings. Any options defined here will be saved into the overall scene configuration.
This area can be accessed by selecting the ‘Settings’ button in the top left menu bar.
.png?revision=1)
To return to the scene designer, either use the ‘Settings’ button again, or press the ‘X’ in the top right corner of the general settings area.
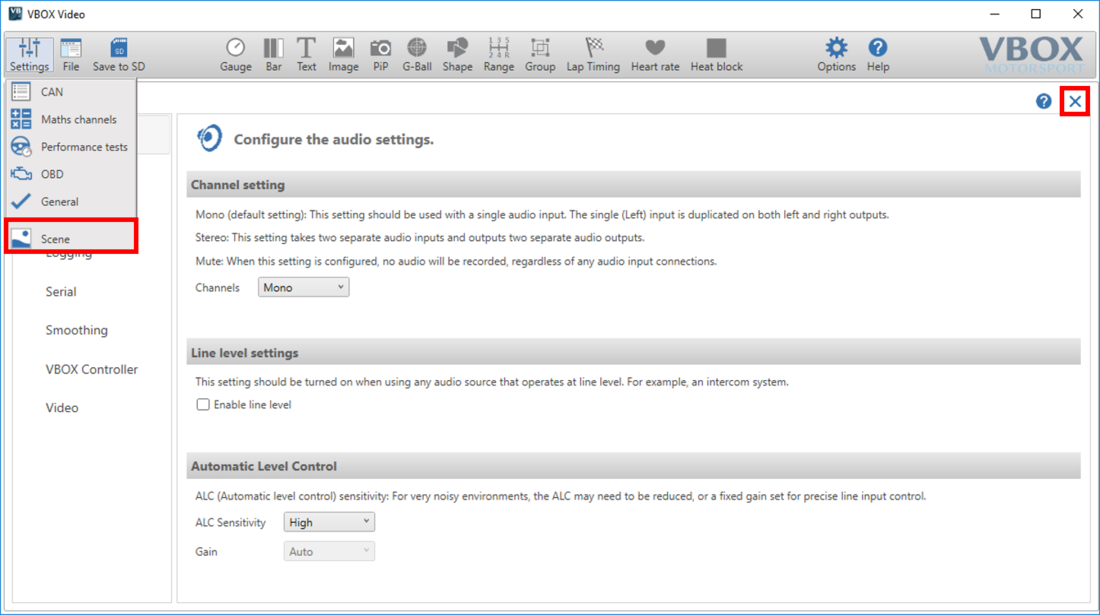
Audio
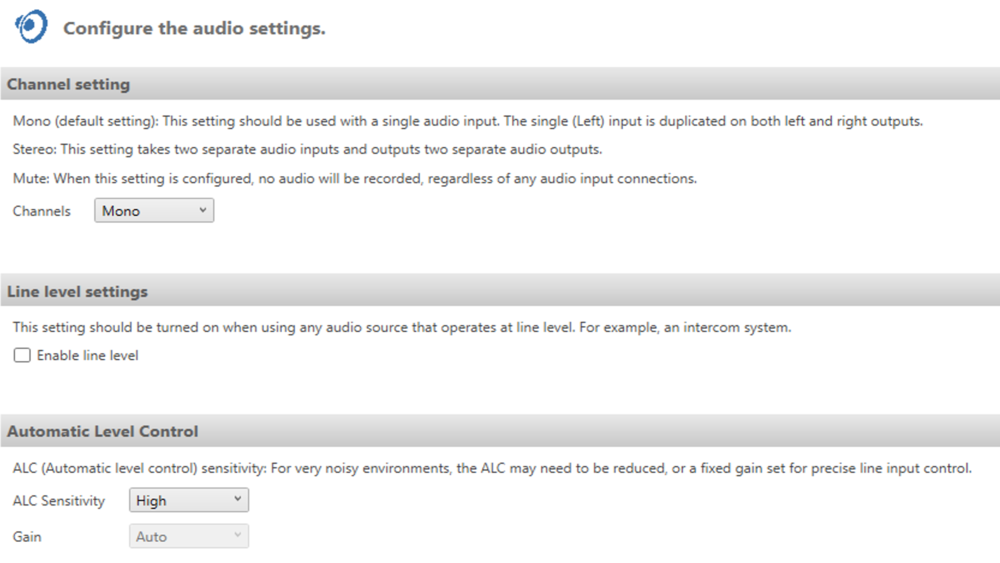
Channel setting
.jpg?revision=1)
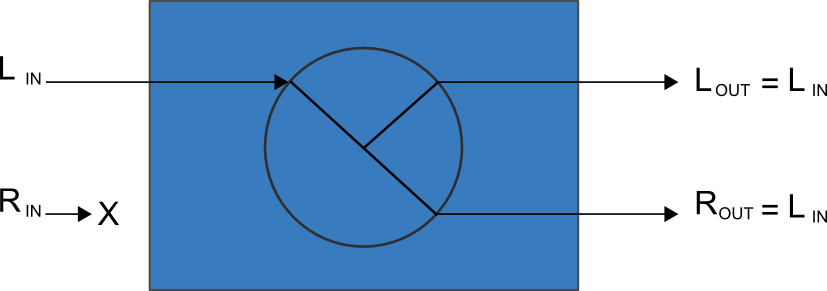
Mono (default setting)
This setting should be used with a single audio input. The single (Left) input is duplicated on both left and right outputs as shown below.
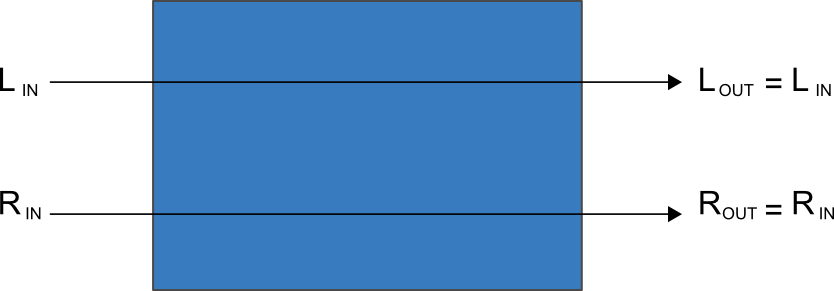
Stereo
This setting takes two separate audio inputs and outputs two separate audio outputs as shown in the image below.
Mute
When this setting is configured, no audio will be recorded, regardless of any audio input connections.
Line level settings
.png?revision=1)
This setting should be turned on when using any audio source that operates at line level. For example, an intercom system.
Automatic Level Control
The options for ALC are shown below - High is the default setting.
.png?revision=1)
For very noisy environments, the ALC may need to be reduced, or a fixed gain set for precise line input control.
Gain is applied to output channels individually, so when using multiple audio inputs on a stereo setting, depending on the input placement, different gain values can be set on each input.
Note: When using the stereo setting with two inputs, the ALC can be adjusted individually on each channel.
Bluetooth
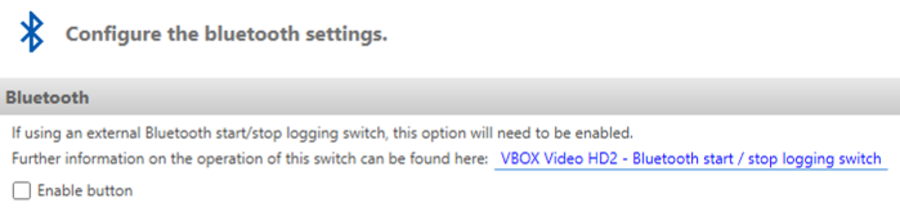
If using an external Bluetooth start/stop logging switch, this option will need to be enabled before connecting.
Enable button
This enables the Racelogic Bluetooth start/stop logging switch (RLACS224) to be used to initiate and stop a recording once paired with the HD2. Further information on the operation of this switch can be found here.
HDMI Output
This menu enables the VBOX Video HD2 HDMI variant to stream real time video and audio from the HD2 to an HDMI compatible monitor, recorder or streaming device.
Note: HDMI output is only available on VBOX Video HD2 units that are version 6 or later.

The dropdown menu at the bottom of the screen allows you to choose the video feed output for the connection:
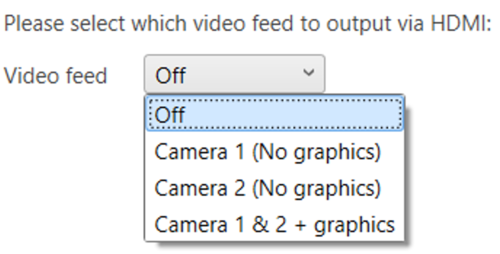
Camera 1 (No graphics)
Output Camera 1 video feed without graphics.
Note: This option is only supported by HD2 cameras with the blue top sticker (RLACS222).

Camera 2 (No graphics)
Output Camera 2 video feed without graphics.
Note: This option is only supported by HD2 cameras with the blue top sticker (RLACS222).

Camera 1 and 2 + graphics
Output Camera 1 and 2 video feed with graphics.
Enable/disable the audio output by ticking/unticking the Enable audio box. This option will be enabled by default.

IMPORTANT
HDMI output is only available when frame rate is selected as 30 fps within the Video Settings.
Logging
When the VBOX Video HD2 is logging data, the REC LED will illuminate solid Blue, changing to flashing Blue if a file is being closed.
IMPORTANT! Never remove the logging media (SD Card or USB Stick) when the REC LED is on. Wait until all files have been closed and the LED is fully OFF before removing the card. Removing media while the unit is logging will risk data loss!

Video Pre-buffer
.png?revision=1)
Video data will be captured for this number of seconds before logging is started.
Note: The maximum pre-buffer delay that can be configured is 30 seconds.
Logging source
.png?revision=1)
This setting defines which type of media (SD card or USB stick) the HD2 will use first if both are connected.
File name of video and data files
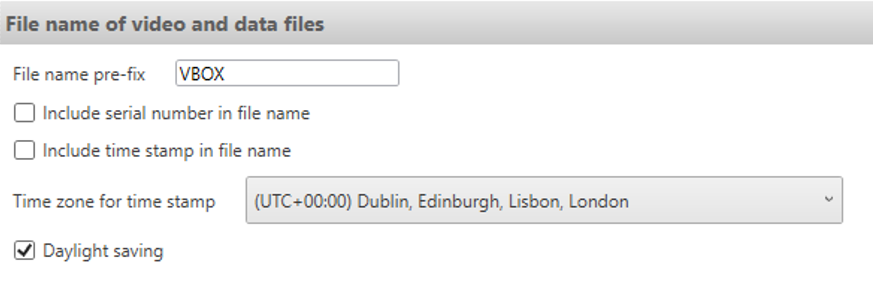
The default filename for videos and ‘.vbo’ files is ‘VBOX’. This will create a video and data file with synchronised names. For example, VBOX0001.mp4 and VBOX0001.vbo. The prefix can be changed in the ‘filename settings’ area, shown below.

There is an option to include the HD2 serial number, or a UTC time stamp in the logged file name.
If the time stamp option is ticked, the format of this time stamp can be selected in the drop down boxes that appear.
The time zone selected will affect the file creation time and also the GPS parameter for local time.
Logging mode
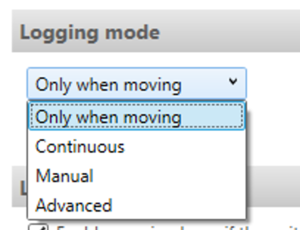
Only when moving (default mode)
This mode will allow the VBOX Video HD2 to automatically start and stop logging based on speed values.
Irrespective of the logging mode set within the scene, pressing the 'REC' button on the front of the unit will override any automatic logging functions. The unit will then record until the card is full, the power is removed, or until the user presses the 'REC' button once more.
Using the 'REC' button on the front of the unit to start or stop a recording puts the unit into a 'partially manual' mode to prevent potential loss of video. This means that once the recording has been manually completed, if the car has been stationary for over 30 seconds, the unit reverts back to ‘Only when moving (default mode)’ logging and will start to record automatically when the vehicle moves again. The unit will also revert back to default if the SD card is changed or if power is removed.
There is a ‘disable manual override’ option (shown above). When this is enabled, the user will not be able to start or stop logging via the front panel.
Continuous
To change the unit into continuous logging mode, edit the drop down box.
When in continuous mode, the VBOX Video HD2 will start logging as soon as there is power and media present. The unit will not stop recording unless the front panel button is pressed, then the unit will not start recording again until either the media is removed and re-inserted, the front panel button is pushed, or the system is turned off and back on.
Manual
To change the unit into manual logging mode, edit the drop down box.
When in manual mode, the VBOX Video HD2 will never automatically start and stop logging. Logging is controlled using the front panel button.
Note: Always ensure that the REC button is pushed to close a file and wait for the REC LED to fully turn off before removing any media.
Advanced
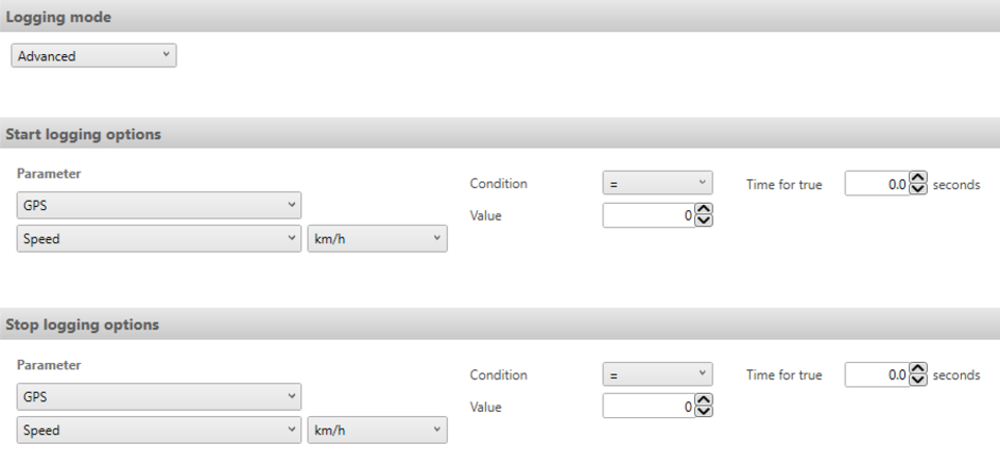
Logging can also be controlled when a GPS, CAN or Maths channel source meets certain conditions. For example, the HD2 can be instructed to only start logging when wheel speed is greater than 15 km/h and stop logging when wheel speed is less than 15 km/h.
'Time for true' allows the user to define a time delay in seconds, after the start or stop logging criteria has been met.
To use a CAN or Maths channel, it must first be configured within the CAN or Maths channels sections. You will then be able to select this channel in the start and stop logging options parameters and the conditions for starting and stopping the logging can be defined.
Logging options
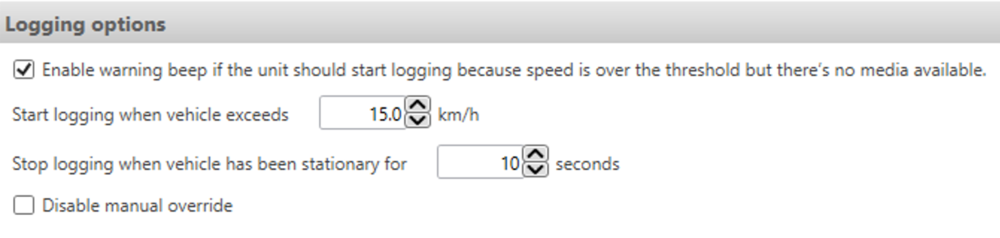
Start logging when vehicle exceeds – This value is the trigger logging speed.
Note: Only available when 'Only when moving' has been selected.
Stop logging when vehicle has been stationary for – Once under the minimum speed value for this number of seconds, HD2 will stop logging.
Note: Only available when 'Only when moving' has been selected.
The default settings are shown above. HD2 will start logging at 15 km/h – video will show 10 seconds of footage prior to this, allowing a standing start to be fully captured. The unit will stop logging when the vehicle speed has been under 15 km/h for 10 seconds.
Any of these values can be adjusted to suit different requirements.
Serial
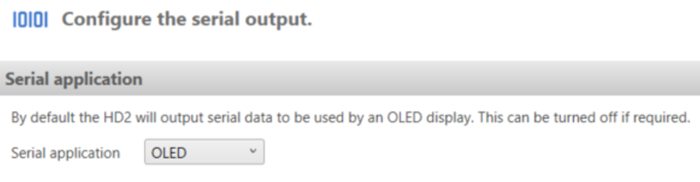
By default the HD2 will output serial data to be used by an OLED display. This can be turned off if required.
Smoothing
.png?revision=1)
Here you can set levels of smoothing to selected channels to help reduce noise. These settings apply only to the graphical overlay operation and have no effect on the captured data.
VBOX Controller

This menu gives you the option to choose whether the VBOX Video HD2 uses its internal GPS engine (default) or accepts a GPS input over CAN, bypassing the internal GPS engine.
FIA CAN
The FIA CAN option is particularly useful in situations where competitors are limited to using only one GPS antenna per car. Enabling will change the CAN baud rate to 1 Mbit/s and disable Serial Output, meaning that the VBOX Video HD2 cannot be used in conjunction with an OLED display.
Note: The FIA CAN setting cannot be enabled if you have configured CAN Inputs.
Enable VBOX CAN auto detect
The Enable VBOX CAN auto detect option is used to automatically detect external VBOX CAN Streams that VBOX Video HD2 can use for speed and position measurements.
This option is enabled by default. You should disable this option if you are logging vehicle CAN Bus information that is featuring CAN frames that match the VBOX CAN stream (this can result in conflicts that can affect the speed and the position of the HD2 unit).
Video Settings
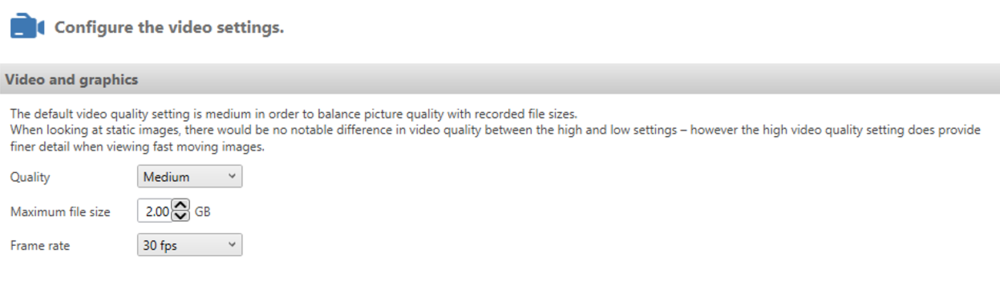
The default video quality setting is medium in order to balance picture quality with recorded file sizes. When looking at static images, there would be no notable difference in video quality between the high and low settings, however, the high setting does provide finer detail when you are viewing fast-moving images.
Quality
| Quality | Bit Rate | File Size |
|---|---|---|
| Low | 8 Mbit/s | ~ 3.5 GB/hr |
| Medium (default) | 12 Mbit/s | ~ 5.25 GB/hr |
| High | 16 Mbit/s | ~ 7 GB/hr |
Note: Files will record at a slightly higher bit rate in low-light conditions.
Maximum file size
Select a maximum file size per recording. This is set at 2 GB by default and is configurable from 0.5-4.0 GB. If a recording is greater than the selected maximum file size, it will be split into a separate file.
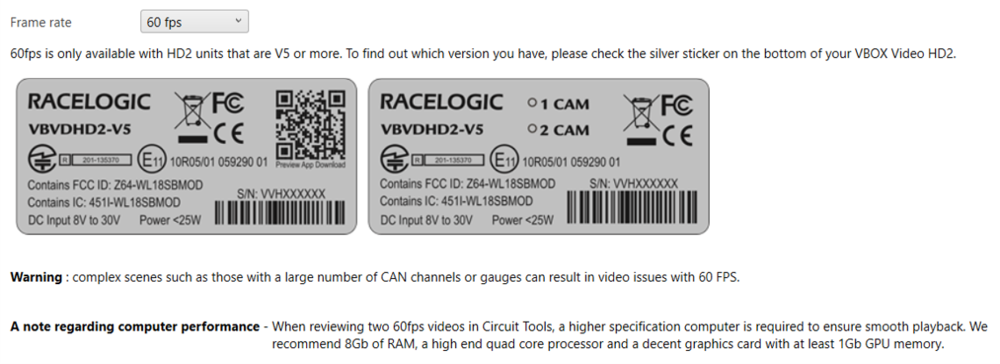
Frame rate
VBOX Video HD2 units can record at either 30 fps (default, frames/second) or 60 fps (frames/second).
|
IMPORTANT 60 fps is only available with HD2 units that are V5 or V6 with firmware version 1.3 and earlier and with RLACS222 cameras only. 60 fps will not be available if you are using HDMI Output. |
Notes:
- Complex scenes, such as those with a large number of CAN channels or gauges can result in video issues when using the 60 fps frame rate. If this happens, you should change the frame rate setting to 30 fps.
- If you wish to review two 60 fps videos in Circuit Tools, you will need a higher-specification computer to ensure smooth playback. We recommend 8 GB of RAM, a high-end quad-core processor and a decent graphics card with at least 1 GB of GPU memory.