04 - BTMS Display
This App is to be used in the Brake Temperature Monitoring System (BTMS) with the Racelogic Brake Temperature Sensor kit (RLACS272-BRK). The app has a real-time display of the temperature of each brake disc. You will also see your current speed and Vmax speed. It will provide you with an immediate insight into what is happening to your brakes on the track. This is invaluable information for chassis tuning and driver development.
On the responsive colour display, you will see a visual representation with 64 individual heat maps, as well as live and maximum temperature values.
You can download the app here and find the instructions for installing it here.
Main Screen
.png?revision=1&size=bestfit&width=869&height=640)
Sensor Display
The sensor display has been split into four areas representing each brake disc; front left brake disc (top left), front right brake disc (top right), rear left brake disc (bottom left) and rear right brake disc (bottom right). For each brake disc, available information includes a visual concentric heat map temperature representation, live temperature and maximum temperature achieved.
.png?revision=1&size=bestfit&width=783&height=299)
Heat Maps
Each sensor measures 16 temperature spots across a brake disc surface. These 16 temperature channels are visually represented by concentric heat maps on the main screen. The colours of the heat maps will blend between Blue, Green, Yellow and Red, with Blue being the minimum temperature and Red being the maximum temperature.
Max Temperature
The BTMS app will store the highest measured temperature from each sensor and display these on the main screen. Until the app receives a temperature reading you will see "--" in its place.
Note: The max temperature values appear greyed out to prevent driver confusion.
The app will save the max temperature values after a power cycle, but you can reset them by tapping the Reset button on the main screen footer.
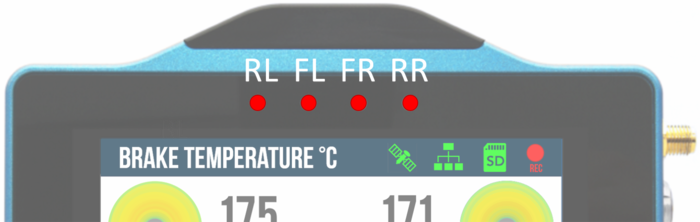
LEDs
The 4 LEDs at the top of the unit provide visual feedback depending on what process the app is performing:
- Overheat Temperature: If the sensors register a value higher than the set Overheat Temperature, the LEDs representing the RL, FL, RR and FR brake discs, will illuminate Red and stay on until the temperature drops below the overheat temperature for 1 second.
- Screenshot: If the app successfully saved a screenshot, the LEDs illuminate yellow in sequence from left to right to illustrate the progress of writing the data to the SD card.
Sats Status
| The Satellite Icon illustrates whether the unit has a valid satellite lock. | |
| When a lock is acquired, this icon will be solid green. |  |
| If there is no satellite lock, the icon will flash red. |  |
CAN Data
The CAN Data Icon displays the status of the CAN connection between the tyre temperature sensors and the tyre temperature display.
When the app detects CAN data, the CAN Data Icon will be green  and you will see the temperature values and the heat maps as normal. If it cannot detect CAN data, the icon will be red
  , the heat maps will be greyed out and the temperature values will display as "--".
.png?revision=1&size=bestfit&width=727&height=515)
SD Status
The SD Card Icon displays the status of the recording media. When you have inserted an SD card and it has free space, the icon will be green  . If the app cannot detect an SD card or the media is full, the icon will be red
  .
.
When the icon is green, you can tap on it to manually start or stop the data logging and override the Configured Logging Strategy.
Logging Status
| The red Record Icon will show when the unit is logging data to the SD card. |  |
| If the icon appears white after you have initiated logging, it means that the unit is primed for logging and is in the process of synchronising the internal real-time clock (RTC) to GPS time. The logging will not start until this synchronisation process is complete. |  |
| IMPORTANT Do not remove the SD card when the Record Icon is red. You may lose data or damage the SD card if you remove it while the unit is logging. |
|
Settings
You can find the Brake Temperature Monitoring System App Settings menu by tapping the Settings button  in the bottom left corner.
There are 2 main App Settings screens available which you can toggle between by tapping the Forward  and Back
  arrows at the bottom right of the screen or by swiping left or right. Other settings menus, such as General Settings and Diagnostics Settings are also available and are covered in more detail further down.
|
|
 Sensor Settings Screen |
To save the settings and return to the main screen, tap the Exit button  in the bottom left corner. All settings will be saved after a power cycle.
Temperature Settings
This menu contains options for minimum temperature, maximum temperature and overheat temperature.
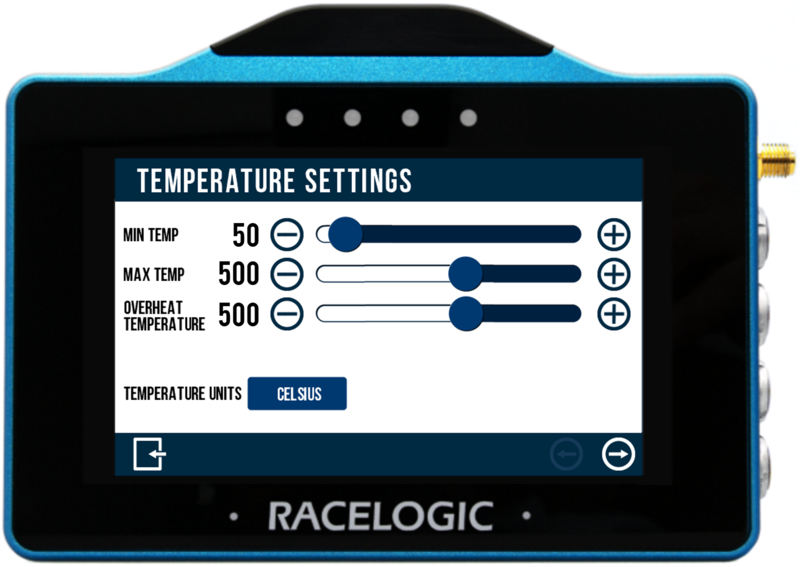
You can change the values by pressing and sliding the Blue Circle  left or right. You can use the Plus
  and Minus
  buttons for a more accurate temperature value selection.
Min Temp
This setting allows you to define the minimum temperature value for the heat maps. For example, if you define a minimum temperature value of 50°C, any temperature reading of <50°C will appear Blue.
Max Temp
This setting allows you to define the maximum temperature value for the heat maps. For example, if you define a maximum temperature value of 500°C, any temperature >500°C will appear Red.
Overheat Temperature
With the Overheat Temperature slider, you can define the temperature value that activates the overheat LEDs. When activated, they will light Red and stay on until the temperature drops below the overheat temperature for 1 second. Each LED represents a brake disc, as defined below.
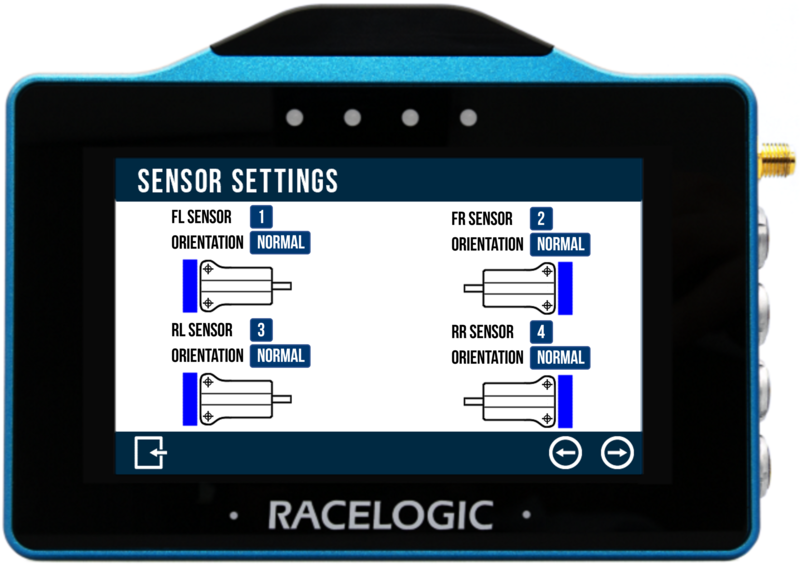
Sensor Settings
The SENSOR SETTINGS menu contains sensor number and orientation options.
You can change the settings by pressing the corresponding button next to an option. The button will display the currently selected option.
Sensor Number
You can manually define which set of heat maps to assign to a sensor. This setting is available so that you do not need to swap around already installed sensors on the vehicle if you accidentally installed some in differing corners from the default settings.
To change which sensor is assigned to which set of heat maps (FL, FR, RL, RR) simply tap the small number button to toggle between sensor 1, 2, 3, and 4.
Orientation
You can mount the temperature sensors on the struts or the hub facing towards the brake disk. You can set the orientation as ‘Normal’ or ‘Flipped’ depending on which way the sensors are positioned
You must configure this setting correctly to ensure that the heat maps are in the correct order on the main screen.
To change the orientation setting, simply tap the orientation button. The sensor image on the screen will change accordingly and the button will display the current orientation setting.
General Settings
The General Settings menu contains units, logging mode and brightness options.
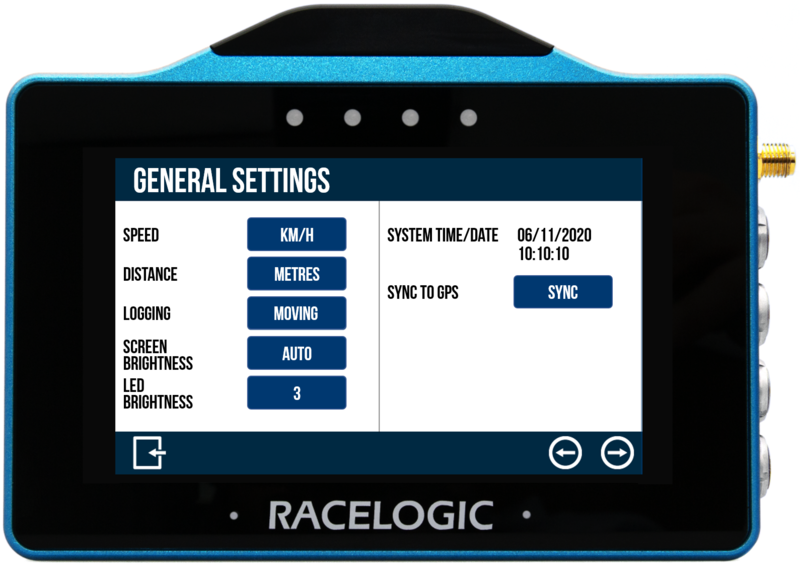
- Speed: The speed setting lets you change the speed units between km/h (default) and mph. Changing the speed units will affect all visual speed parameters on all screens. The unit labels will change and all speed values will automatically recalculate. Tap the button to change the units.
- Distance: The distance setting lets you change the distance units between metres (default) and feet. Changing the distance units will affect all visual distance parameters on all screens. The unit labels will change and all the distance values and results will be recalculated accordingly. Tap the button to change the units.
- Logging: The logging setting lets you toggle between 2 logging modes. Tap the button to change the mode:
- Continuous: The VBOX Touch will start logging when an SD card has been inserted and initialised.
- Moving (default): The VBOX Touch will start logging as soon as an SD card is inserted, and the vehicle is moving at a speed over 0.5 km/h or more. The logging will pause when the speed is less than 0.5 km/h for 3 seconds and will recommence when the speed is greater than 0.5 km/h again, appending the same file.
- Notes:
- By pressing the SD Card Icon, you can start and stop the recording manually, regardless of the set logging mode.
- A new data file is created every time the VBOX Touch starts/stops logging, data is not appended to an existing data file.
- Screen Brightness: This setting lets you adjust the screen brightness between 5 levels. 1 is the dimmest and 5 is the brightest setting. You can also choose 'Auto', which uses the internal ambient light sensor to automatically adjust the screen brightness. In dark conditions, the screen brightness will dim, and in light conditions, the screen will brighten. Tap the button to cycle through the available options.
- LED Brightness: You can manually adjust the LED brightness between 5 levels. 1 is the dimmest and 5 is the brightest (this is extremely bright!). You can also turn off the LEDs completely. Tap the button to cycle through the available options. The LEDs will preview the brightness level.
- System Time/ Date: This displays the current time and date being used by the system.
- Sync to GPS: This feature will synchronise the internal real-time clock (RTC) to GPS time as long as the unit has obtained GPS time, is not moving and is not logging. No GPS time is indicated by a red satellite icon. When you tap this icon, you will see a synchronisation progress screen.
Diagnostics
The Diagnostics menu is the final screen in the Settings menu, it displays basic GPS receiver and VBOX information.
The satellite icon at the top of the screen is the quickest way to determine if the unit has a valid satellite lock. When it has a satellite lock, the satellite icon will be solid green. When it does not have a satellite lock, the icon will flash red.
Logging
Depending on the Configured Logging Strategy, the BTMS App will log a standard .vbo data file containing all standard GPS parameters plus all 16 CAN parameters from each sensor, 64 in total.