07 - VBOX Sport Performance Test iOS Application
Introduction
|
VBOX Performance Test is a companion app for VBOX Sport. When connected to a VBOX Sport, the Performance Test app can use its GNSS data stream transmitted via Bluetooth. By using VBOX Sport to collect the GNSS data, you get a level of accuracy that is currently unheard of with iPhone and iPad apps. The Performance Test app uses this data to provide you with acceleration, deceleration and VMAX information for your vehicle, data that was previously only available to professional Racelogic VBOX users. You can quickly and accurately measure your 0 to 60 acceleration time, turn your test track into a dragstrip and measure your 1/4 mile time and trap speed. |
|
|
The different modes allow you to measure your braking performance and zero-to-zero times, using the same VBOX technology that is used by all the major motor manufacturers and car magazines around the world. The app's full functionality is available when you are connected to VBOX Sport via Bluetooth with an iOS device running iOS 9.0 or later. If you are not connected to a VBOX Sport, the app will launch in demo mode to allow you to sample the features. The VBOX Performance Test app is available to download for free at the Apple store. Find the app by searching for VBOX Sport, Racelogic or VBOX PT. |
|
Menu Bar
The bar at the bottom of the screen has 4 menu areas: Test, Results, Setup and Config. This menu bar is always available.
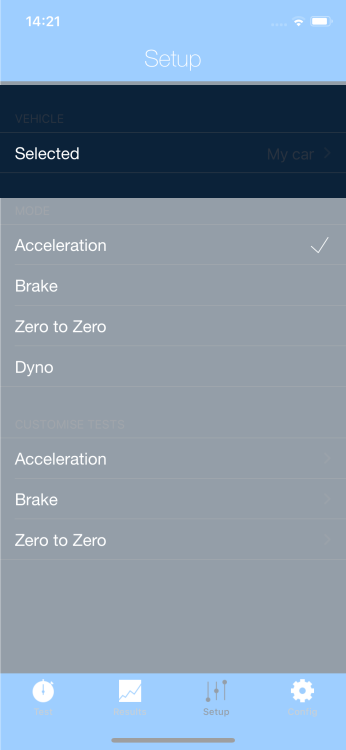
Setup Menu
| The Setup menu is where you can add vehicle details, select which test mode you want to use and customise individual tests. |  |
Vehicle
| You can select a vehicle to use for the test in the Vehicle menu. You can use a vehicle that is already there, or you can add a new vehicle. |
Add Vehicle
| 1. Press on the vehicle that is currently selected in the Setup menu. |
2. In the Vehicles menu, press the + icon to open up the New Vehicle menu. The tick mark indicates which vehicle is currently selected for use in the tests. Press on a vehicle name to change which vehicle is selected. |
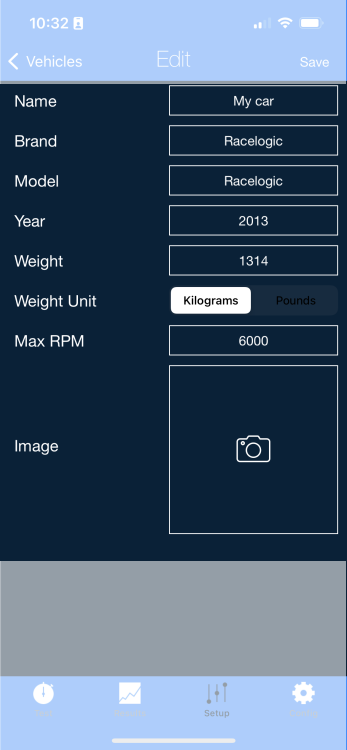
3. Input vehicle details such as brand, model, weight, image, etc. Note: If you upload a vehicle image, it will be included in all shared reports. |
 |
|
 |
| 4. Press Save when you are finished. | 5. The vehicle will then be added to the Custom area in the Vehicles menu. | 6. When you have finished in the Vehicles menu, press the Setup button at the top left of the screen to return to the Setup menu. |
|
|
|
|


Edit Vehicle
| You can also edit existing vehicles |
| 1. Press on the vehicle that is currently selected in the Setup menu. | This will open the Vehicles menu. | 2. Press the Information icon on the vehicle you want to edit. This will open the Edit vehicle settings. |
|
|
|
|
| 3. Make the edits you need to make. | 4. Press Save when you are finished editing the vehicle details. | 5. When you have finished in the Vehicles menu, press the Setup button at the top left of the screen to return to the Setup menu. |
|
|
|
|

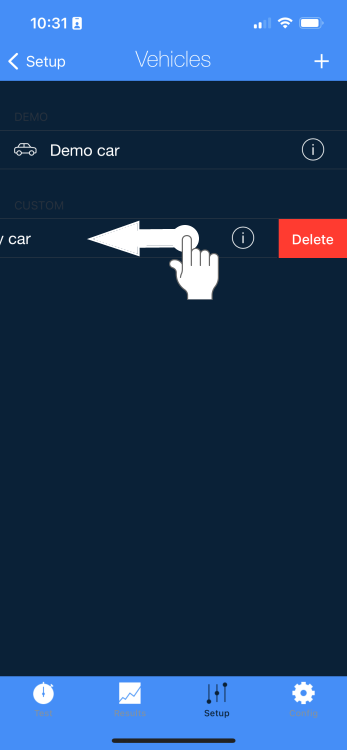
Delete Vehicle
| You can remove a vehicle from the app: | |
| 1. Open the Vehicle menu by pressing on the vehicle that is currently selected in the Setup menu. | 2. Swipe left over the vehicle you wish to remove and press the red Delete button that appears. |
|
|
|
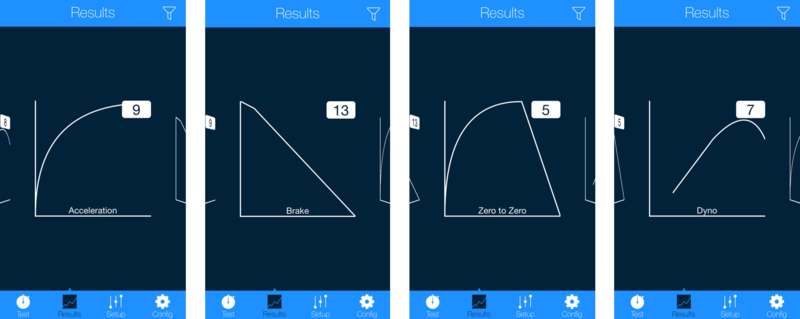
Mode
|
Select between Acceleration, Brake, Zero to Zero and Dyno tests. Press the desired test to select it (a tick mark will show the selected test), Selecting a test will change the Test Display. Note: You can only run one test mode at any time. |
|

Customise Tests
|
This section is where you can define test ranges. You can only set one range for zero-to-zero tests, but there is no limit on the number of acceleration or brake tests. Define a range by pressing on the test you want to customise. Note: Distance acceleration tests will automatically calculate Mile, ½, ¼ and 1/8th Mile results. |
|

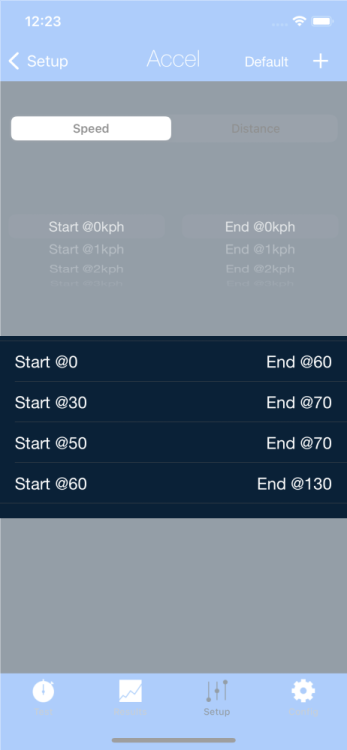
Adding an Acceleration Range
Start Speed
|
The Acceleration Test is set to start from 0 by default. You can, however, change the start speed of the test by scrolling down the Start Speed list. Altering this speed will also allow you to perform a speed-to-distance test (for example 5 mph to 300 ft). If the start speed is altered, the distance range results will include the set start speed in brackets next to the distance header. You can also add either custom Speed or Distance test ranges. |
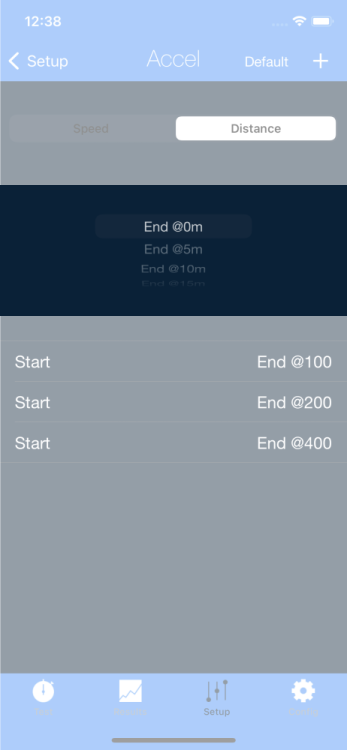
Speed Range
|
By default, the Acceleration Test has five set speed ranges:
You can, however, add custom speed ranges for the acceleration test: |
|
1. Make sure that the Speed button is selected. |
2. Select your required start and end speeds. |
3. Press the + icon in the top right-hand corner to confirm your selection. | 4. The new range will be added to the list of available test ranges. |
|
|
|
 |
 |
| Note: If you intend to use One Foot Rollout, The lowest acceleration speed test range you can use is 0 – 10 mph. If you try to use a value that is lower than 10 mph, the test will fail to complete along with all subsequent tests set. | |||


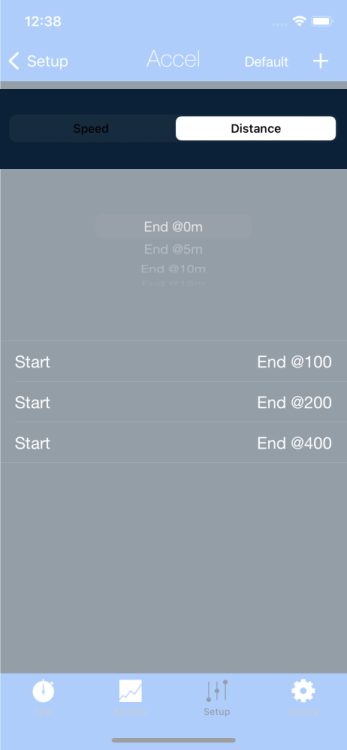
Distance Range
|
By default, the Acceleration Test has three distance test ranges:
You can, however, add custom distance ranges for the acceleration test: |
|
1. Make sure that the Distance button is selected. |
2. Select your required end distance. |
3. Press the + icon in the top right-hand corner to confirm your selection. | 4. The new range will be added to the list of available test ranges. |
 |
 |
 |
 |
Adding a Brake Test Range
|
By default, the Brake Test has three test ranges:
You can, however, add custom brake ranges for the brake test: |
|
1. Select your required start and end brake speeds. |
2. Press the + icon in the top right-hand corner to confirm your selection. |
3. The new range will be added to the list of available test ranges. |
 |
 |
 |
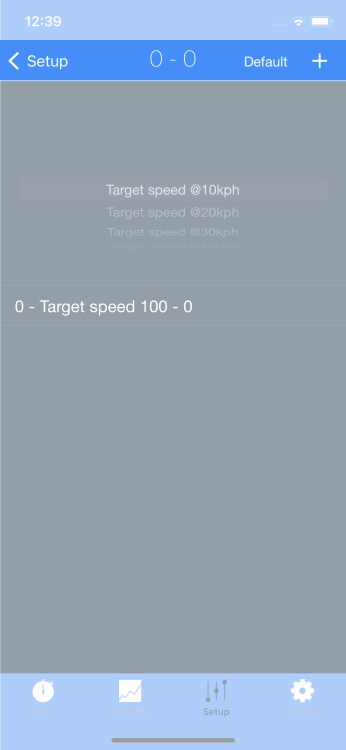
Changing the Zero to Zero Test Range
|
The Zero to Zero Test is set as 0 – 100 – 0 by default. You can, however, change the zero-to-zero range: |
|
1. Select the required target speed. |
2. Press the + icon in the top right-hand corner to confirm your selection. |
3. The new 0-to-0 range will be displayed here. |
 |
 |
 |
Remove a Test Range
| To remove a test range, swipe left over the range in question and press the red Delete button that appears. |  |
Restore Test Ranges
|
You can restore the test ranges to the default range values by pressing Default at the top of the screen and confirming the prompt that appears. |
 |
Config Menu
| This screen is always accessible via the Config button in the bottom menu panel. |  |
| You can use it to change units, apply smoothing, apply one foot (1 ft) rollout, activate demo mode, control beeping, control button sounds, add auto reset, add a performance delta, and show recent results. The application version number is listed at the top of this screen in brackets. |
|
| Go to VBOX Sport on the Motorsport website. | 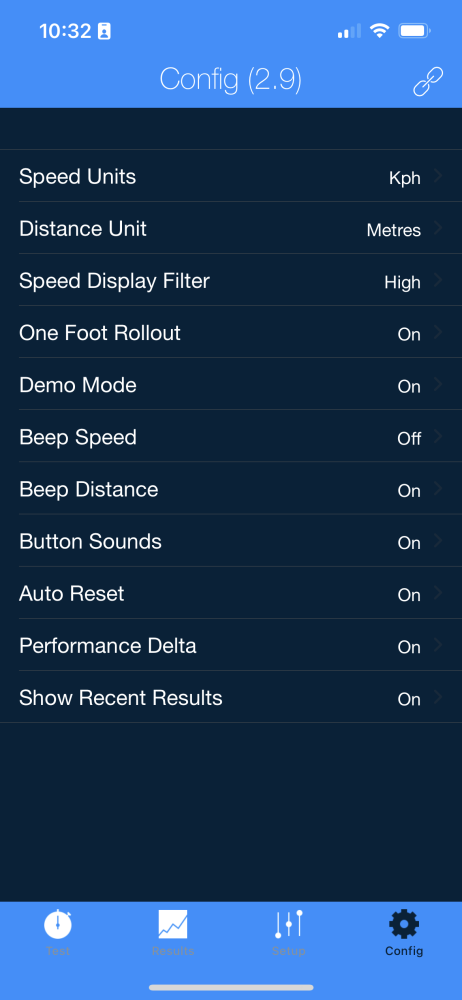 |
|
| Speed units | Choose to display the speed units in mph or km/h. | |
| Distance unit | Choose to display the distance values in metres or feet. | |
| Speed Display Filter | Applies smoothing to the live speed readout. This does not affect results. | |
| One Foot Rollout | One foot rollout does not take in to account the time taken to travel the first 1 ft within any speed or distance tests. | |
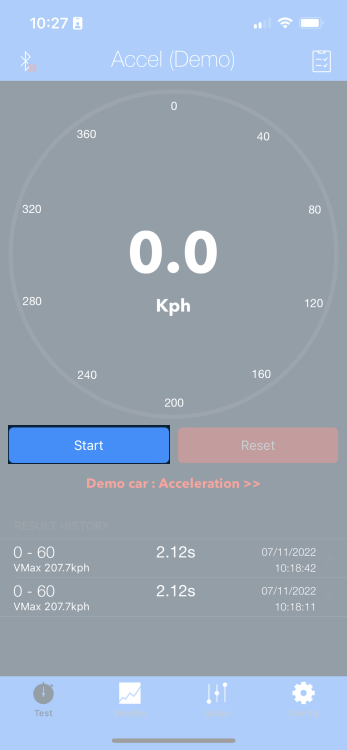
| Demo Mode | Activate demo mode to show test run examples. | |
| Beep Speed | You can set the PT app to beep at a set speed value by setting it to ON and using the custom text box to set the speed. | |
| Beep Distance | You can set the PT app to beep at a set distance value by setting it to ON and using the custom text box to enter the distance. | |
| Button Sounds | Enable or disable button sounds. | |
| Auto Reset | Auto reset removes the need to manually restart tests between runs. | |
| Performance Delta | Adds a Delta-V green or red background to accel tests to indicate whether the run is quicker or slower than the last. | |
| Show Recent Results | Creates a recent results section containing the last 3 runs at the bottom of the Test menu. |
Test Menu
|
This screen shows a live speed readout and allows the user to activate a test session and capture results. The test displayed depends on what you have chosen in the Setup Menu. The Bluetooth icon at the top of the screen indicates whether the VBOX Sport is connected to the device or not. |
 |
Acceleration Test
|
By default, you must press Start to begin a test. Test ranges will populate as soon as the values are met. When the test is finished, the results will automatically be brought into view. If you have selected Show Recent Results in the Config menu, the previous 3 results will be displayed below the current results. You can press on these results to view them in more detail. After viewing the results, you must hit Reset and Start before the next test starts. |
| Start test | See results | Reset |
|
By default, you must press Start to begin a test. Test ranges will populate as soon as the values are met. |
When the test is finished, the results will automatically be brought into view. If you have selected Show Recent Results in the Config menu, the previous 3 results will be displayed below the current results. You can press on these results to view them in more detail. Note: Acceleration tests end when VBOX Sport detects deceleration. |
After viewing the results, you must hit Reset to clear the results before you can start the next test. |
 |
 |
 |
|
Note: If you have customised multiple acceleration test ranges, the test will end when deceleration is detected and will not start again until the lowest speed over all the ranges has been met. Any acceleration after the end of the test, that fails to start from the minimum speed condition, will not be populated in the results. For example, if the acceleration test was customised into the ranges listed below, the test would finish once deceleration has been detected. It would not be possible to manually start or auto restart (if Auto Reset is enabled) until the vehicle is at the lowest condition (i.e. 0 mph). If the vehicle was to accelerate through 30 – 70 mph or 80 – 120 mph before the speed dropped to 0 mph, these results will not populate.
|
Performance Delta
| If you have enabled Performance Delta in the Config menu, a green or red background will show live during the test, indicating whether the current test run is quicker or slower the previous test run. |  |
| Note: With Auto reset turned on in the configuration section, tests will automatically restart when the first start condition of the defined test(s) is met. |
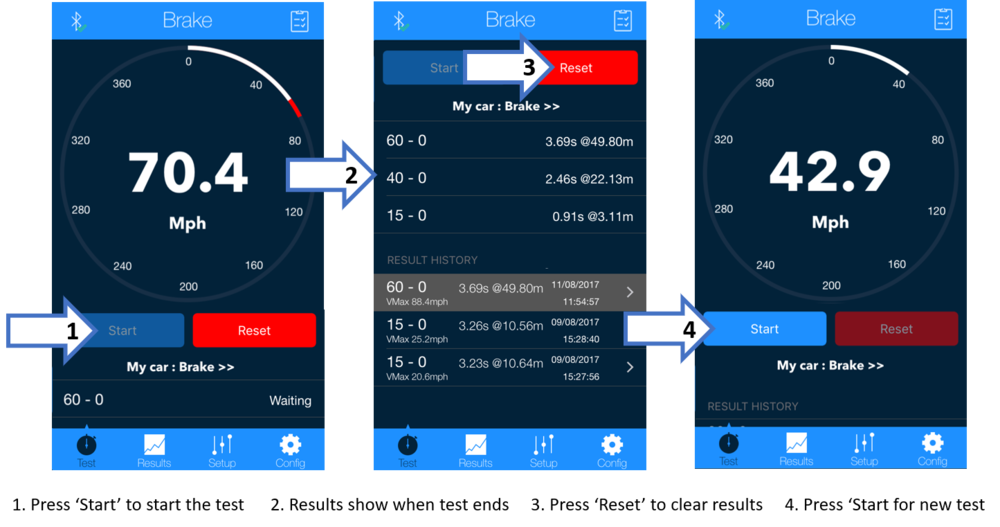
Brake Test
|
By default, you must press Start to begin a test. Test ranges will populate as soon as the values are met. When the test is finished, the results will automatically be brought into view. If you have selected Show Recent Results in the Config menu, the previous 3 results will be displayed below the current results. You can press each result to view it in more detail. After viewing the results, you must press Reset and Start before the next test can start. |
 |
| Note: With Auto Reset turned on in the configuration section, tests will automatically restart after the first start condition of the defined test(s) is met. |
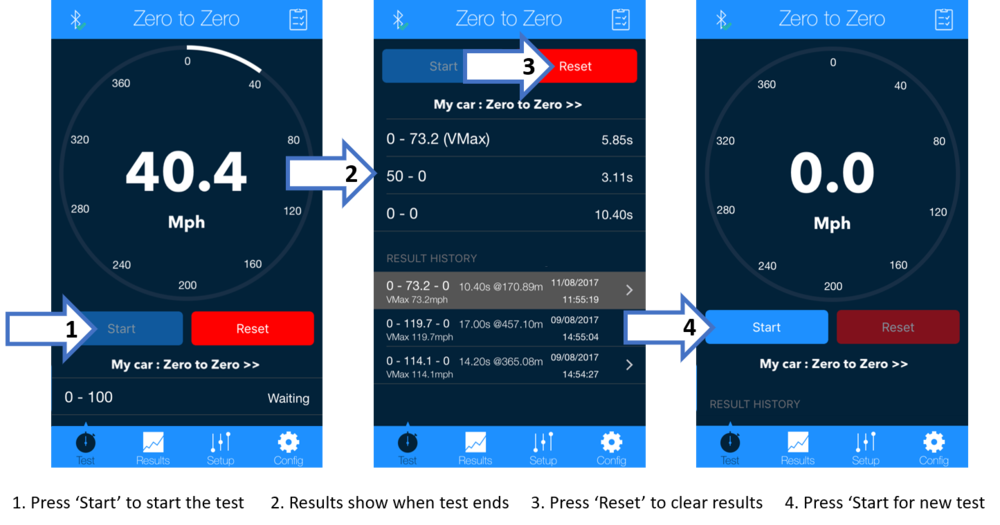
Zero to Zero Test
|
By default, you must press Start to begin a test. Test ranges will populate as soon as the values are met. When the test is finished, the results will automatically be brought into view. If you have selected Show Recent Results in the Config menu, the previous three results will be displayed below the current results. Press on the results to view them in more detail. After viewing the results, you must press Reset and Start before the next test can start. |
 |
| Note: With Auto Reset enabled in the configuration section, tests will automatically restart after the first start condition of the defined test(s) is met. |
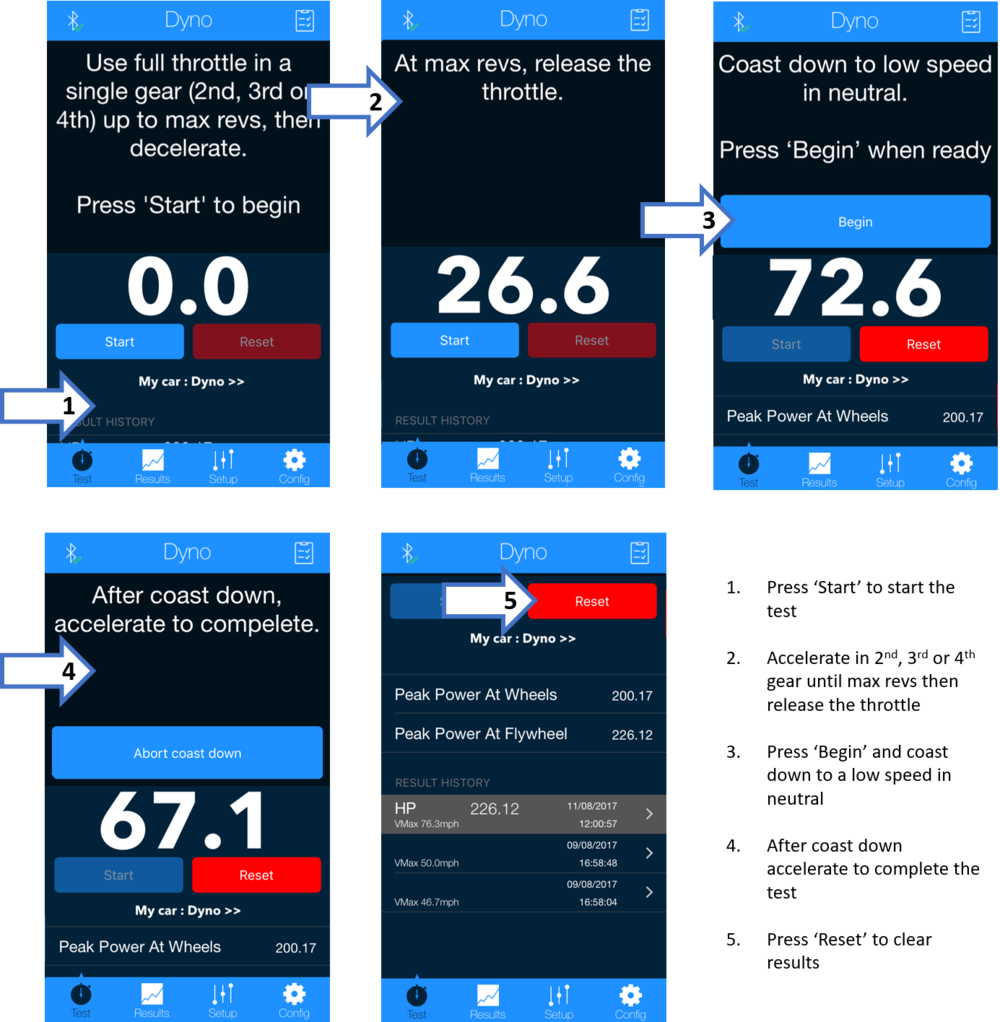
Dyno Test
|
By default, you must press Start to begin a test. When the test is finished, the results will automatically be brought into view. If you have selected Show Recent Results in the Config menu, the previous 3 results will be displayed below the current results. Press on the results to view them in more detail. After viewing the results, you must press Reset and Start before the next test can start. |
 |
| Note: With Auto Reset enabled in the configuration section, tests will automatically restart when the first start condition of the defined test(s) is met. |
Test Details
 |
|
| When you are in the live test mode, you can press the Details button for quick access to the latest test results. |
Results Menu
Viewing ResultsThe results for all completed tests are stored in the Performance Test application. You can view previous results by selecting the desired test through the results menu. |
|
 |
|
|
In each section, you can view result graphs and details of individual test runs. Note: If you have selected One Foot Rollout in the Config menu, the Speed and Distance headers will be suffixed with (ONE FOOT ROLLOUT). |
|
 |
|
|
If you select a speed, distance or acceleration result in an individual test run, you will see a list of all previous results in that parameter. You can see the date and time of the results and the best result is highlighted in green. Note: The date and time format will change depending on the settings chosen in the device. |
|
 |
|
| Note: The VMax result will be the maximum speed of the whole run, not just the speed range. | |
Sharing Results
| You can share a report of a test result to Facebook, Instagram or locally on the device by pressing the Share button at the top of the Details screen. | |
 |
|
| If you have added a vehicle image in the Vehicle Setup area, the image will be included in the report. |
Filtering and Deleting Results
| If you have many test results stored, you may wish to filter what is displayed. Press the Filter button in the top right-hand corner to select tests from any particular vehicle. | |
 |
|
| You can delete test runs by pressing the Edit button in the results list for any test mode. Select test runs and clear them by pressing the Delete button and confirming the prompt. | |
 |
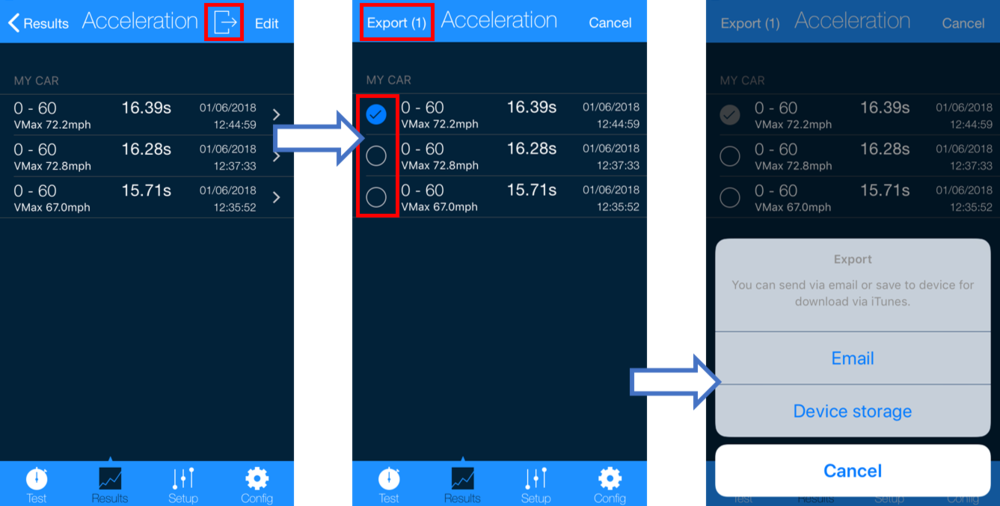
Exporting Results
| You can export selected results by pressing the Export button at the top of the screen when in the results list for any test mode. The results can be emailed or stored locally on the device as a .csv file to be downloaded later via iTunes. | |
 |
How to Download via iTunes
|
Connect your device to iTunes, click on the device and enter the Apps tab. Click on the VBOX PT App and select the .csv file with the exported results. Click on Save to and select the location on your computer that you wish to save it to. |
 |