Settings
|
The Settings Menu for the VBOX Mini Pit Lane Timer contains settings for the pit lane timer functionality itself, the display, GNSS options and the CAN options. You can also see hardware and firmware information. Navigate to the Mini Pit Lane Timer Settings with the up/down arrows and press the OK button when you see the Menu screen. |
.png?revision=1) |
Pit Lane Timer Menu

Set Entrance/Exit
A submenu in which you can define the entrance and exit points for the pit lane. The Mini Pit Lane Timer will remember these values until you override them or clear them.

Set Entrance
Push the OK button as you cross the pit entrance timing line to record the entrance point. The screen will automatically move to Set Exit.
Set Exit
Drive through the pit lane. Press the OK button as you cross the end of the timing line to record the exit point. The pit lane entrance and exit gates are now set.
Back
Press the OK button with the Back option selected to return to the main settings menu.
Pit Timing Mode
This setting changes the method of pit lane timing. There are two options of operation - both displays the same information on the pit lane timer screen when in the pit lane, but the triggers for the timing differ slightly.

Entrance to ExitThe first, and default, option is the Entrance to Exit mode. This is most commonly used for endurance races. When you select this mode, the Mini Pit Lane Timer will use the Minimum Time setting and the Pit To Exit Time setting to calculate the time you should take from the pit lane entrance to the pit lane exit, and will notify you whether your time falls within the minimum pit stop time set for the event. The Mini Pit Lane Timer will start timing as soon as you cross the pit entrance gate. It will advise you when to start driving again when you are in the pit box, and will display a speed limiter when the vehicle is moving to signal if you are driving too fast for too slow based on your settings.
|
Stationary In PitThe second mode is the Stationary In Pit mode, which is used for most classic races. When it has been set to this mode, the Mini Pit Lane Timer will use the Minimum Time setting as a timer, counting the time you are required to be stationary. When you use this mode, the Pit To Exit setting will be ignored.
|
Minimum Time
|
This is where you can enter the minimum number of seconds for the pit lane as specified in the regulations for your event. Based on the Pit Timing Mode you have chosen, this time is either the time spent from crossing the entrance of the pit to the exit of the pit (if using Entrance to Exit mode) or the time spent stationary in the pit box (if using Stationary in Pit mode). This time value can be set from 15 seconds to 600 seconds (with one decimal place). Press the OK button with the Minimum Time setting highlighted to enter the setting. Use the arrow buttons to edit the time and press the OK button to confirm your set value. |
 |
Pit to Exit Time
|
Note: This setting is only used in the pit timing mode Entrance to Exit. This time is likely to be different every time you drive it, so enter an estimate for the length of time it takes to get from your pit box to the pit exit (max 90 seconds).
|
 |
Speed Limit
|
This speed limit is the maximum speed that you are allowed to travel in the pit lane (minimum 25 km/h and maximum 200 km/h). You can enter the limit that has been set for your event by pressing the OK button with this setting highlighted and using the arrow buttons to adjust the speed limit value. The speed value can be increased or decreased in 5 km/h increments. Press the OK button to confirm the set value. Note: If this value is exceeded by 20 km/h, the Mini Pit Lane Timer will assume that you are staying out on track and will not trigger the pit lane counter. |
 |
Speed Warning
|
The speed defined here is the margin to the Speed Limit (0 to 10 km/h). The Mini Pit Lane Timer will notify you to decrease the speed when you reach the Speed Limit minus the Speed Warning. Press the OK button with this setting highlighted and use the arrow buttons to adjust the speed warning value. The speed warning is selectable in 0.5 km/h increments. Press the OK button to confirm the set value. Example: |
 |
Manage Locations
Detected Track: xxxThe Mini Pit Lane Timer will automatically remember any pit lane locations that you have set. When the unit is next at this location, and has achieved GPS lock, it will detect and load these points automatically. When you create the points, the Mini Pit Lane Timer will store them in its memory as Track_000, Track_001, Track_002, and so on. The unit will automatically load the correct points, so there is no need to change the default name unless you wish to. If you want to edit the name of a created circuit to display the track name as soon as the points are loaded, you must save the text file to the SD card and manually edit it on a PC. When editing the names, you must make sure that you keep the "PIT"' prefix and only change the "Track_000" text. In order to avoid duplicates, you should clear all pit locations from the Mini Pit Lane Timer's memory, and then load the renamed file. |
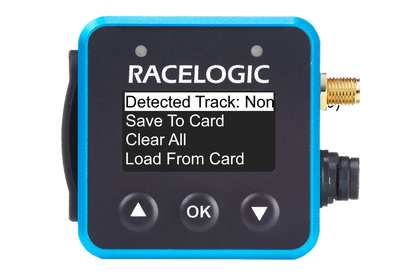 |
Save To CardAlthough all set points are stored in the units internal memory, you may want to save the list of known tracks as a text file, either to edit track names, share new locations with other drivers, or just as a backup. Highlight Save To Card and press the OK button. This will create a file named ‘pitLocation000.txt’ on the SD card (a higher number indicates the latest revision on the card). Clear AllWARNING! Selecting this option will clear all stored pit lane locations from the Mini Pit Lane Timer's internal memory. You may wish to do this if you have previously saved the file out and either added new pit lane information or edited the track names. When new pit lane locations are added from the SD card, these will not overwrite the currently stored location, but add to them. Therefore, when making changes, it is best to clear the old list from the units memory before you load a new list to avoid duplications. Clear the unit's memory by highlighting Clear All and pressing the OK button. Highlight ERASE and press the OK button to confirm that you wish to clear all stored pit lane locations in the unit's memory. If you wish to exit the Clear All settings and go back to the Manage Locations menu, you must highlight Cancel and press the OK button to confirm your selection. Load From CardIf you have made changes or additions to a saved file, you can reload it into the Mini Pit Lane Timer's memory. Notes:
Insert the SD Card into the Mini Pit Lane Timer and navigate to the Manage Locations menu. Highlight the Load From Card option and press the OK button. The file will be loaded into the unit. Back Press the OK button with the Back option selected to return to the Manage Locations menu. |
|
Back
| Press the OK button with the Back option selected to return to the main settings menu. |
Display Menu
Speed Settings
|
Use the speed settings to change the units, decimal places and smoothing applied to the speed on the screen. UnitsPress the OK button to toggle through km/h, mph and kts. The default setting is km/h. Decimal PlacesPress the OK button to cycle through 0, 1, and 2 decimal places. The default setting is 0.
Smoothing Press the OK button to cycle through 0, 1, and 2 decimal places. The default setting is 0.
Back Press the OK button with this line highlighted to exit the Speed Settings and go back to the Display Menu. |
 |
Brightness
|
Press the OK button to toggle through five brightness settings. 1 is the darkest setting and 5 is the brightest setting. The display will change its brightness as you toggle through each setting to make it easier to find the correct level for you. The default setting is 5. |
 |
LED Brightness
|
Press the OK button to toggle through five brightness settings for the LEDs. 1 is the darkest setting and 5 is the brightest setting. The LEDs will increase in brightness as you toggle through each setting to make it easier to find the correct level for you. Note: The default setting is 3, level 5 is extremely bright! |
 |
Invert Colour
|
Press the OK button with this option highlighted to toggle the inverted colour on or off. When it is on, you will see a tick appear next to it and the display will apply the setting accordingly. Note: The Invert Colour (white background with black text) is ticked by default. |
 |
Orientation
|
With this setting, you can define the orientation of the Mini Pit Lane Timer's screen using the three options available: Normal, Inverted and Auto. When Auto (default) is selected, the display will automatically rotate when it is turned upside down. Note: If you are fitting the Mini Pit Lane Timer in a permanent install or if you expect it to experience heavy vibrations during use, you may wish to fix the orientation as these scenarios can trigger the sensitive internal gyro sensor and flip the screen while you are using it. AutoThe display will automatically rotate when the unit is turned. NormalThe display will have the same orientation as the Racelogic logo. InvertedThe display will have the opposite orientation from the Racelogic logo. Back Press the OK button with Back highlighted to exit the Display Menu and go back to the main menu. |
.png?revision=1) |
GNSS Options
ColdstartIf the Mini Pit Lane Timer is struggling to acquire satellite lock, you may need to do a GNSS coldstart. This may be necessary if you have not used the unit for a number of days or it has dramatically moved location since the last use. ModeThe GNSS Mode is the satellite constellations that you want to use. You have three options:
Leap SecondsThe number of leap seconds in this setting sets the current offset between GPS and UTC time. This is set by official bodies to compensate for the slowing of the rotation of the earth. A new leap second is usually introduced every 4 to 7 years. The last leap second was added in December 2016. The current offset is 18 seconds - click here for more details. Back Press the OK button with this Back to exit the GNSS Options and go back to the main menu. |
.png?revision=1) |
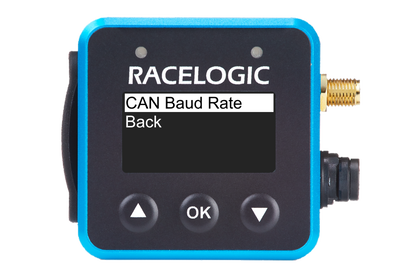
CAN Options
The CAN Options menu is used to configure the CAN output baud rate of the unit. It is necessary to configure this option if you intend to use an OLED Pit Display in conjunction with your Mini Pit Lane Timer. The CAN output can also be used to output data to other 3rd party systems such as AIM and MoTeC.
CAN Baud RateWith this setting, you can turn the CAN baud rate on/off, and increase it or decrease it. The available baud rates are:
Back Press the OK button with the Back option selected to return to the main settings menu. |
 |
About
|
In this section, you can find the installed firmware version and track database version on the Mini Pit Lane Timer, along with its Serial Number and Unit Type. Note: "x" represents an unknown character (digit or letter) to describe the format of the various version numbers.
Back Press the OK button with Back highlighted to exit the About menu and go back to the main menu. |
.png?revision=1) |
Exit
| Press the OK button with the Exit option selected to return to leave the Settings menu and return to the display mode screens. |