Setting up Video VBOX with Racelogic modules and VCI
In this example, we will go through the connection process for two RL modules (TC8 and IMU) to a Video VBOX unit, while also using a CAN02 module to capture vehicle CAN data. Note that the setup process is largely the same irrespective of the RL modules in use.
To ensure no issues occur, it is highly recommended that the latest version of VBOX Setup software is used, and that all modules are running the latest firmware versions.
Setting up the Racelogic Modules
TC8
Connect port 3 on the TC8 to your PC using an RS232 cable (RLCAB001). Note that the TC8 must be powered up - this can be done via connection to a powered Video VBOX unit using an RLCAB005 or RLCAB006.
Run VBOX Setup software and select the correct COM port to connect to the TC8 (check PC device manager if unsure).
Within the settings tab, set the CAN mode to Timed. Check that the other options are configured correctly for your specific setup. The settings for most common use cases can be seen below.
.png?revision=1)
On the channels tab, check that the ID numbers (Response) for each channel do not conflict with those used by any other module (in this case, the IMU04). Here, we can see that the Channel 1 response ID is set to 0x3E0.
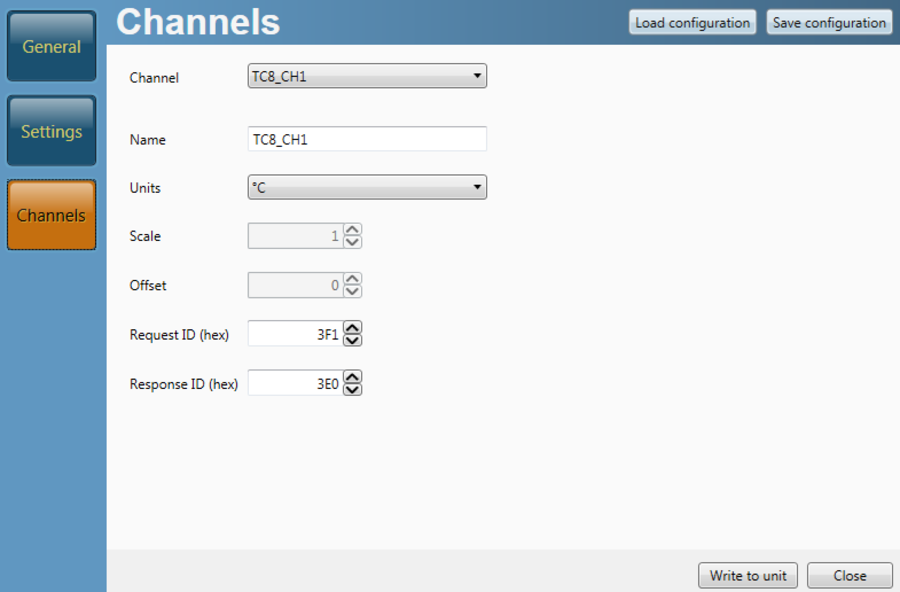.png?revision=1)
IMU04
Connect the CAN/SER port on the IMU04 to your PC using an RS232 cable (RLCAB030-S). Note that the IMU04 must be powered up - this can be done via connection to a powered Video VBOX unit (RLCAB120).
Run VBOX Setup software and select the correct COM port to connect to the IMU04 (check PC device manager if unsure).
Within the settings tab, set the CAN mode to Timed. Check that the other options are configured correctly for your specific setup. The settings for most common use cases can be seen below.
Also within the settings tab, check the Response ID given to each channel set does not conflict with those used by any other module (in this case, the TC8). Here, we can see that the PitchRate & Roll Rate response ID is set to 0x602.
.png?revision=1)
Setting up the Video VBOX
Open Video VBOX Setup software and load in your desired video overlay. Expand the CAN and Module configuration section and click the 'Load' button within the 'Inputs' section.
.png?revision=1)
Load in the CAN database files (.dbc) for the TC8 module and select the desired channels to log. This example setup is not using the extended ID’s.
.png?revision=1)
Check that the baud rate of the Video VBOX matches the modules (and your connected vehicle), in this case, it is the default of 500 KBit. Set the mode to 'VCI' and tick the 'Send Acknowledge' box.
Repeat the same process with the IMU channels. All module DBC files can be downloaded from here.
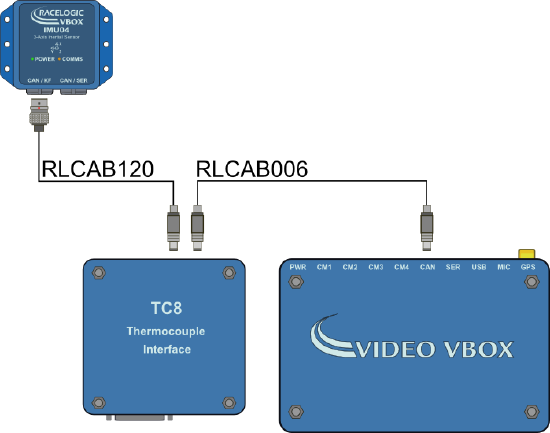
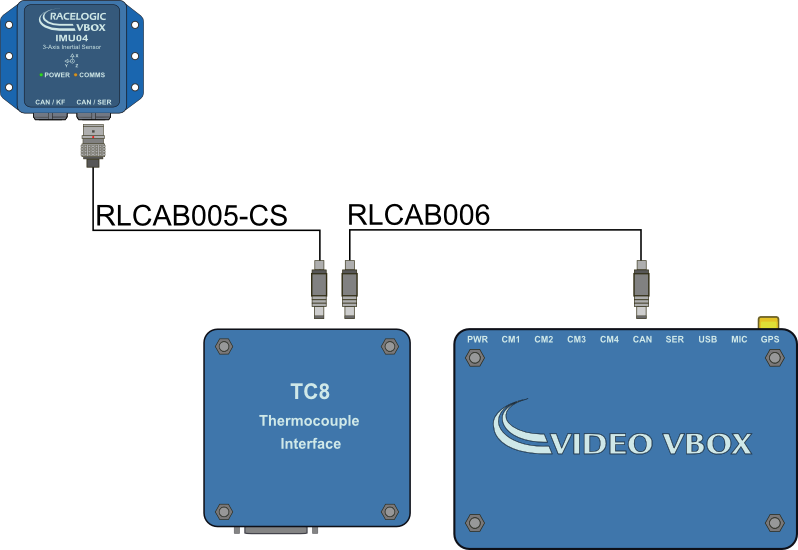
Now, upload the scene to the Video VBOX. This will allow you to connect the modules as shown below, and log data successfully.
|
Option 1 - using CAN/KF port on IMU04 |
Option 2 - using CAN/SER port on IMU04 |
Adding VCI to the setup using CAN02 module
To log vehicle CAN data at the same time as RL module data, you will need to use a CAN02 module.
Connect port 3 on the CAN02 to your PC using an RS232 cable (RLCAB001). Note that the CAN02 must be powered up - this can be done via connection to a powered Video VBOX unit (RLCAB005 or RLCAB006).
Run VBOX Setup software and select the correct COM port to connect to the CAN02 (check PC device manager if unsure).
Within the CAN tab, the incoming vehicle CAN channels must be setup.
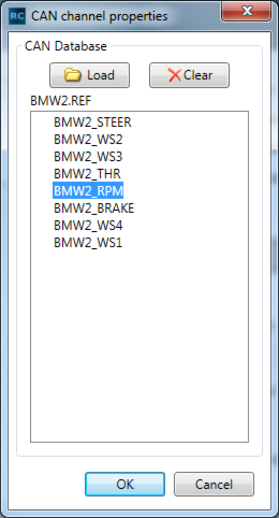
To do this, import the vehicle CAN database file for the connected vehicle – in this case I am using BMW2.REF. All vehicle CAN database files held by Racelogic can be downloaded from here.
Once the file is imported, to log additional channels, press 'Add' and select each desired channel.
|
|
.png?revision=1) |
Here I am logging RPM, Brake and Throttle. As we are using a REF CAN file (Racelogic Encrypted file) the details of the vehicle CAN channel will not be shown.
.png?revision=1)
Make sure the Baud rate matches the VVB and vehicle (500 Kbit/s is default).
Moving to the Outgoing CAN tab, you are able to set up the ID's for the vehicle CAN data to be sent out to the Video VBOX on.
You must ensure that the CAN ID’s used do not conflict with any other modules (in this case, the IMU04 and the TC8).
In this case, we can see that the response ID's 0x7F8 and 0x7F9 are being used.
.png?revision=1)
When this is complete, write the setup to the CAN02 module.
To enable the Video VBOX to identify the CAN channels from the CAN02, these channels also need to be configured separately within the Video VBOX Setup software. Using the CAN channel configurations within VBOX Setup as a guide, manually enter the channel details, ensuring the setup is identical. Select 'Apply' when each individual channel is completed and repeat for all required channels. More information can be found here.
Any of these channels can then be assigned to elements, for example the RPM channel can be assigned to a gauge.
When you are happy with the scene setup, upload the scene to the Video VBOX.
Connect the units as shown below. This will allow all data to be logged successfully.
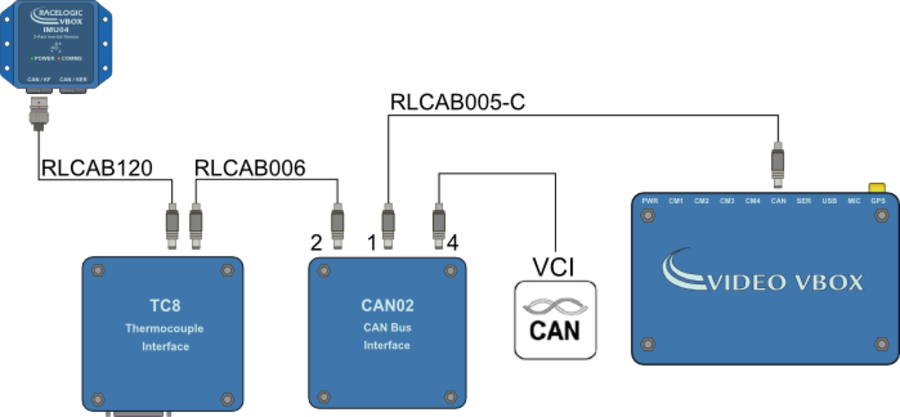

.png?revision=1)