Speed Profiler App
 |
The Speed Profiler Application is ideal for testing durability, fuel economy and tyres. Download and install the Speed Profiler App. Use an SD Card to load a generated .spp file with a set target speed for a duration of time or distance into the VBOX unit. This will give you the ability to receive both audible and visual alerts if you deviate from the target speed (or tolerance). You can find more information about generating .spp files here. Note:
|
Getting Started
|
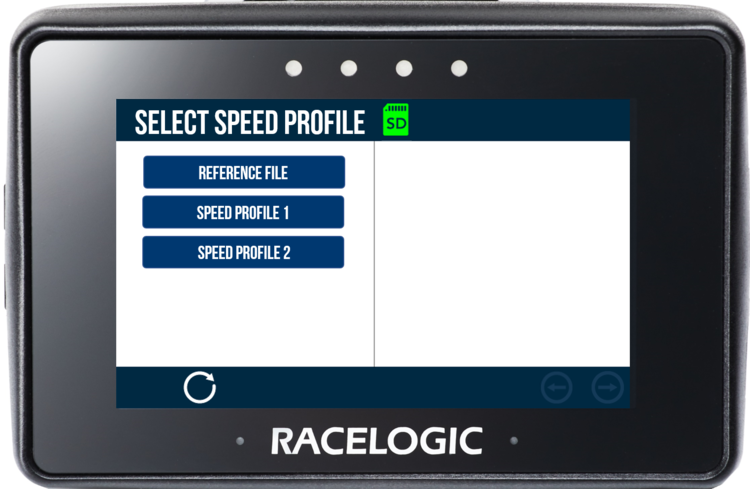
When the unit is powered up, it will search for a speed profile file (.spp) on the inserted SD card. If only one file is present, this file will be loaded automatically. If multiple files are present, the unit will display a speed profile selection menu where you can choose the profile you want to use. The speed units used in the .spp file will be detected, and Performance Box Touch will update to match. |
|
Speed profile selection on startup |
Main Screen
 |
Note: If you are using an external battery with your Performance Box Touch, you will also see a battery icon in the top right-hand corner indicating the charge level.
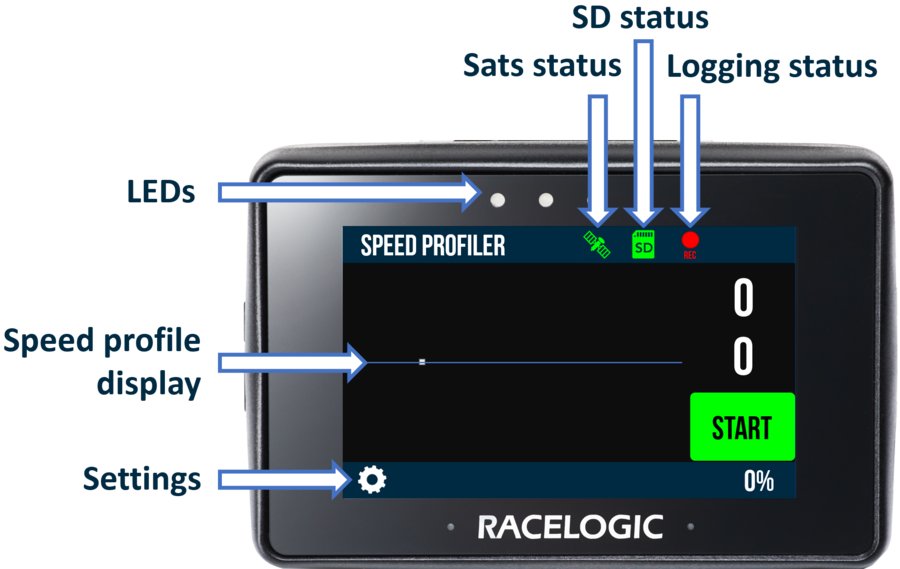
Display
Speed Profile Display
| The application includes a live graph that allows the driver to see forthcoming speed changes and help them keep the speed within the tolerance. The graph scrolls from left to right, plotting GPS speed against time. The current speed is indicated by a white square that remains static. A white trace behind the square will display the speed history. |
 |
|
The X-axis (speed=0) is identified by the blue line. The target speed is identified by the red line. The speed tolerance margin is identified by white lines on either side of the target speed. The display shows the previous 2.5 seconds and the next 6.5 seconds of the configured profile. |
Start/Reset
| Press the START button to start the speed profile file (.spp). If you have selected Wait Until Moving in the Test Settings, the test will not start until it detects movement. Once it has started, you can terminate the test and stop the logging by pressing the RESET button (if applicable). If you reset the test before it ends, the VBOX unit will not save the score to the _results.txt file but will display RESET next to the test in the SCORE field. |
Pause/Resume
| When the vehicle is stationary, you can pause the test by tapping on the Pause button. |  |
| When the test is paused, the button will change to the Resume button. Tap this button to resume the test again. |  |
Current Speed Chart
| The current speed is indicated by a white square. The white trace behind the square displays the speed history for the previous 2.5 seconds. The current speed will always be centred vertically on the screen. |
Target Speed Chart
| The target speed is identified by the red line. The chart shows the target speed of the previous 2.5 seconds and the next 6.5 seconds of the configured profile. |
Speed Tolerance Margin
|
As it is difficult to drive at precisely the expected target speed, the speed tolerance provides a margin on either side of the target speed line that the driver can stay within without affecting the test results. The speed tolerance margin is identified by white lines on either side of the target speed and you can configure it in the Test Settings. The chart shows the margin of the previous 2.5 seconds and the next 6.5 seconds of the configured profile. The difference between the actual speed and the target speed tolerance margin will be indicated by an arrow. |
Current Speed
| Displays the current speed of the vehicle in the units defined in the .spp file. |
Target Speed
|
Displays the target speed of the vehicle in units defined in the .spp file. It will change to the next value 3 seconds before the end of an accel/decel transition. If the change is a deceleration, the value will have a red border, If the change is an acceleration, the border will be green. It will also sound lead-in beeps 3 seconds before the end of a transition to draw the driver's attention to an approaching change in speed. You can configure the beep volume in the Test Settings. |
Progress
| This displays the progress of the test as a percentage. |
LEDs
| The 4 LEDs at the top of the unit provide visual feedback in relation to the target speed: |
|
The current speed is <2 (km/h or mph) faster/slower than the target speed LEDs. |
LEDs will be off |
|
|
The current speed is 2 – 2.5 (km/h or mph) faster/slower than the target speed. |
1 LED will be green if slower |
1 LED will be red if faster |
|
The current speed is 2.5 – 3 (km/h or mph) faster/slower than the target speed. |
2 LEDs will be green if slower |
2 LEDs will be red if faster |
|
The current speed is 3 – 3.5 (km/h or mph) faster/slower than the target speed. |
3 LEDs will be green if slower |
3 LEDs will be red if faster |
|
The current speed is >3.5 (km/h or mph) faster/slower than the target speed. |
4 LEDs will be green if slower |
4 LEDs will be red if faster |


Status Icons
Satellite Status
| The Satellite Icon illustrates whether the unit has a valid satellite lock. | |
| When a lock is acquired, this icon will be solid green. |  |
| If there is no satellite lock, the icon will flash red. |  |
SD Status
|
The SD Card Icon displays the status of the recording media. When an SD card has been inserted and has available space, the icon will be green. When the icon is green, you can press it to manually start or stop the data logging. |
 |
| If the VBOX unit cannot detect an SD card or if the card is full, the icon will be red. |  |
Logging Status
| The red Record Icon will show when the unit is logging data to the SD card. |  |
| If the icon appears white after you have initiated logging, it means that the unit is primed for logging and is in the process of synchronising the internal real-time clock (RTC) to GPS time. The logging will not start until this synchronisation process is complete. |  |
| IMPORTANT Do not remove the SD card when the Record Icon is red. You may lose data or damage the SD card if you remove it while the unit is logging. |
|
End of Test
| At the end of a test, you will see a results screen. If the driver has already been selected, it will show a score associated to that driver, representing the % of test time spent within the tolerance margin. If you have not selected a driver yet, or if you want to change the selected driver, press the New Driver button. |
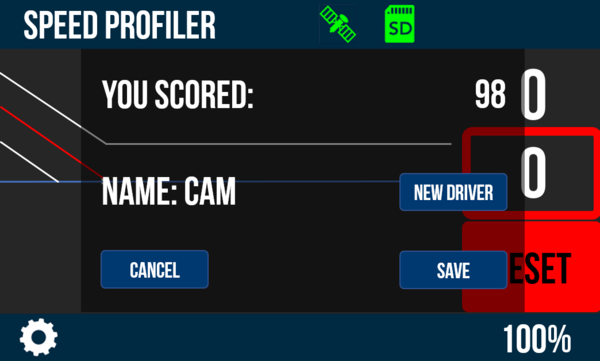 |
| Results screen |
|
Press the Save button to save the score to the '_results.txt' file on the SD card. If you want to exit without saving, press the Cancel button.
The '_results.txt' file has the following format: [DRIVER NAME] [SPP NAME] [DATE] [TIME] [SCORE] [FILE NAME] If you have not selected a driver, the results screen will not let you save the score until you select one by pressing the New Driver button. |
Settings
Buttons
| The Speed Profiler App Test Settings menu is available by selecting the Settings Button on the bottom left of the screen. |  |
| General Settings and Diagnostics Settings menus are also available which can be accessed by selecting the Forward and Back arrows on the bottom right of the screen, or by swiping the screen left or right. |   |
| To save the settings and return to the main screen, select the Exit Button on the bottom left. All settings are saved after a power cycle. |  |
| The Refresh button will update the list of available profiles/drivers after you have added or removed one. |  |
| The Confirm button |  |
| The Up/Down buttons |
Select Settings Screen
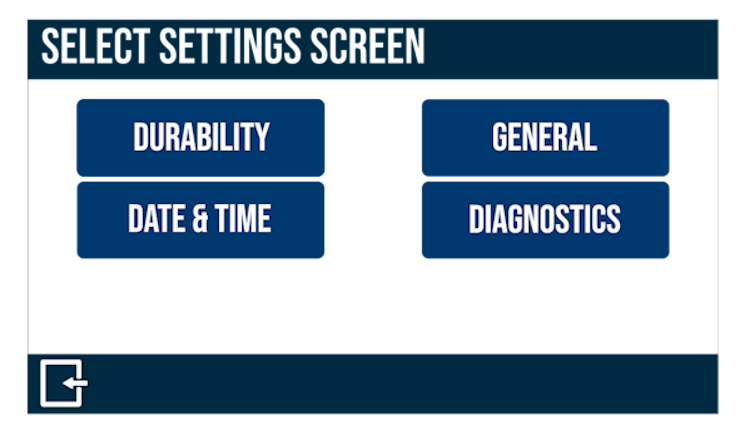
DurabilityThis button will open the Test Settings where you can find the settings for Wait until moving mode, beeps, speed tolerance, nightmode, speed profile file (.spp) and driver options. |
 |
GeneralThis button will open the General Settings where you can find the settings for units, logging mode, results format and brightness options. |
 |
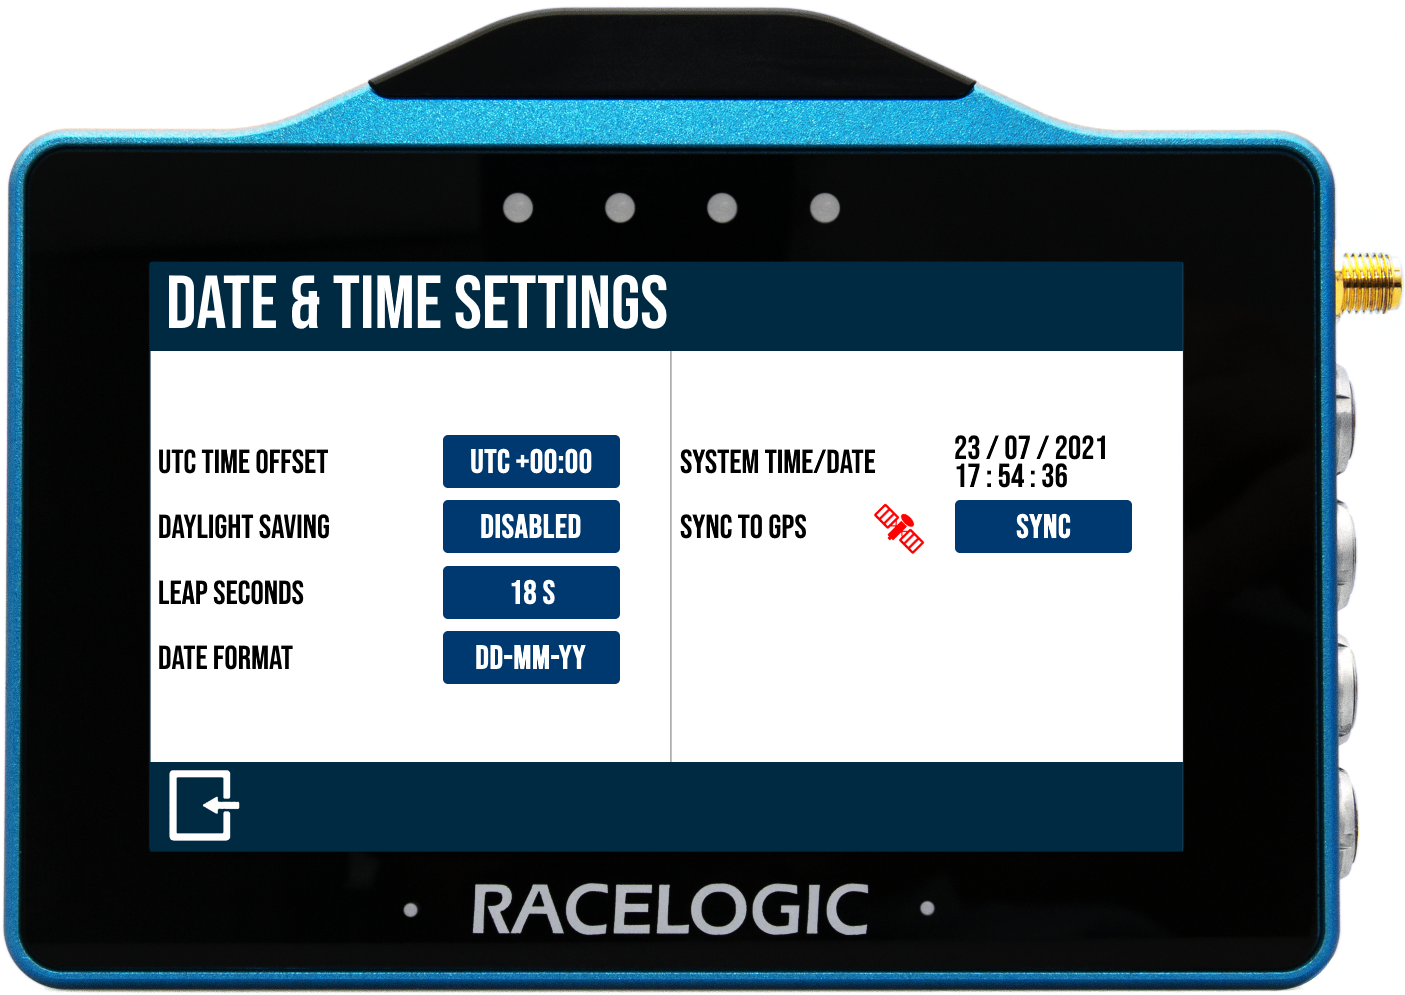
Date & TimeThis button will open the Date & Time Settings where you can find the settings for UTC Time offset, Daylight saving, leap seconds, date format, system time/date and sync to GPS. |
 |
DiagnosticsThis button will open the Diagnostics screen where you can find information about the satellites, database version and VBOX unit. This is also where you can coldstart the VBOX unit if required. |
 |
Test Settings
| This menu contains Wait until moving mode, beeps, speed tolerance, nightmode, speed profile file (.spp) and driver options. |
 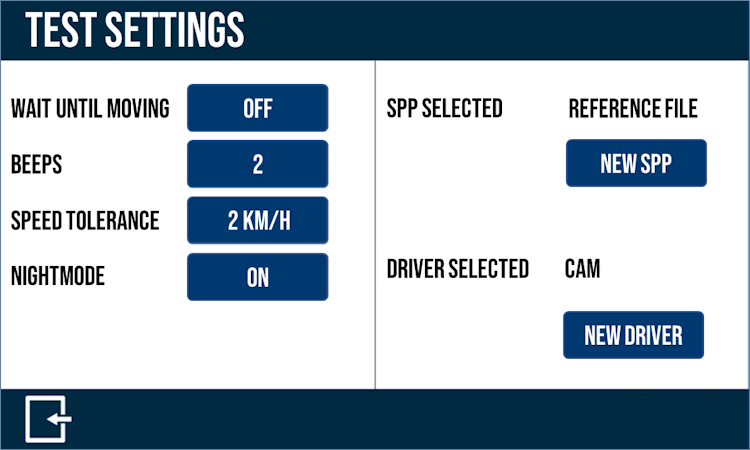 |
Wait Until Moving
| This setting will start the test once the vehicle has started moving (faster than 0.8 km/h). The setting is only valid if the loaded speed profile file (.spp) begins with an acceleration. If you have selected Automatic Logging in the General Settings, it will start logging once it detects movement. |
Beeps
| This setting controls the volume of the audible lead-in beeps that are sounded during accel/decel transitions. You can manually adjust the beep volume in 5 levels. 1 is the quietest and 5 is the loudest. You can also choose to turn the beeps off. |
Speed Tolerance
| This setting controls the tolerance of the test in relation to the actual speed and the speed profile detailed in the loaded speed profile file (.spp). You can choose between 1 and 10 (km/h or mph depending on the Speed Units set in the General Settings). |
Nightmode
| When you select this mode, you can press on the Main Screen to toggle between the default display profile and a profile that suits night-time operation. You can set the nightmode screen and LED brightness profile in the General Settings. |
| If you have enabled Nightmode in the Test Settings, you can press a free space on the screen to toggle between the default display profile and a Defined Profile that suits night-time operation. The Nightmode display is indicated by a Moon icon in the upper right-hand corner. |  |
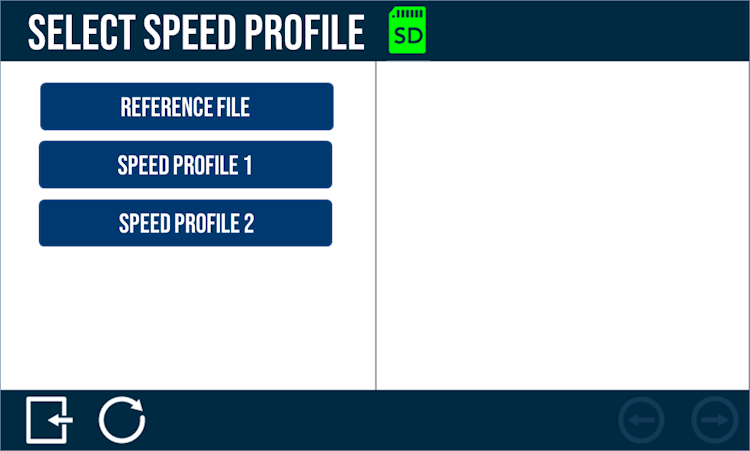
SPP Selected
| This area displays the currently selected speed profile file (.spp) that was chosen during the start-up. You can change the profile by pressing on the New SPP button, which will open the Select Speed Profile menu. |
 |
|
This menu will list all .spp files saved on the inserted SD card. Tap on a profile to select it. If there is a large number of .spp files available, the list of files could be presented on more than one page. You can navigated between these pages with the Forward and Back arrows in the bottom right corner of the screen, or by swiping left or right. If you want to add a new profile to the list, you must remove the SD card, insert it into a computer and place the required file(s) on the root directory of the SD card. The list of available speed profiles will be refreshed when you insert the SD card back in the unit. If you are already in the Select Speed Profile menu, you must tap on the Refresh button at the bottom of the screen. This will manually update the available profiles. |
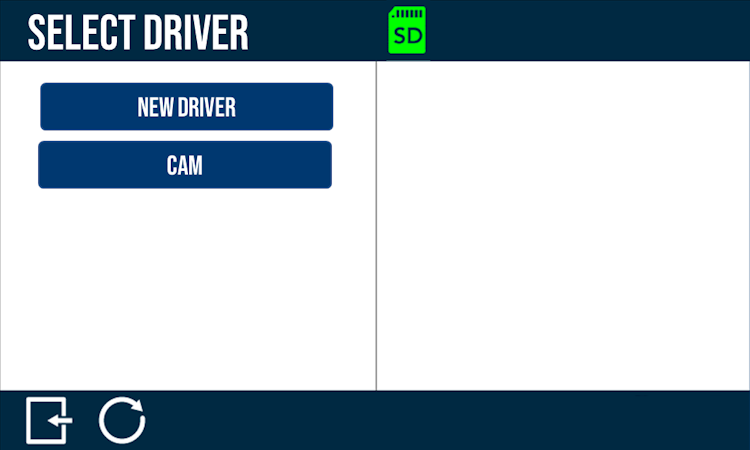
Select Driver
| This area displays the currently selected driver. You can change or add a new driver. Press the New Driver button to open the Select Driver menu. |
 |
|
Tap on a driver profile to choose a previously configured driver. If there is a large number of driver profiles available, the list of names could be presented on more than one page. You can navigate through the pages with the Forward and Back arrows in the bottom right corner of the screen, or by swiping left or right. You can add a new driver by tapping on the New Driver button. This will open the Name menu where you can use the Up and Down arrows to create a three character alpha-numeric name. Tap on the Confirm button in the bottom right corner to save the selected name. |
 |
|
Driver names are stored in the saved '_driverlist.txt' file on the root directory of the SD card. You can open this file and edit it on a computer if necessary. This gives you the ability to use names that have more than 3 characters. The list of available driver names will be refreshed once the SD card is inserted back in to the unit. If you are already in the Select Driver menu, you must tap on the Refresh button in the bottom left corner of the screen to manually update the driver names. The currently selected driver will also be included in the saved '_results.txt' file when a test is completed. |
General Settings
| This menu contains units, logging mode, brightness options, sync to GPS and Nightmode options. |
 |
SpeedYou can set the speed units to either km/h or mph. Changing the speed unit will affect all the visual speed parameters on all the screens, the unit labels will change and all the speed values will automatically be recalculated. Tap the button to toggle between the 2 units. |
 |
DistanceYou can set the distance units to either metres or feet. Changing the distance unit will affect all the visual distance parameters on all the screens, the unit labels will change and all the distance values and results will automatically be recalculated accordingly. Tap the button to toggle between the 2 units. |
 |
AccelerationYou can set the acceleration units to either M/S2 or G. Changing the acceleration unit will affect all the acceleration parameters on all the screens, the unit labels will change and all the acceleration values and results will automatically be recalculated accordingly. Tap the button to toggle between the 2 units. |
 |
LoggingYou can toggle between 2 logging modes. Tap the button to change the mode:
|
|
Results Save FormatYou can choose the format you wish to save the results in to either TEXT or CSV. This is the file format that the unit will use to save all presented results to the SD card. |
 |
Screen BrightnessYou can adjust the screen brightness. There are 5 levels, where 1 is the dimmest and 5 is the brightest. You can also use the Auto setting, where the unit will use the internal ambient light sensor to automatically adjust the screen brightness. In dark conditions, the screen brightness will dim, and in light conditions the screen will brighten. Tap the button to cycle through the available options. The screen brightness level will be applied as you cycle through the levels. |
 |
LED BrightnessYou can adjust the LED brightness. There are 5 levels, where 1 is the dimmest and 5 is the brightest (this is extremely bright!). You can turn the LEDs off. Tap the button to cycle through the available options, the LEDs will preview the brightness levels as you cycle through them. |
 |
Nightmode Screen BrightnessYou can adjust the screen brightness when Nightmode is enabled. There are 5 levels, where 1 is the dimmest and 5 is the brightest. You can also use the Auto setting, where the unit will use the internal ambient light sensor to automatically adjust the screen brightness. In dark conditions, the screen brightness will dim, and in light conditions the screen will brighten. Tap the button to cycle through the available options. The screen brightness level will be applied as you cycle through the levels. |
 |
Nightmode LED BrightnessYou can adjust the LED brightness when Nightmode is enabled. There are 5 levels, where 1 is the dimmest and 5 is the brightest (this is extremely bright!). You can also turn the LEDs off. Tap the button to cycle through the available options. The LEDs will preview the brightness levels as you cycle through them. |
 |

Date & Time Settings
| This menu contains date and time settings. |
 |
UTC Time Offset
|
The UTC offset value is set as '+00:00' by default and can be changed, if required, on the screen that is displayed when you press the current value button. Use the Plus (+) and Minus (-) buttons to select the desired time zone offset values (including available 30 and 45 minutes). Pressing and holding a button will fast-scroll through available valid time settings. Minimum: -12:00; maximum: +14:00. Notes:
|
_600px.png?revision=1) |
| UTC Offset Selector Example |
Daylight Saving
|
When 'Enabled', this setting will add +1:00 hr to the local time setting. 'Disabled' by default. Notes:
|
Leap Seconds
|
The leap second value is set as '18 s' by default and can be changed if required using the keypad presented when the current value button is pressed. This was increased to 18 seconds as of December 2016 - more information on this is available here. Notes:
|
|
To save your selected value, press the Confirm button at the bottom right of the screen, or press the Cancel button at the bottom left of the screen to return to the Time Settings screen without saving. Note: The maximum input value is 99. |
_-_No_Frame_600px.png?revision=1) Leap Second Keypad Example |
Date Format
| You can change the date format between DD-MM-YY (default) and MM-DD-YY. |
System Time/ Date
|
This displays the current time and date being used by the system. They are displayed within the .vbo header file, file date created time stamp, the acceleration history results session header, deceleration history results session header, laps history filename and the gates file (.spl) header. Note: The time/ date displayed by the unit may be inaccurate until a valid satellite lock is achieved. The unit will then update to the correct time/ date as long as the unit is not logging. |
Sync to GPS
| This feature will synchronise the internal real-time clock (RTC) to GPS time as long as the unit has obtained GPS time (no GPS time is indicated by a red satellite icon), isn't moving and isn't logging. When pressed, a synchronisation progress screen is presented. |
Diagnostics
| The Diagnostics menu displays basic information about the GNSS receiver and the VBOX unit. | |
.png?revision=1) |
| The satellite icon at the top of the screen is the quickest way to determine if the unit has a valid satellite lock. When it has acquired a lock, it will display as solid green. When there is no satellite lock, the icon will flash red. |
|

GPS Information
|
VBOX Information
|
This section displays the device serial number, hardware version number of the unit as well as the version and system version currently used on the unit. This information is useful in the event of troubleshooting a potential issue with the Performance Box Touch device. |
Battery Information
| This section displays the serial number, firmware version number and hardware version number of a connected battery. This information is useful in the event of troubleshooting a potential issue with the Performance Box Touch battery. |