How to Mount the IMU

Option 1: Roof-Mounting (Recommended)
The easiest method of mounting the IMU is by placing it directly on the vehicle roof, co-located with the GPS antenna.
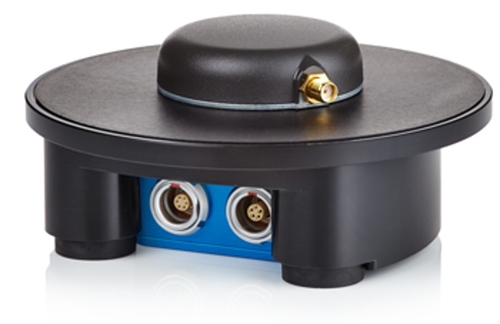
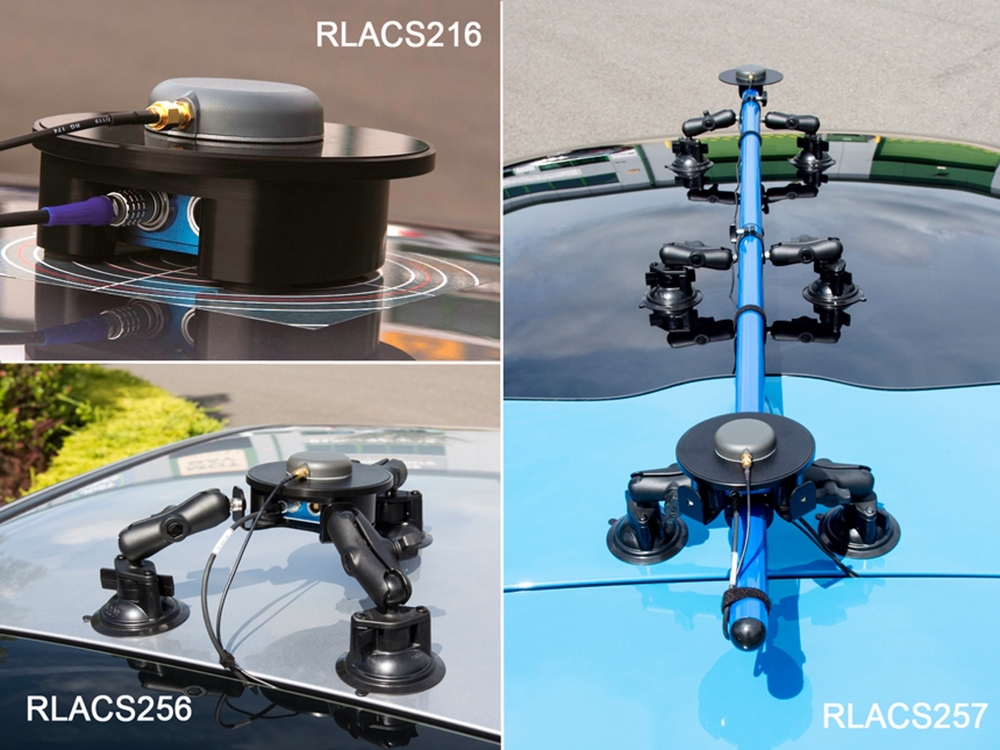
Magnetic base (RLACS216)A specially designed IMU Roof Mount (RLACS216) allows for an IMU04 (only) to be securely fastened within the machined enclosure while it's magnetic base ensures that it stays safely in place. The antenna can then be placed directly above the IMU allowing for the data sources to be measured at the same point (if you are using a non-magnetic ground-plane antenna, the RLACS230 IMU04 Roof Mount should be used instead).
|
 |
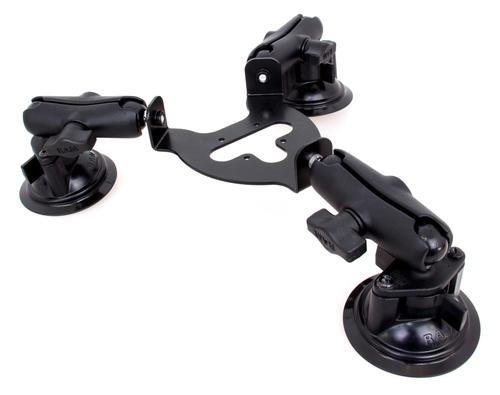
Suction mount (RLACS256)When using a vehicle with a non-ferrous roof such as aluminium, carbon fibre or glass (sun roof), the magnetic based IMU Roof Mount will not hold and a suction mount is required along with the magnetic base. With its three points of contact, the Vacuum Tripod Mount (RLACS256) ensures a very stable fixture and reduces IMU vibration that might be transmitted by the vehicle's roof. The adjustable lever arms allow for the levelling of the IMU on a non-flat roof whilst extending the mounting options on the vehicle. For example, you can fix the mount partially or fully on a coupé's glass roof when trying to achieve a greater antenna separation in a dual antenna setup. |
 |
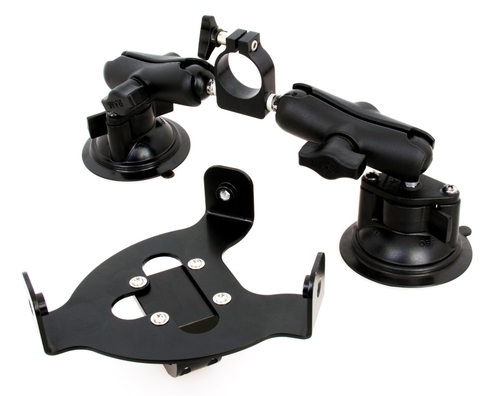
Suction mount with dual antenna pole fixing (RLACS257)If you are testing with a VBOX 3i Dual Antenna and are looking for a maximum antenna separation*, the use of a Roof Mounting Pole (RLACS171) in combination with the Pole Mount with Ferrous Plate (RLACS257) and a magnetic base mount will allow for a quick dual antenna alignment.
*Maximum antenna separation improves the accuracy of slip angle measurement. |
 |
Please contact vbox@racelogic.co.uk for more information, or to order an IMU Roof Mount.
Mounting Suggestions
The IMU roof mount should be mounted on a braced, stable part of the roof, such as the area over the A or B Pillar.
Care should be taken to avoid placing the mount in a half braced position, where the front or rear is on a supported part of the roof, and the opposite end is on a flexible location. The potential pivot can induce a pitch rate oscillation that will influence the accuracy of the results.
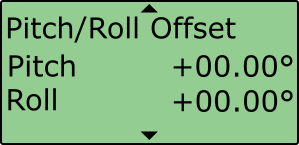
The IMU roof mount can be placed on a non-flat surface. When placed on a non-flat surface, the 'Pitch/Roll Offset' action should be used to compensate the IMU attitude angle channels (Pitch angle, roll angle). This is performed from VBOX Manager.
 |
 |
Be aware that when mounting the IMU on an angle, that the raw accelerometer and gyro data will be incorrect, as the channels are not pitch compensated.
Measuring Translation Points
Customer required translation measurements should be made in the same plane as to which the IMU is mounted (i.e. perpendicular to the IMU base, not straight down to the ground).
 |
 |
Important notes when using ADAS Setup
- If using IMU filter with ADAS mode, the GPS antenna and IMU must be co-located (roof mount) or positioned so there is no relative X or Y offset between them. If there is a difference, manual contact points should reference the IMU location, rather than the GPS antenna.
- When using IMU Filter the user cannot use 'SET POINTS' functionality to define contact points in 1, 2 or 3 target ADAS modes.
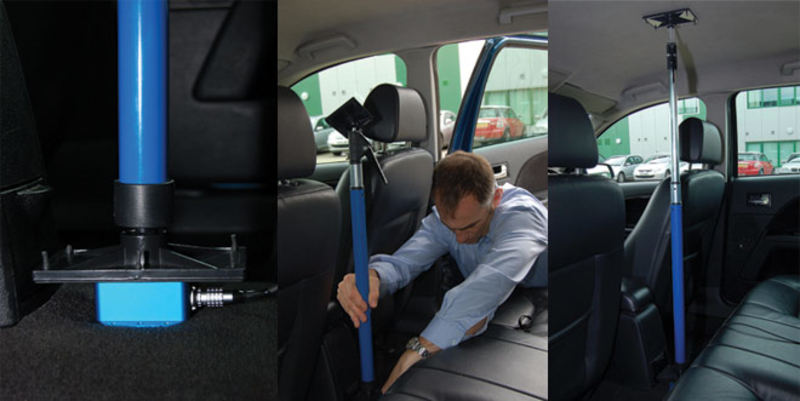
Option 2: Using a Mounting Arm
A flexible way to fix the IMU rigidly within the vehicle is by using the Racelogic Mounting Arm. The three-part telescopic handle is fully adjustable to any length between 70 and 150 cm to which another 20 cm can be added by extending a third section using the compression lever.
Both ends are fixed to an 8 cm x 13 cm plate which sits on a joint to accommodate for uneven surfaces. Pressed against the IMU on the floor and the vehicle's ceiling, the mounting prop ensures that the IMU is fixed tightly.
Please contact vbox@racelogic.co.uk for more information or to order a mounting arm (RLACS212)
Option 3: Fixed Mounting
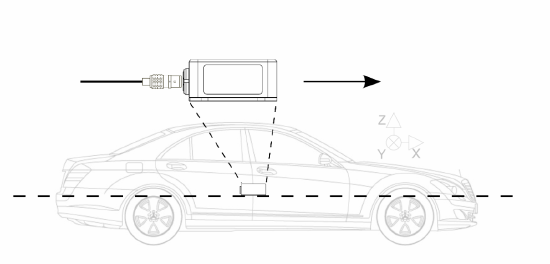
It is also possible to fix the IMU firmly to the body of the vehicle, mid-way along the wheelbase. Try to position the unit as close as possible to the centre of the vehicle, making sure it is mounted in the direction of travel - as shown in the image below. It is also important to mount the sensor so that it is level with the ground.
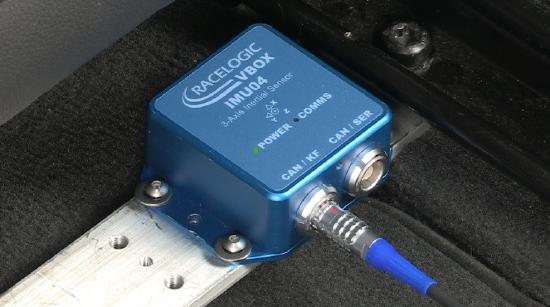
For best results, mount the IMU and GPS antenna as close to each other as possible. For example: Bolt the IMU to the seat rails and place the GPS antenna on the roof directly above.
Note: The IMU and antenna should be mounted on the same rigid body, to provide a relative reference. So for a vehicle such as a truck cabin, both the IMU and antenna should be fitted to the cabin body (if cabin is air-sprung) or to the vehicle chassis.
|
|
|
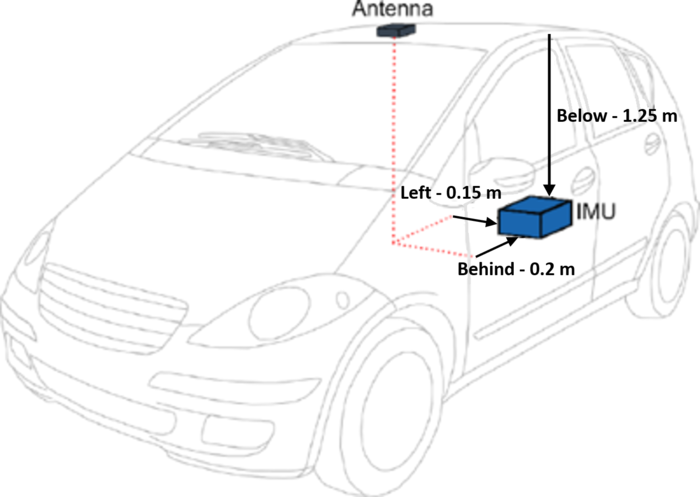
Measuring IMU-Antenna Offsets
|
When using either a fixed mounting point or the mounting arm, you must measure the relative position of the IMU in relation to the antenna* to at least within +/- 5 cm. These distances must then be entered into the VBOX via either VBOX Setup or using VBOX Manager. These measurements are required when using either an IMU04 or an IMU03 unit. *When using a twin antenna system, these measurements must be taken from the primary antenna (A). |
 |