Lateral Aquaplane
Introduction
The ‘Lateral Aquaplane’ test is a plugin for the VBOX Test Suite software.
The test itself allows the user to measure the lateral aquaplane performance of a given tyre based on speed and attained lateral acceleration. This allows the user to compare the performance of different tyre tread patterns.
Ribbon Bar
The Lateral Aquaplane test has a tailored 'Test Setup' ribbon bar, from which the test and test area can be configured.

Note: Ribbon bar icons may move/ resize dependent on the Software window size.
Test

Configure
The 'Configure' button displays a pop up window whereby the parameters of the test can be defined.
Report
The 'Report' button creates a report from the current test results. This button is only available when a run or run has been selected from the test results window.
Gate

Start of Test
Allows the start of the test to be defined in the chart and map windows at the point of the cursor, indicated by a green coloured line which turns to a dark blue coloured line when selected. Once the start of test has been defined, the width can be specified.
IMPORTANT - When adding a gate, the vehicle must be travelling greater than 0.8 km/h in order to ascertain the heading of the gate.
Start of Bath
Allows the start of the water bath to be defined in the chart and map windows at the point of the cursor, indicated by a blue coloured line which turns to a dark blue coloured line when selected. Once the start of bath has been defined, the width can be specified.
IMPORTANT - When adding a gate, the vehicle must be travelling greater than 0.8 km/h in order to ascertain the heading of the gate.
End of Bath
Allows the end of the water bath to be defined in the chart and map windows at the point of the cursor, indicated by a red coloured line which turns to a dark blue coloured line when selected. Once the end of bath has been defined, the width can be specified.
IMPORTANT - When adding a gate, the vehicle must be travelling greater than 0.8 km/h in order to ascertain the heading of the gate.
Export/Import
These functions are not applicable to this test.
Edit Data
the 'Edit Data' button allows the user to enter session specific data such as driver name, track facility and weather data.
Test Configuration
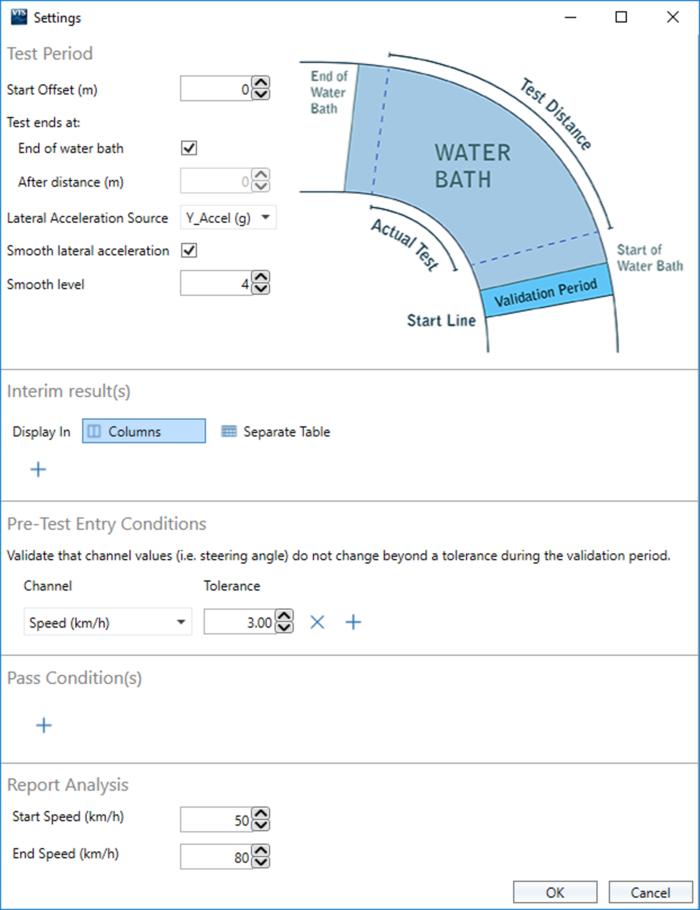
Selecting the 'Configure' button will display a pop up window where the user can define the parameters of the test. These include the start and end conditions, as well as the pass conditions.
Use the up and down buttons  to the right of the parameters to Expand and Collapse the parameter headings.

Test Period
Start Offset (m)
By default, the test will start on the crossing of the ‘Start of Bath’ line, however it is possible for the user to offset the start of test by a specified amount from the start of the water bath.
Test ends at
Allows the user to specify whether the test will end on the crossing of the ‘End of Bath’ line, or after a specified distance.
Lateral Acceleration Source
By default the lateral aquaplane plugin will use the lateral acceleration value generated from an IMU 'Y_Accel' (if available) as this signal is usually less noisy than the lateral acceleration generated from GPS. If the user enables IMU integration on a VB3i, then the GPS acceleration will be smoother than the IMU signal and so Racelogic recommend selecting the ‘Lat_Acc' option from the drop down in this case. You can also use the drop down menu to select a CAN source for the Lateral Acceleration.
Smooth lateral acceleration
This option can be selected to apply a smoothing level to the lateral acceleration signal used in the results.
Smooth level
Sets the amount of smoothing that will be applied to the lateral acceleration channel.
Pre-Test Entry Conditions
To ensure that the driver enters the water bath in a steady state, it is possible to add ‘Pre Test Entry Conditions’. The Pre test entry period starts from when the user crosses the ‘Start of Test’ line and ends on the crossing of the ‘Start of Bath’ line and the user can define a tolerance limit that a specific channel must not be exceed during this period. If the user exceeds this limit, the test will be classed as a ‘fail’ by highlighting that run in red.
It is possible to add more conditions by pressing the ‘+’ button.
Report Analysis
This area specifies the start and end speed that will form the boundaries for an ‘area under the curve’ calculation in the final report.
Completing a Test
To start an online test, the user must first select the correct COM port from the ‘Online’ drop down menu in home tab. Once connected to a VBOX, the dashboard will change to show the 'START', 'STOP' and 'RESET' buttons.
Setting Start Lines
Before the software can begin to produce results, the user must first set the ‘Start of Test’, ‘Start of Bath’ and ‘End of Bath’ lines. To do this when connected to a VBOX, the user must drive to the required point on the track and press the relevant button on the ‘Test Setup’ tab. Once pressed, the software will require the user to drive away in a straight line to understand the direction of which the line should be set.
To set the start lines in a previously recorded file, the user must position the map cursor on the correct part of the track and then press the relevant button on the ‘Test Setup’ tab.
No matter whether the user is connected to a VBOX or not, Racelogic recommend that the saving of test settings once the lines have been set. This will allow the user to repeatedly recall these test lines without having to set them individually for each test.
Test Results Area
The test results area is the area that displays all of the results from the current test. Within this area it is possible to include/exclude results from the chart area, display the average/max/min values and also easily identify any runs which have not met the pass criteria.
Every time a new test is started (via the 'START' button on the dashboard), or a new file is loaded, a new tab will be added to the test results area, allowing the user to switch between separate tests or files and compare runs from each. A session can be removed from the results area by pressing the ‘x’ icon on the tab.
Session Data
By pressing the 'Edit Data' button .jpg?revision=1&size=bestfit&width=60&height=57) next to the name of the file/run or in the ‘Test Setup' ribbon bar, a new window will be displayed whereby the user can add various different pieces of vehicle and test information, such as:-
next to the name of the file/run or in the ‘Test Setup' ribbon bar, a new window will be displayed whereby the user can add various different pieces of vehicle and test information, such as:-
- Vehicle
- Vehicle Model
- Vehicle Number
- Driver Name
- Wheels/Tyres
- Wheel Dimension
- Tyre Make
- Tyre Dimensions
- Tyre Model
- Tyre Pressures
- Test
- Test Date
- Test Track
- Test Facility
- Comments
- Conditions
- Weather
- Temperature
- Track Temperature
- Humidity
- Wind Speed
When in 'Offline' mode, this information will be saved into the .vbo file meaning that this information will be recalled every time the file is loaded into VBOX Test Suite.
When in 'Online' mode, a newly-created session will be populated with session data from the previous session.
This information will be included in the test report to allow the user to understand which result applies to which tyre.
Note: This data is purely optional and has no effect on the test or test result.
To save time, it is possible for the user to import and export the session information for use in other sessions.
Once the session information has been completed, it is possible to export the data to a .vbses file. This file will contain all the session information that can then be imported into the open session information field.
Result Columns
.png?revision=1)
Along the top of the Test results area are some default columns. These columns are:-
- Run – Indicates which run number the results relate to, with run one being the first run completed. There is also a selection box that, when ticked, includes that run in the graph and into the Average/Max/Min/Standard Deviation calculations. Once selected, a coloured square will appear to indicate which colour this run is displayed as on the graph.
Note: If you are loading a file offline, all valid runs are ticked automatically. - Pre Test var. – Indicates the total variance of the channel specified in the test setup. If this variance is outside the designated limit, this column will be highlighted red.
- Time – The total time the run has taken.
- Entry Speed – The speed at which the test started.
- Lateral Accel (min) – The minimum absolute lateral acceleration achieved during the test.
Editing a Column
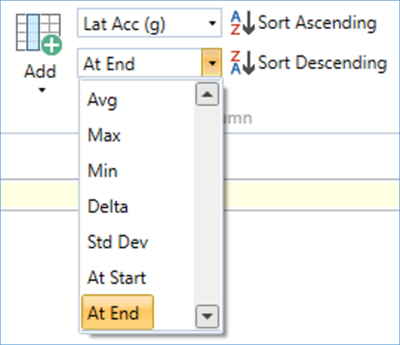
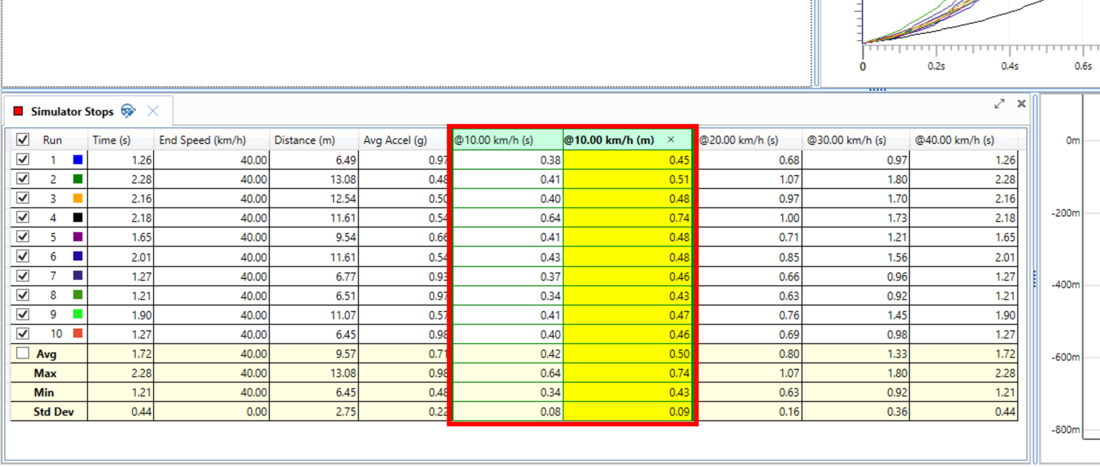
As default, a column is added as an ‘At End’ condition. It is possible to change this by selecting the column title you wish to edit (once selected, the column will be highlighted in yellow) and changing the condition in the ‘data column’ area in the ‘Test Setup’ tab of the ribbon bar.

It is possible to choose the following conditions for the main results:-
- Avg – The mean average of the parameter during the run.
- Max – The maximum value of the parameter during the run.
- Min – The minimum value of the parameter during the run.
- Delta – The difference between the start and end value of the parameter.
- Std Dev – The standard deviation of the parameter during the run.
- At Start – The value of the parameter at the start of the run.
- At End – The value of the parameter at the end of the run.
- Gate – The value of the parameter at the crossing of the specified gate line (e.g. Start of Test).
It is also possible to change the displayed parameter, by using the other drop down menu on the ribbon tab and selecting the desired parameter.
Dashboard
Along with the usual dashboard functionality, the ‘Lateral Aquaplane’ test has some extra options that can be displayed to the user.
By selecting the 'Add Gauge' button from the dashboard tab, a drop down menu will appear whereby the user can select 'Test' and then the desired parameter to be displayed. On selection, a gauge will be automatically added to the dashboard. Any gauges displaying a result of a test, such as an average or maximum value, will have a 'Result' icon  to the left of the gauge name to indicate that it is either a result of the previous run if viewing live data, or the currently selected run if viewing a saved file.
All Result Column parameters are also available as a gauge.
Showing Test Results on the Dashboard
It is possible to display the time, entry speed and lateral acceleration test results from the last run completed as a gauge on the dashboard.
.png?revision=1)
It is also possible to show the current run number on the dashboard to give an easy, clear indication of the amount of runs completed. An 'OK Runs' gauge can also be added to indicate how many runs have met any specified pass conditions.

Creating a Report
VBOX Test Suite allows the user to turn the results table into a custom report whereby the user can easily compare and display the results from their Lateral aquaplane test.
This report will include all of the previously entered session data, along with a table of results from each test and also a graph of all selected data that shows entry speed vs Lateral acceleration
The user can then choose to print or save this report. A sample of this report can be seen below:-
.png?revision=1)
.png?revision=1)


