07 - VBOX Test Suite Home
The 'Home' tab is the main area that controls the central operation of the software. As a result this tab is always displayed to the user to be selected as needed.

Note: Ribbon bar icons may move/ resize dependent on the Software window size.
The following functions are found on the 'Home' tab:
Layout (L)
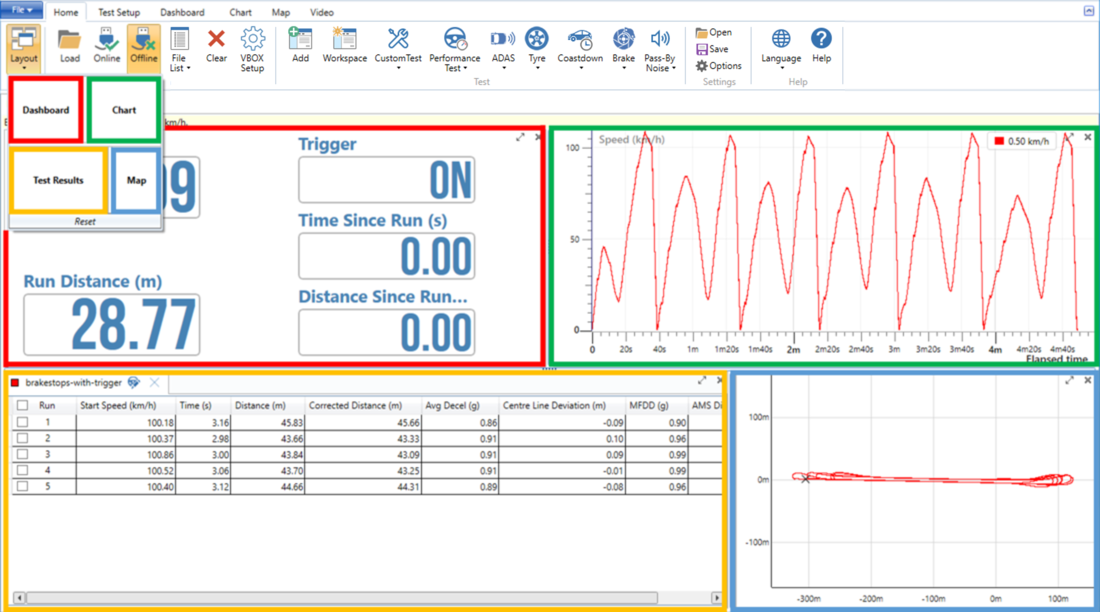
The 'Layout' button is used to define what areas are displayed in the software and will change depending on which plugin the user has selected.
By selecting the 'Layout' button or by using the keyboard shortcut L, a window is expanded to show all available areas and their position on the screen. Clicking on an area within this window will either show or hide that area within the main software screen. The layout can also be changed in this window by selecting and dragging an area to the desired location. Clicking on 'Reset' will restore the Layout screen to it's default layout, using the keyboard shortcut F4 will restore all closed windows to their previous positions and views.

A similar result can be achieved by using the ‘Maximise’ and ‘Minimise’ buttons in the top right hand corner of each window area or by using keyboard shortcuts. The maximise button  will make that area fill the whole screen, automatically hiding all other areas, whilst the minimise button
  will automatically hide that window.
Keyboard shortcuts
| Display/hide window | Full screen window | |
|---|---|---|
| Dashboard | D | Ctrl+D |
| Chart | G | Ctrl+G |
| Map | M | Ctrl+M |
| Results | R | Ctrl+R |
Data
Load (F3/Ctrl+O)
When in offline mode, it is possible to load in VBOX data files (.vbo, .dbn and .asc files) for the post processing of results. Selecting the 'Load' button or by using the keyboard shortcuts F3 or Ctrl+O, will open a file browser window which can be used to navigate to where the .vbo file is located. By selecting ‘Open’, the file will be automatically loaded into the software and the results area for any open tests will automatically be populated. Selecting 'Cancel' during the loading process will stop the file from loading in to the software.
Online
When the software is connected to a VBOX, it is possible to display live data within the software, as well as perform live vehicle tests. To do this, the user must select the ‘Online’ button. Doing this will open a drop down menu whereby the user can select the ‘COM Port’ to which the VBOX is connected. Once selected, the software will display the live serial stream from that VBOX.
Notes:
- Selecting the 'Online' button will clear any data and files currently loaded.
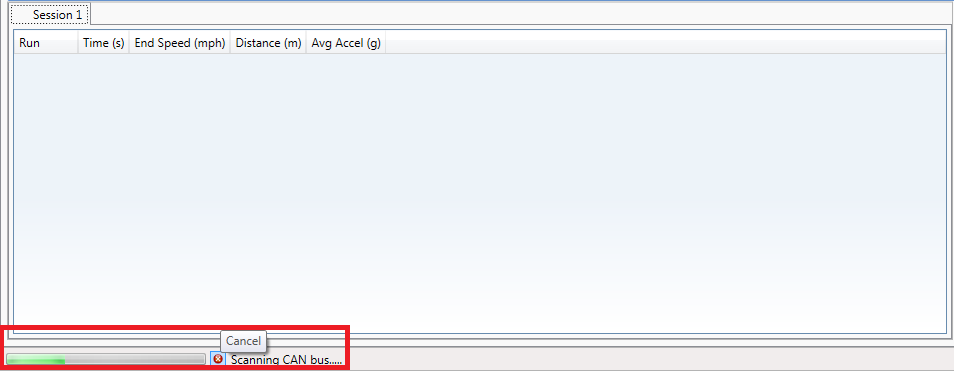
- The COM port selection can be cancelled before the software has fully opened online communications. This is done by selecting the X button at the bottom left of the software window, as shown below.

Offline
The 'Offline' button changes the software into ‘Offline mode’, where by the user can load a data file for post processing of results.
File List
Selecting the 'File List' button will open a drop down list of all currently open files in the software. The colour associated with each file will be shown next to the file name. The colours can be changed within the Results or Chart areas.
Selecting the  next to a file name will remove the file from the whole of the software. If multiple files are loaded, selecting 'Close All Files' will remove all of the files.
Clear (Ctrl+N)
Selecting the 'Clear' button will clear/close all active sessions, as well as any data that has accrued on the map window. When pressed, the user will be warned that all data will be cleared.
VBOX Setup
Selecting the 'VBOX Setup' button will open VBOX Setup software, which is used to configure VBOX units. Further information on VBOX Setup functions can be found in individual VBOX unit manuals.
Test
Add Test (Ctrl+N)
The 'Add Test' button allows the user to add in a specific test to the software. Selecting the 'Add Test' button or using the keyboard shortcut Ctrl+N, will display a window whereby the user can select the required test from a list of available tests.
.png?revision=1)
Selecting a star  next to a test will 'favourite' that test and make it accessible from the Home tab.
Workspace
The 'Workspace' button changes the selected test tab to a Workspace.
Tests
Next to the workspace button will be buttons that represent all available test categories. Selecting one of these buttons will display a drop down of all the default and user saved tests for that categories. Selecting a test will replace the current test.
Settings
Open
The 'Open' button opens a saved configuration file (.vbts). Selecting the 'Open' button will bring up a file browser window that allows the user to specify the file name and location.
Save
The 'Save' button creates a configuration file (.vbts). This configuration file will save all open tests, test configurations, dashboard and chart layouts.
Options
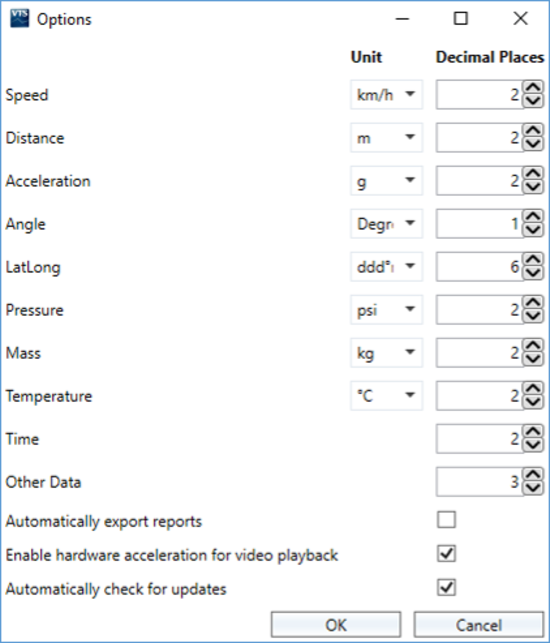
The 'Options' button allows the user to specify the units and decimal places to be displayed of:-
- Speed
- Distance
- Acceleration
- Angle
- Latitude and Longitude
- Pressure
- Mass
- Temperature
- Time
- All other data

These settings will be applied to the whole software and so will take effect in the dashboard gauges, chart legend and results table.
- If the ‘Automatically export reports’ option is ticked, when the user presses the report button in any test, a watermarked .pdf of that report will automatically be exported from the software which has not been modified by the user.
- If the ‘Enable hardware acceleration for video playback’ option is ticked (enabled by default), VBOX Test Suite will use GPU acceleration for video playback. Whilst this may not be required for desktop machines, VBOX Test Suite can struggle just using CPU acceleration when playing back more than one video if using lower powered machines such as laptops and tablets.
- If the 'Automatically check for updates' option is ticked (enabled by default), the software will automatically check to see if a newer version is available when a valid internet link is detected. If the user unticks this box, the software will only search for newer versions when 'Check For Updates' is selected from the 'File' Menu.
- When the software language has been changed to a language that is not English, a 'Reports in English only' option is available (unticked by default). This will translate the information contained within a report in to English.
Language
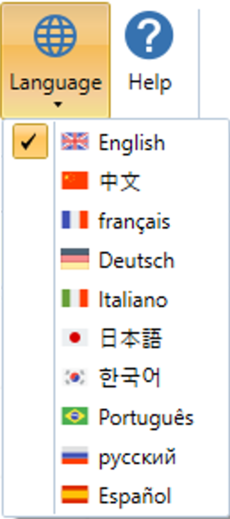
This option will change the language used within the software, available languages include English (default), Chinese, French, German, Italian, Japanese, Korean, Portuguese, Russian and Spanish.

Note: Some items may not be translated due to system language limitations.

