Display Modes
SpeedIn speed mode, the screen will display a large clear speed value with up to 2 decimal places. You can set the speed to display in km/h, mph or knots. You can adjust the number of decimal places displayed. For more information on how to change these settings, see here. Note: To start or stop data logging on the Mini OLED, press the OK button when in Speed Display mode.
|
.png?revision=1) |
Max SpeedIn max speed mode, the screen will show the highest achieved speed value to 0, 1 or 2 decimal places. Note: If you press the OK button the unit will reset the displayed maximum speed value. |
|
.png?revision=1)
Lap CountThe lap count screen will display 2 counters. On the left-hand side of the screen, you can see the total lap count – this counter can only be reset by a power cycle of the VBOX Mini OLED. On the right-hand side of the screen, you can see the current laps. You can reset this by removing the logging media from the Connected VBOX unit. |
|
.png?revision=1)
Lap TimingAll lap times and split times are interpolated to 0.01-second resolution. In this mode, the screen can display either a live rolling lap time or a static last lap time and the lap count. You can change this in the Lap Timing Menu. |
.png?revision=1) |
Fastest lapThe difference between the new lap time and the best lap time will be shown with a + or – sign. A ‘–’ is shown when a faster than best is achieved and a ‘+’ is shown for a slower than best. |
Split line displayIf you have set up split lines in the Lap Timing menu, the Mini OLED will display split times for 2-20 seconds when you cross the split line. See Display Time to find the setup info and how to change the display time. |
Setting a start/finish lineOn the lap timing screen, you can set a new start/finish line by pressing the OK button. If you press the button by mistake, you can cancel the process by pressing the ▼ button within 5 seconds. If you also require split lines or a separate finish, you must use the ‘set start, finish and splits’ option in the Main Menu. Note: The vehicle must be moving >0.5 km/h before you can set a Start/Finish Line. |
|
.png?revision=1)
Predictive Lap TimingBefore you can use this mode, you need to set a start/finish line. Make sure that you have selected a track layout through the main menu or set a start line manually. |
|
Before you cross the start line, the screen will show Waiting for start line and the distance from your current location to it. |
|
| When you cross the start line to begin your first lap, the Mini OLED will begin to create a reference lap. | .png?revision=1) |
|
When you complete your first lap, the Mini OLED will start comparing your current lap to your best lap (reference lap) and display the live delta time on the screen. |
|
|
The reference lap will be replaced with any subsequent quicker lap time. Fixing a reference lap prevents faster lap times from replacing it. Pressing the OK button will either fix the lap you are currently driving or fix a lap saved in the memory. You can choose which one your Mini LapTimer will use under Fixed Lap Mode in the Predictive Settings. If you power-cycle the unit, clear the lap timing data or reset the start/finish, the fixed reference lap will be removed. If you wish to retain a fixed reference lap, make sure that the lap is saved to the SD card. You can then load it into the device when you need it. Note: When you have fixed a reference lap, you will see a message confirming your selection on the screen and you will see a padlock icon in the top left corner.
|
|
|
If you press and hold the OK button for 4 seconds when in this mode, It will clear the stored reference lap and clear all lap timing data. |
|
.png?revision=1)
.png?revision=1)
.png?revision=1)
Transfer Ref. Lap to XXXThis feature allows the user to save a reference lap for future use. Insert an SD card into the VBOX data logger and select: A message will be displayed to confirm that the lap was saved successfully. You can find it in the root directory on the SD card inserted in your VBOX data logger. It will have the file name OLED.REF. Note: The vehicle must be stationary to make this transfer. |
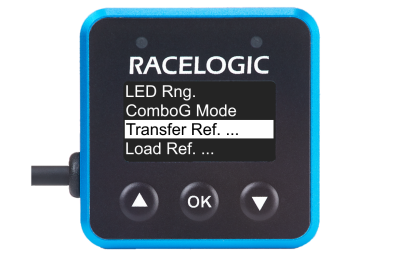 |
Load Ref. Lap from XXXTo load a saved reference lap file from a previous session, copy the desired file into the root directory of an SD card, and insert the SD card into the VBOX data logger. IMPORTANT: The file must be called OLED.REF. Select MENU > PREDICTIVE SETTINGS > LOAD REF. LAP FROM XXX. Note: The vehicle must be stationary to make this transfer. Reference laps will be reset, either when you set a new start/finish or if the ‘reset lap timing data’ option is selected in the lap timing menu. You can also create a reference lap with the Circuit Tools software, as described here. |
 |
Live timingThe main predictive screen shows a continuously updated delta to the reference lap. When a lap is completed, it will give a final lap time and total time difference to the reference lap. If you achieve a faster time than the reference, it will show a negative time. |
|
Speed BarIn the speed bar mode, the screen will show a set centre speed with a bar graph indicating the speed between the set speed and the actual speed. |
.png?revision=1) |
Longitudinal GThis screen displays the current longitudinal g in the vehicle as a live display as well as the maximum longitudinal g reached. This helps the driver push the vehicle that little bit harder when braking. Note: If you press the OK button, the unit will reset the displayed maximum g value (Peak g). |
.png?revision=1) |
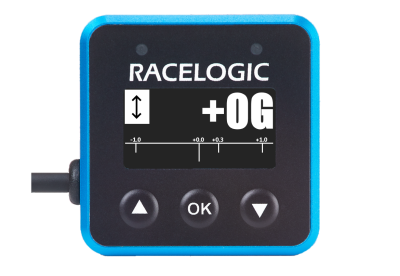
Longitudinal G BarThis screen shows a target, maximum, and minimum range of longitudinal g on a bar graph display. Note: If you press the OK button, you can alter the maximum (+3.0 g) and minimum (-3.0 g) values labelled on the graph. You can set the target g in the same menu (between -3.0 to +3.0 g) to help you reach the desired g when cornering. In the menu, you can also select to have an inverted target g labelled on the graph. |
.png?revision=1) |
Lateral GThis screen displays the current lateral g in the vehicle as a live display as well as the maximum lateral g reached. This helps the driver push the vehicle that little bit harder in corners. Note: If you press the OK button, the unit will reset the displayed maximum g value (Peak g). |
.png?revision=1) |
Lateral G BarThis screen displays the current lateral g in the vehicle as a live display as well as the maximum lateral g reached. This helps the driver push the vehicle that little bit harder in corners. Note: If you press the OK button, the unit will reset the displayed maximum g value (Peak g). |
.png?revision=1) |