02 - CAN Gateway Setup CAN Passthrough
Selecting the 'CAN Passthrough' option on startup allows you to use CAN Gateway to isolate two CAN buses with two different CAN bus rates. CAN-FD messages will be limited to the first eight bytes.
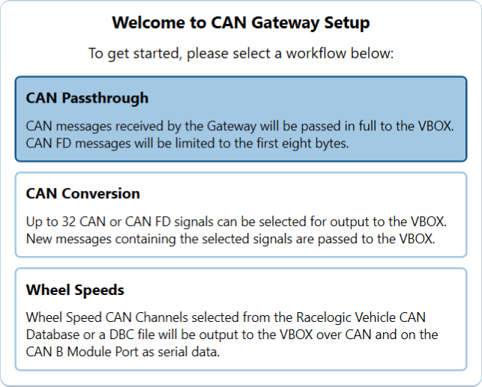
To achieve this, do not load any .dbc files or add any manual CAN Signals, simply select the desired the CAN Configuration settings for the vehicle and VBOX CAN ports and then generate a configuration file for use by CAN Gateway.
Overview
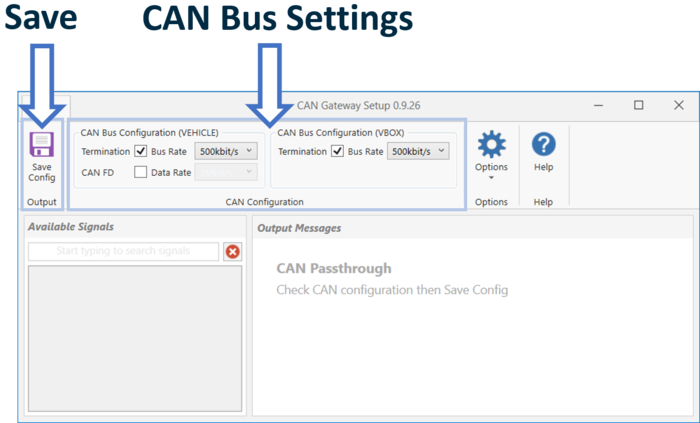
CAN Configuration
The CAN Bus Settings area enables you to define the vehicle and VBOX CAN/CAN-FD baud rates, data rate and allows you to select termination.
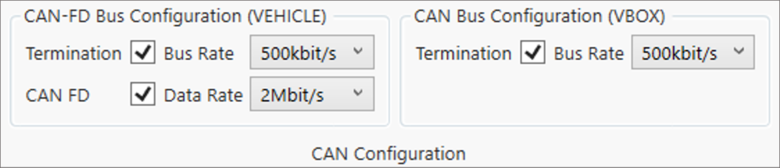
CAN Bus Configuration (VEHICLE)
Define the vehicle CAN- bus baud rate (selectable as 125, 250, 500 kbit/s (default) or 1 Mbit/s). Click here for details on how to physically measure CAN baud rate.
If you are using CAN-FD signals, ensure that the CAN FD box is checked. Once selected, choose the desired data rate (selectable as 500 kbit/s, 1, 2 (default), 3 or 4 Mbit/s). Once the CAN FD box is checked, the only selectable vehicle CAN bus and VBOX CAN bus baud rates are 500 kbit/s or 1 Mbit/s.
CAN Bus Configuration (VBOX)
Define the VBOX CAN bus baud rate (selectable as 125, 250, 500 kbit/s (default) or 1 Mbit/s).
Termination
Within the settings area, it is also possible to select termination in relation to the vehicle and VBOX CAN bus (on by default).
When connecting to Racelogic modules and other CAN data-loggers and sensors, additional CAN termination may be needed depending on the specific setup. Click here for more information on CAN termination.
Save Configuration
Once you have selected the required settings, you can save the GWCONFIG.INI configuration file to CAN Gateway.
Connect CAN Gateway to a PC via USB using the supplied connector RLCAB117 to the USB connector on the front panel of the unit.
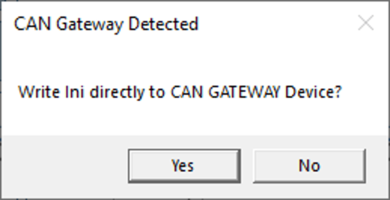
Note: If you are unable to connect CAN Gateway to a PC, you can save the configuration file to the PC and transfer the file over at a later date.
Select the 'Save Config' button at the top of the window. The software will then open a navigation window where you can browse your computer to select a folder location to save the file. A sub folder will be created within this which is time and date stamped automatically. If CAN Gateway is connected and detected, the software will ask you if you would also like to save the GWCONFIG.INI configuration file direct to CAN Gateway, saving you from transferring it separately.