Performance Box Touch V2 – Accel Mode
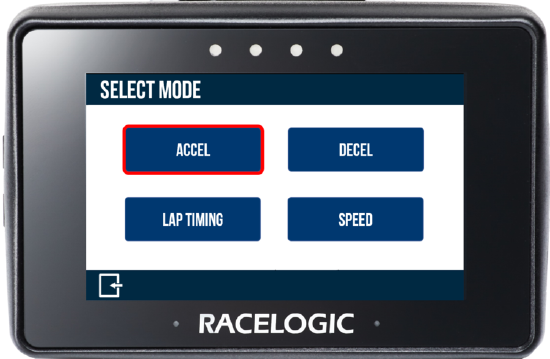
| Acceleration Mode is where you can perform acceleration tests by using either pre-defined configurations or your own specified values. You can also display up to 4 concurrent test results on the screen. You can access this display mode by pressing the Mode button at the bottom of the screen and selecting Accel. |
 |
|
The previously selected Acceleration test will be displayed after each power cycle. You can choose from either speed or distance parameters to start and end the test. Test results displayed on the screen of the Performance Box Touch will remain on-screen at the end of the test until the next start condition is met. The speed units used depend on what you select in the General Settings area. Note: If the start condition is 0 km/h, Performance Box Touch will use the Smoothed Speed Value to reset the test to avoid a test incorrectly resetting in noisy satellite reception areas. |
Accel Mode Overview
| There are 3 different acceleration screens and you can access them by using the Forward and Back arrows at the bottom right of the screen or by swiping left or right on the screen. |  |
 |
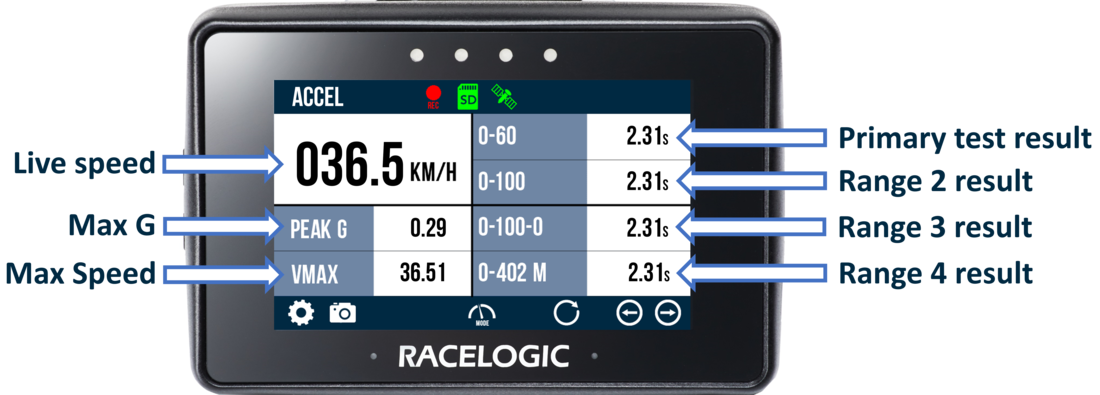
Accel - Primary Screen
| This is the default acceleration screen and it displays current/completed test information. If you have enabled One Foot Rollout or Slope Correction in the Accel Settings, the test header text will reflect the selected options. |
 |
|
The screen is split into 2 halves:
Note: If you are using the Performance Box Touch with a battery connected, the Current Test header will not include units (unless you have selected 0 – ¼ mile 0 – ½ mile) to make space for the battery charge icon. |
Accel - Secondary Screen
| This screen displays current test information for all ranges. If you have enabled One Foot Rollout or Slope Correction in the Accel Settings, the test header text will reflect the options. |
 |
|
The screen is split into 2 halves:
|
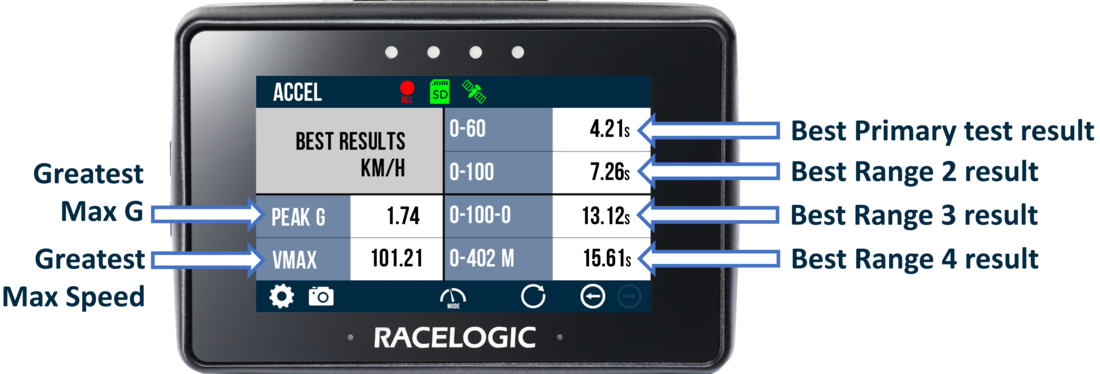
Accel - Best Result Screen
| This screen displays the best test information for all the ranges. If you have enabled One Foot Rollout or Slope Correction in the Accel Settings, the test header text will reflect the selected options. |
 |
|
The screen is split into 2 halves:
|
Selecting Accel Tests
| You can define Accel Tests by pressing the Settings button at the bottom left of the screen and selecting the Accel option. You can define 4 concurrent tests. These are by default: 0–60, 0–100, 0–100–0 and 0–¼ mile. |
.png?revision=1) |
|
The currently selected test ranges are presented on the left-hand side of the screen and will be remembered for future use, even if you choose another mode. Press on the existing parameters to change them. |
 |
| Note: You can also define Accel tests in the Secondary Accel Screen by double-tapping on an existing test range header or result. |
Test Type
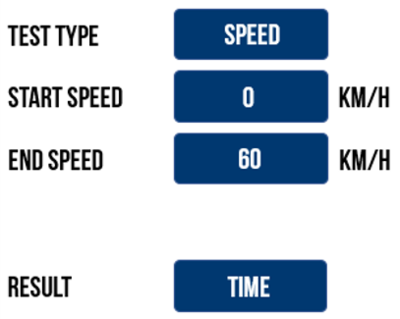
| Tap on the blue Test Type parameter to toggle between Speed, Distance or 0-Speed-0 (e.g. 0–100–0). The parameters displayed will depend on the test type you have chosen. | ||
 |
 |
 |
| Speed Test Parameters | Distance Test Parameters | 0-Speed-0 Test Parameters |
| Test Type | Parameters | ||
|---|---|---|---|
| Speed | Start Speed (km/h or mph) | End Speed (km/h or mph) | Result (time or distance) |
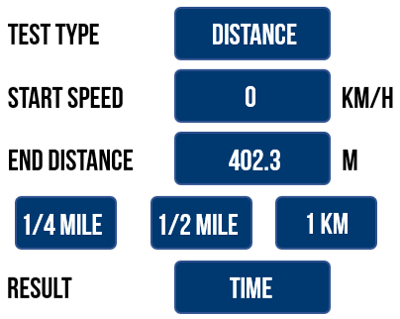
| Distance | Start Speed (km/h or mph) | End Distance (m or ft) Pre-Set Distance buttons include ¼ mile, ½ mile and 1 km. |
Result (time or speed) |
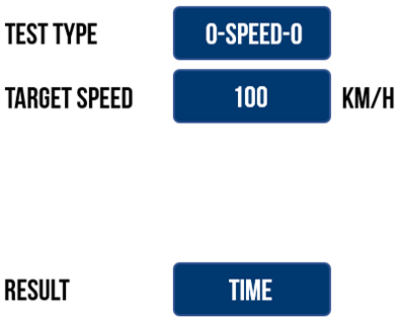
| 0-Speed-0 | Target Speed (km/h or mph) | Result (time or distance) | |
Start/End Conditions
| You can define the start and end conditions by pressing the corresponding buttons and using the presented keypad to set a value. If you are defining a Distance test, you can use one of the pre-set distance buttons to quickly choose the test. |
_-_No_Frame-v2.png?revision=1) |
| Keypad example for Start Speed. |
|
To save your chosen value, press the Confirm button on the bottom right of the screen. If you wish to return to the Custom Test screen without saving, press the Cancel button. Notes:
To save your chosen range, press the Confirm button at the bottom right of the screen. To go back to the Accel Mode screen without saving, press the Cancel Button at the bottom left of the screen. The parameters of the Primary test are displayed at the top right of the Primary Accel Mode screen. The test ranges will be remembered for future use, even if you choose another mode. |
 |
 |
Result Type
|
You can toggle between the test result type for a selected test range by tapping on the blue box with the current option.
|
Accel Settings
| You can access the Accel Mode settings screen by pressing the Settings button at the bottom left of the screen and selecting the Accel option. Now you can choose the test parameters and other test options. You can toggle between the different settings by pressing the corresponding blue value button next to an option. | |
.png?revision=1&size=bestfit&height=380) |
| Return to the main screen by pressing the Exit button at the bottom left. |  |
Alert at End/Target
 |
|
By default, the Performance Box Touch has audible and visual alert signals for when the test end criteria and the target speed are met in a 0-Speed-0 test. It will beep and the 4 LEDs across the top of the device will flash green for 0.5 s. Tap the blue value button to disable/enable the alert. Note: This setting will only apply to the Primary Test. |
One-foot Rollout
 |
|
When enabled, the test will not commence until the vehicle has travelled a distance of 1 ft or 0.305 m. You can find more information on the one-foot rollout feature here.
|
Slope Correct

Screenshot
|
Selecting the Screenshot button will save a full image of what is shown on the screen to the inserted SD card. You can learn more about the screenshot function here.
|
Test History
|
You can view a history of the test results by selecting the Results button at the bottom of the Primary Accel screen. Test results will display until you choose a new test type or you press the Reset button. |
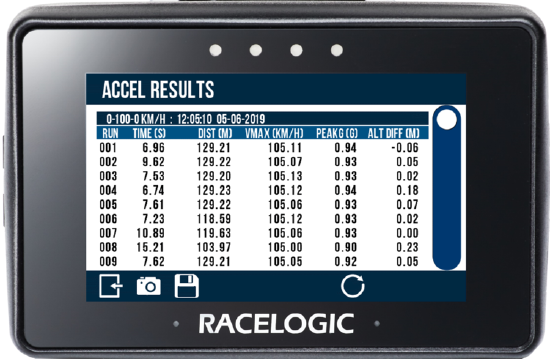 |
| Results screen sample |
|
The tests will be displayed in chronological order and the fastest will be highlighted in green. You can scroll through the results by using the scroll bar on the right-hand side of the screen. Each new session will have a separate header, which displays the time and date for the first completed test in that session. Information in the results includes:
You can take a screenshot of the test history by pressing the Screenshot button. |
| Return to the main screen by selecting the Exit button on the bottom left. | |
| IMPORTANT Performance Box Touch can display a maximum of 127 tests in chronological order. However, if you have completed more tests they will still be recorded on the SD card. Once you have reached the 127-test limit, you will see a brief warning message advising you that further tests will not be saved to the Test History. This message will show again if you power-cycle the unit. A 'TEST HISTORY FULL' notification will also be displayed beneath the Live Speed display. To view new test history results, you must first press the Reset Button. |
Save Results
|
You can also save the results as a .txt or .csv file (depending on the option selected) to the SD card by pressing the Save button at the bottom of the screen. When pressed, the unit will emit an audible confirmation notification. If the results have been saved unsuccessfully, for example, no SD card is inserted or the card is full, the button will flash 3 times and Performance Box Touch will emit an audible error notification. If saved successfully, the file name will include the test type, the date, and the time from the first completed run in that session. Along with the test history information described above, the results file also includes average acceleration information, as well as the latitude and longitude position (in degrees and decimal degrees format) added to the session header. |
 |
Reset
| Pressing the Reset button at the bottom right of the screen will reset all test results shown on the current screen. When you press it, the LEDs will briefly flash green twice and the unit will emit an audible confirmation notification. |