Create - SatGen 4
The Create Tab
Click on the Create tab to configure and create your output file. You will see the following:

Output
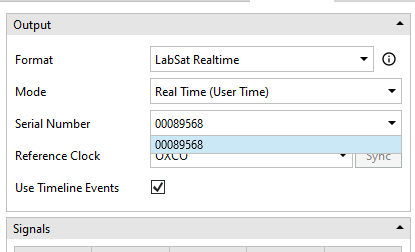
Format
|
Select the format of your output file, which is the LabSat product you wish to replay the scenario on. You have the following options:
|
|
|
Information Click on the information icon to the right of the selected format to see relevant information for your chosen LabSat product, such as the Data rate, Sample rate, Bandwidth and Frequency. |
|


Directory
| This is the location where you wish to save the scenario file. SatGen 4 will use the SatGen OutputFiles folder by default, but you can change the location by clicking on the … button next to the directory name. This will open the Windows File Explorer, where you can navigate to the required save location. |  |
File name
|
This is where you enter the name for your scenario file. SatGen 4 will use New Scenario_xxxx as the default name. If you have entered a file name but want to revert to the automatic naming system, you can click on the Reset button behind the file name. |
 |
Signals
|
This area will display the signals that are available. They will change depending on the set output format and the SatGen 4 license you are using. Click on the signals you wish to include in your file. Selected options will be highlighted in blue. |
 |
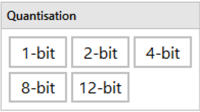
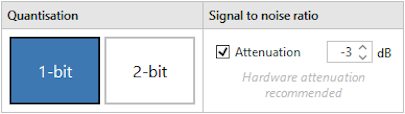
Quantisation
|
This area gives you the option to select the quantisation applied to your signal. Note: The available options will depend on the set output format and the SatGen 4 variant you are using. |
 |
Signal to Noise Ratio
|
You can use the attenuation tick box to enable or disable the attenuation. When it is enabled, you have the option to adjust it between 0 and -15 dB. Note: You can read more about the Signal-to-noise ratio in SatGen 4 here. |
 |
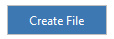
Create File
|
Click on the Create File button to make SatGen 4 generate your scenario file and save it in your chosen directory. The file will be available in the queue where you can see the progress of the creation. When the file has been created SatGen will go on to process any remaining scenarios in the queue. |
 |
Note: The generation of scenario files takes a lot of resources, and your computer may struggle to perform other tasks while SatGen generates these files. If you need to create multiple scenario files, we recommend that you use the Add to Queue button to save your file in the queue while you configure your other scenarios. You can then choose to resume the file generation when you are ready.
Add to Queue
| Click on the Add to Queue button to make SatGen 4 send the scenario file to the queue and pause the file generation. This lets you resume the file generation process at a suitable time. | 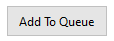 |
Note: The generation of scenario files takes a lot of resources, and your computer may struggle to perform other tasks while SatGen generates these files.
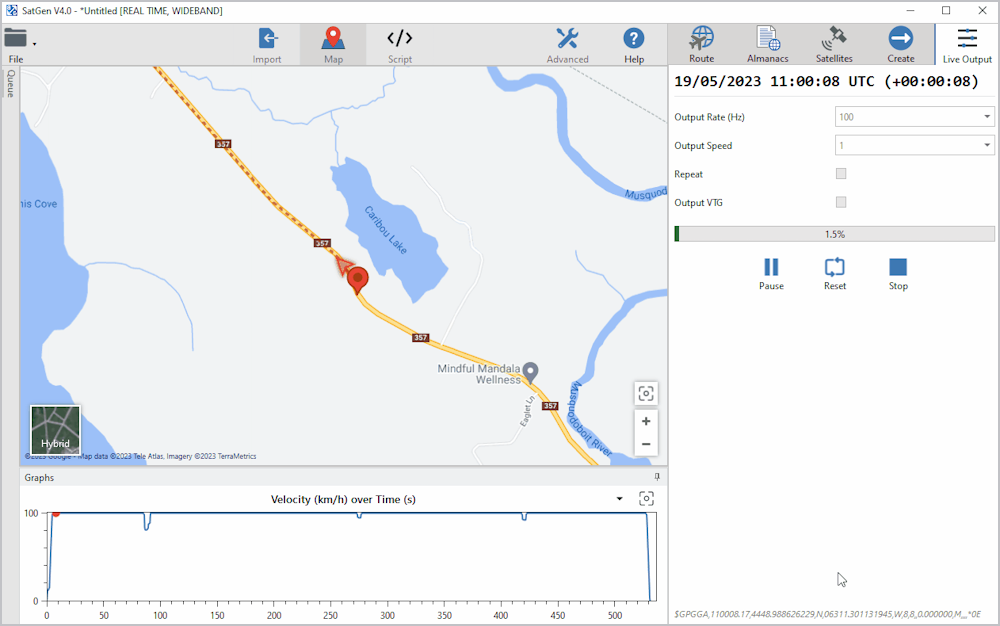
Real Time Creation
|
The SatGen software can generate a live signal stream to a LabSat Realtime unit that can convert the RF data from digital to analogue with less than 1 second’s latency. Real Time is an output format in SatGen 4. There are two variations of this feature:
Once you have specified your desired route, you can proceed to create the scenario:
|
 |
Note:
|
 |
|
 |
|
.png?revision=1) |
|
 |
Note: When you want to run real-time simulations, we recommend that you disable all background activity in Windows, pause Windows Updates, etc. |
 |
Live Output - Mode
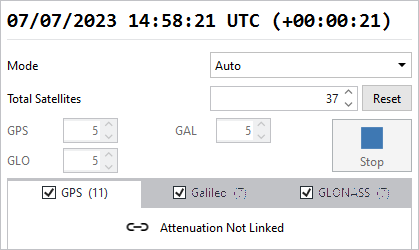
AutoThis mode will use the total number of satellites as restricted to the value in the Total Satellites setting. If a buffer under-run occurs, (indicating that the computing power required to simulate that many satellites exceeds the capabilities of the computer), SatGen 4 will reduce the total number of satellites by 1. This makes it safer to run a real-time simulation on a slower machine, as the number of satellites will keep dropping one by one until there are no more buffer under-runs and the simulation is stable. That final number of satellites is then remembered between sessions, to avoid buffer under-runs the next time you run a real-time simulation. Note: The simulated satellites are chosen by an algorithm that promotes the satellites that are going to stay in view longer. |
 |
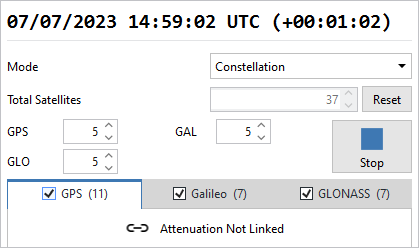
ConstellationThe number of satellites is limited separately for each constellation. You can, for example, select 8 GPS satellites and 5 Galileo satellites. Constellation Satellite number You can select the number of satellites you wish to simulate from each available constellation. The available constellations will depend on your system. Note: The simulated satellites are chosen by an algorithm that promotes the satellites that are going to stay in view longer. |
 |
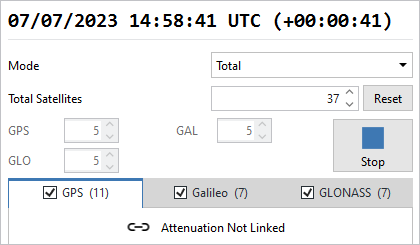
TotalThis mode will use the total number of satellites as restricted to the value in the Total Satellites setting. If a buffer under-run occurs, (indicating that the computing power required to simulate that many satellites exceeds the capabilities of the computer), SatGen 4 will attempt to simulate the specified number of satellites even if the machine is not capable of sustaining it. Note: The simulated satellites are chosen by an algorithm that promotes the satellites that are going to stay in view longer. |
 |
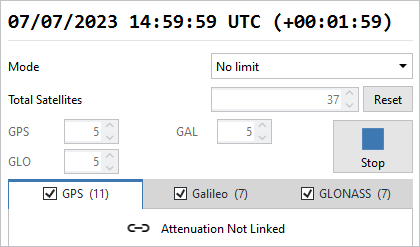
No LimitThe number of satellites is not limited in any way. All satellites in view will be simulated whether the PC can process the simulation or not. |
 |
ManualYou can select the satellites you wish to simulate manually from the list of visible satellites. Unlike in the Constellation, Auto and Total modes, where you select the number of satellites but not which satellites in each available constellation, you have full control over which satellites are simulated in Manual mode. |
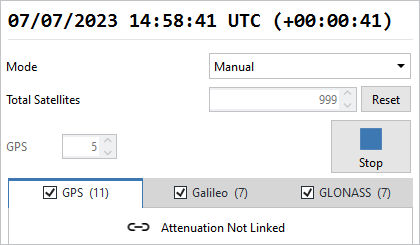 |
Total SatellitesThis setting defines the maximum number of satellites SatGen can use in the simulation. Use the up and down arrows to adjust the number of satellites. Reset Click the Reset button to set the number of Total Satellites to the default value of 999. |
 |
Stop ButtonClick the Stop button to stop the simulation. |
 |
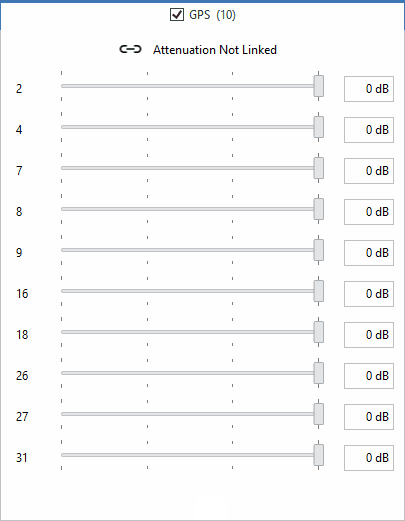
Attenuation SlidersYou can use the attenuation sliders to add attenuation to the individual satellites. Alternatively, you can link the attenuation sliders to apply the same level of attenuation to the entire constellation. Note: Due to the Automatic Gain Control always amplifying the signal to fully utilise the 1- or 2-bit output range, reducing the level of all satellites will not affect the signal. You can reduce the level of 1 or 2 satellites in relation to the others, but the total signal power will always remain constant. |
 |
Status IndicatorYou will also see a new status indicator on the Toolbar.
|
|
The status indicator will display yellow when the simulation first starts and the time is being synchronised. It will display green when live signals are being transmitted. If too many satellites are present the status will briefly display red to symbolise an overload and reduce the number of satellites until it is able to successfully transmit again. A counter will be displayed in the status to make it easy to see how many times the software has encountered an overload during the simulation. |

SatGen Wideband
SatGen 4 can create wideband signals in the upper and lower L band and will take advantage of the LabSat 3 Wideband unit's ability to read RF data at up to 95 MB/s. SatGen 4 can create the following signals in 1-, 2- or 3-bit I & Q Format:
|
|
|
You can find the full signal description for each signal here.
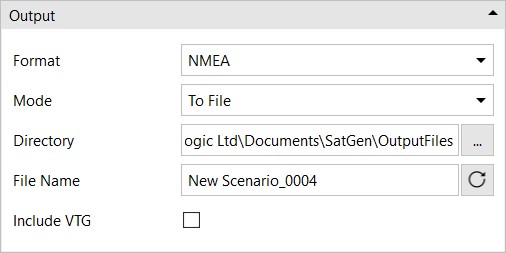
NMEA
Mode: To FileDirectory This is the location that you wish to save the scenario file in. SatGen 4 will use the SatGen OutputFiles folder by default, but you can change the location by clicking on the … button next to the directory name. This will open the Windows File Explorer, where you can navigate to the required location. File name This is where you enter the name for your scenario file. SatGen 4 will use New Scenario_xxxx as the default name. If you have entered a file name but want to revert to the automatic naming system, you can click on the Reset button behind the file name. Include VTG Tick this box to include the VTG message in your output file. |
 |
||||
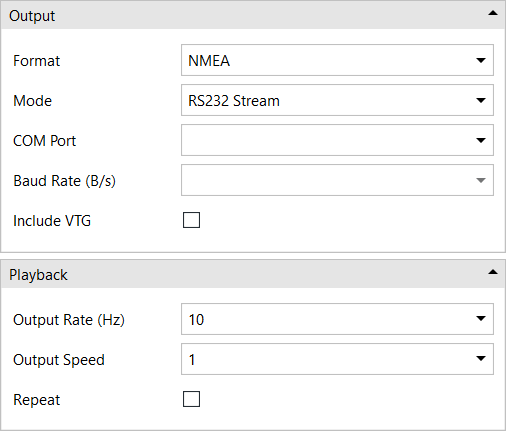
Mode: RS232 StreamCOM Port Select the COM port you wish to use for the output stream. Baud Rate (B/s) Set the required baud rate for your output stream. Include VTG Tick this box to include the VTG message in your output stream. Playback
Repeat Tick this box to make the stream loop. |
 |
Live Output
|