03 Settings – VBOX Touch 1.5
|
Detailed information about the settings and configurations on VBOX Touch using firmware version 1.5.
You find the VBOX Touch Settings menu by selecting the mode you want to use and pressing the Settings button at the bottom left of the display mode screen. |
 |
|
A Select Settings Screen is then presented, allowing to you choose Mode Specific settings (which will change depending on which mode you are using), General Settings, Date and Time Settings, Diagnostic Settings, Serial Port Settings and CAN Bus Settings. Press the Exit button on the bottom left to return to the Select Settings Screen. Pressing the Exit button again will return you to the main screen. |
Mode Settings
| The first option on the Settings screen depends on which Display Mode you are using. You can find more information on these on the page for each specific Display mode. |
General Settings
| This menu contains units, logging mode, save format and brightness options. |
.png?revision=1&size=bestfit&width=632&height=447) |
Speed
| This setting allows you to change the speed units between km/h and mph. Changing the speed units will affect all visual speed parameters on all screens, unit labels will change and all speed values will be automatically recalculated accordingly. Press the button to change the units. |
Distance
| This setting allows you to change the distance units between metres and feet. Changing the distance units will affect all visual distance parameters on all screens, unit labels will change and all distance values and results will be automatically recalculated accordingly. Press the button to change the units. |
Acceleration
| This setting allows you to change the acceleration units between m/s² (default) and g. Changing the acceleration units will affect all acceleration references on all screens, unit labels will change and all acceleration values and results will be automatically recalculated accordingly (with the exception of the PK G acceleration and deceleration test values). Press the button to change the units. |
Logging
| This setting allows you to toggle between 2 logging modes, press the button to change the mode: | |
|
Continuous The VBOX Touch will start logging as soon as an SD card is inserted and initialised. |
Moving (default) The VBOX Touch will start logging as soon as an SD card is inserted and a speed over 0.5 km/h is detected. Logging will pause when speed is less than 0.5 km/h for 3 seconds, and will then recommence recording once speed is greater than 0.5 km/h, appending the same file. |
|
Notes:
|
|
Results Save Format
| You can change the data format of results saved (to inserted SD card) from test history screens. Options are either text format (.txt, default) or comma-separated values format (.csv). |
Screen Brightness
| You can manually adjust the screen brightness between 5 levels, with 1 being the dimmest and 5 being the brightest setting. An 'Auto' setting is also available which uses the internal ambient light sensor to automatically adjust the screen brightness. In dark conditions, the screen brightness will dim, and in light conditions, the screen will brighten. Press the button to cycle through the available options. |
LED Brightness
| You can manually adjust the LED brightness between 5 levels, with 1 being the dimmest and 5 being the brightest setting (this is extremely bright!) or turn off the LEDs. Press the button to cycle through the available options, the LEDs will preview the brightness level. |
Date and Time Settings
| This menu contains date and time settings. |
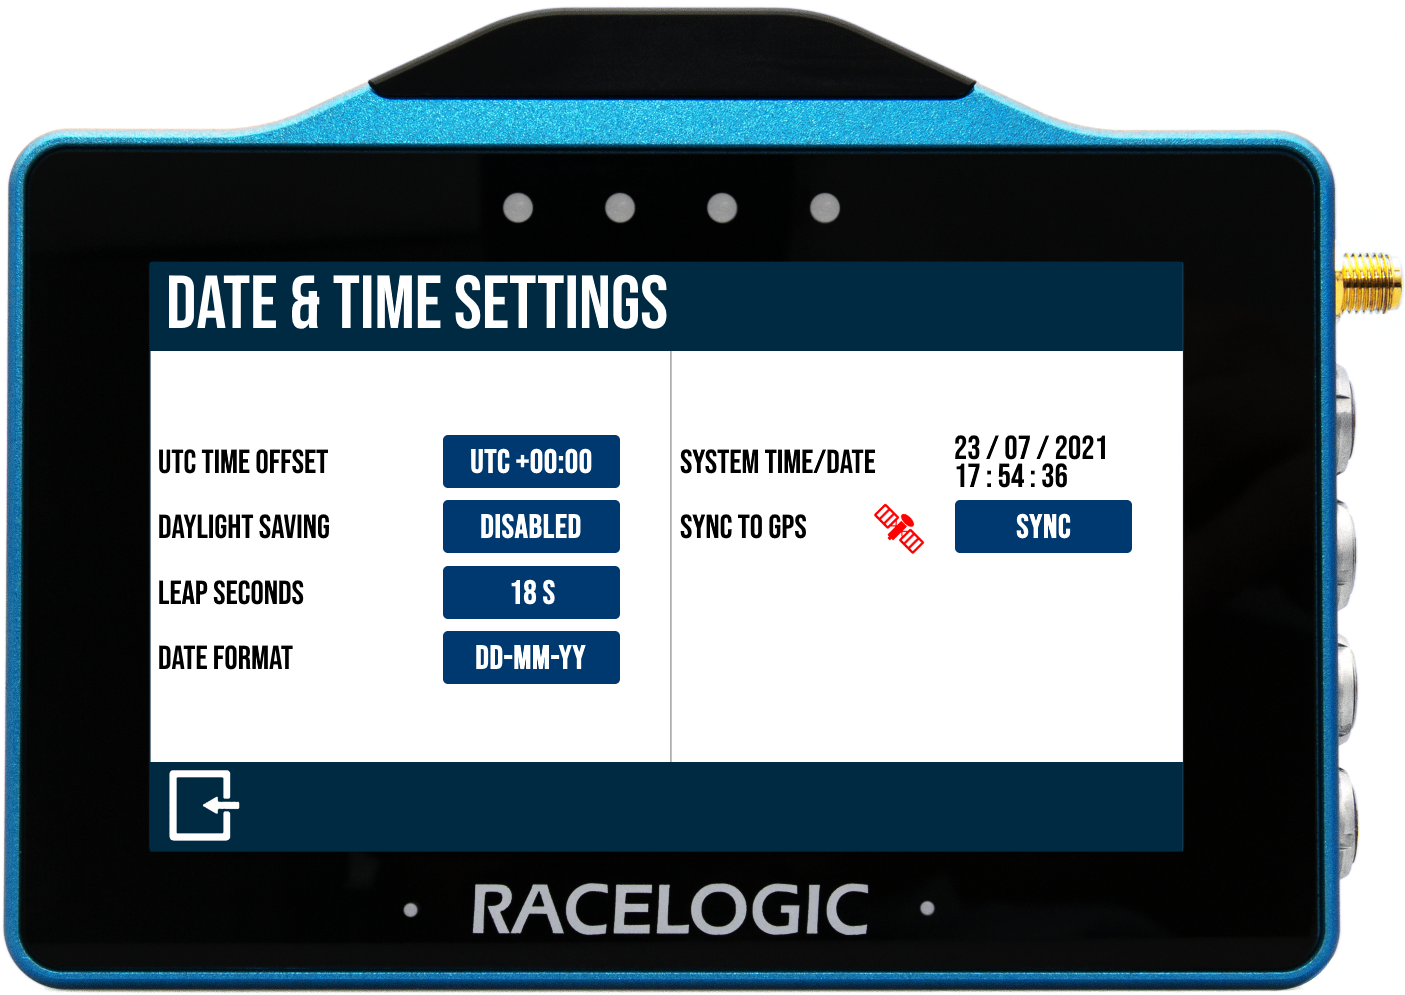 |
UTC Time Offset
|
The UTC offset value is set as '+00:00' by default and can be changed, if required, on the screen that is displayed when you press the current value button. Use the Plus (+) and Minus (-) buttons to select the desired time zone offset values (including available 30 and 45 minutes). Pressing and holding a button will fast-scroll through available valid time settings. Minimum: -12:00; maximum: +14:00. Notes:
|
_600px.png?revision=1) |
| UTC Offset Selector Example |
Daylight Saving
|
When 'Enabled', this setting will add +1:00 hr to the local time setting. 'Disabled' by default. Notes:
|
Leap Seconds
|
The leap second value is set as '18 s' by default and can be changed if required using the keypad presented when the current value button is pressed. This was increased to 18 seconds as of December 2016 - more information on this is available here. Notes:
|
|
To save your selected value, press the Confirm button at the bottom right of the screen, or press the Cancel button at the bottom left of the screen to return to the Time Settings screen without saving. Note: The maximum input value is 99. |
_-_No_Frame_600px.png?revision=1) Leap Second Keypad Example |
Date Format
| You can change the date format between DD-MM-YY (default) and MM-DD-YY. |
System Time/ Date
|
This displays the current time and date being used by the system. They are displayed within the .vbo header file, file date created time stamp, the acceleration history results session header, deceleration history results session header, laps history filename and the gates file (.spl) header. Note: The time/ date displayed by the unit may be inaccurate until a valid satellite lock is achieved. The unit will then update to the correct time/ date as long as the unit is not logging. |
Sync to GPS
| This feature will synchronise the internal real-time clock (RTC) to GPS time as long as the unit has obtained GPS time (no GPS time is indicated by a red satellite icon), isn't moving and isn't logging. When pressed, a synchronisation progress screen is presented. |
Serial Port Settings
| This menu contains serial output settings. |
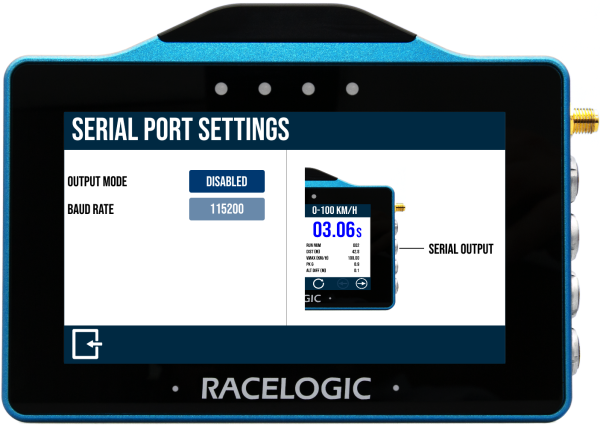 |
| Serial output is available on the top CAN/Serial port of the VBOX Touch, as shown in the image on the right-hand side of the Serial Port Settings. |
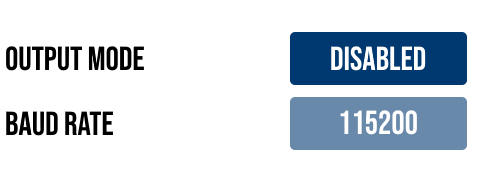 |
Output Mode
| If required, choose the output mode of the serial port, selectable as 'VBOX Stream', 'Lap Timing' or 'Disabled' (default). VBOX Stream allows you to connect VBOX Touch with a computer using an RLCAB001 and conduct online testing with VBOX Test Suite, more information on this is available here. Selecting the Lap Timing option will output lap timing parameters. |
Baud Rate
| Displays the serial output baud rate, set as 115200 kbit/s. |
Diagnostics
| The Diagnostics menu is the final screen within the Settings menu, it displays basic GNSS receiver and VBOX information. |
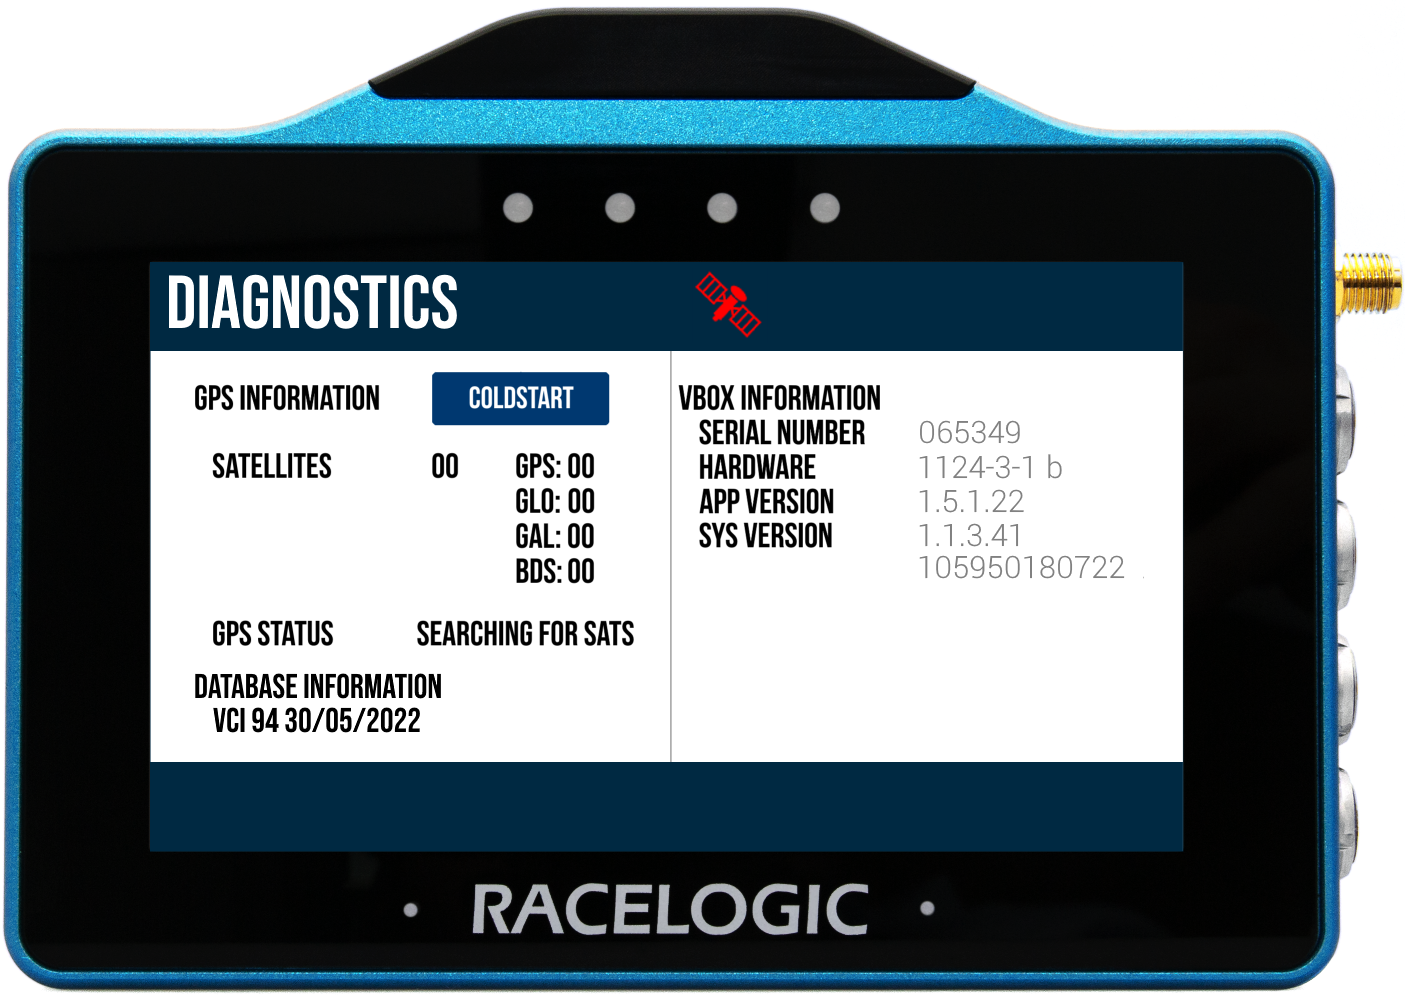 |
| The satellite icon at the top of the screen is the quickest way to determine if the unit has a valid satellite lock. When lock is acquired, it will display as solid green. When there is no satellite lock, the icon will flash red. |
GPS Information
| Press the COLDSTART button to perform a cold start on the VBOX Touch. This means the receiver will clear any data currently stored within its internal memory. It may be required to do this when the GPS engine has locked up or the VBOX Touch is struggling to acquire a satellite lock (more than 4 satellites). |
| When the button has been pressed, the unit will make an audible sound and a ‘PLEASE WAIT’ message will be displayed on the screen which will count down from 3. The number of satellites will then be displayed as '00' and GPS status will show ‘SEARCHING FOR SATELLITES’ until the satellite lock has been acquired. It will take approximately 25 to 30 seconds for the unit to reacquire the satellite lock. |
Satellites
|
Displays how many satellites the receiver is currently using. |
GPS Status
| This indicates the current GPS lock status of the unit: When the unit is searching for a valid satellite lock, ‘SEARCHING FOR SATELLITES’ is displayed. When the GPS receiver has acquired a satellite lock, one of the following will be displayed: |
|
Database Information
| This displays the CAN database version that is currently installed on the unit. |
VBOX Information
| This section displays the device serial number, firmware version number and hardware version number. This information is useful in the event of troubleshooting a potential issue with the VBOX Touch device. |
CAN Settings
|
The CAN Bus menu is where you can configure the settings for your CAN data capture. The menu is split into two sub-menus, one for each isolated CAN port on the VBOX Touch unit. You can set each port to one of the following modes: CAN input, Racelogic (RL) modules or CAN output. When you set it to CAN output, VBOX Touch will be transmitting its own GNSS-derived data, including lap timing data, to a third-party CAN logger. |
 |
CAUTION: Connect to the vehicle CAN bus at your own risk. |
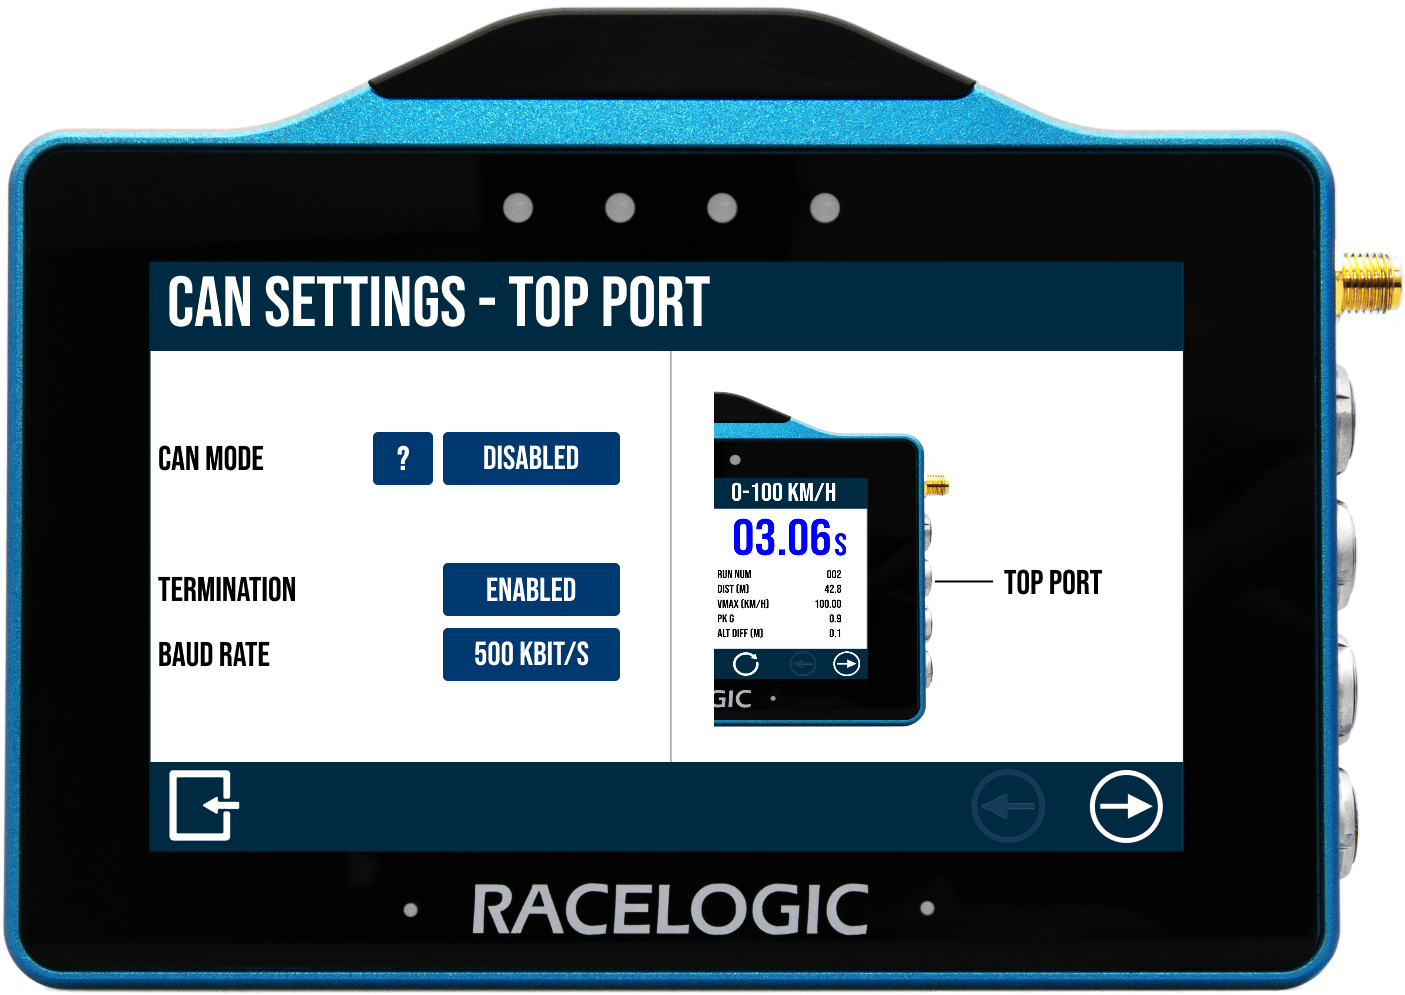 |
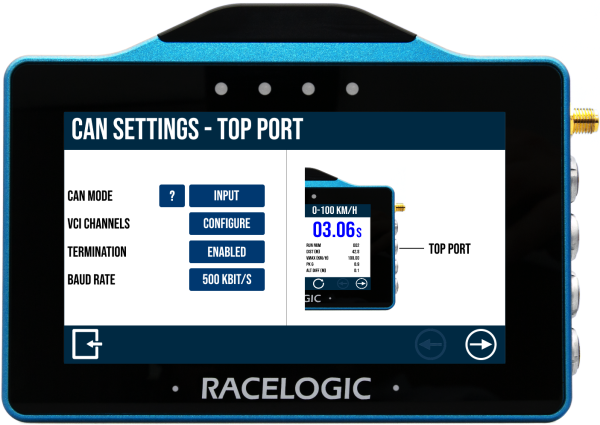
| Your first option is to select which port you want to configure the CAN settings for. Use the Forward and Back arrows in the bottom right-hand corner to navigate between the two ports and their settings. The settings options are the same for both the top and bottom port. |
CAN ModeThis setting lets you choose which CAN mode you want to use for this port. You can choose between RL Modules, Input, Output and Disabled. Press on the '?' to see an overview and an explanation of the different CAN modes available. When you have selected the CAN mode you want to use, you will get the option to configure the selected mode. Press the Configure button that appears below your CAN Mode selection. |
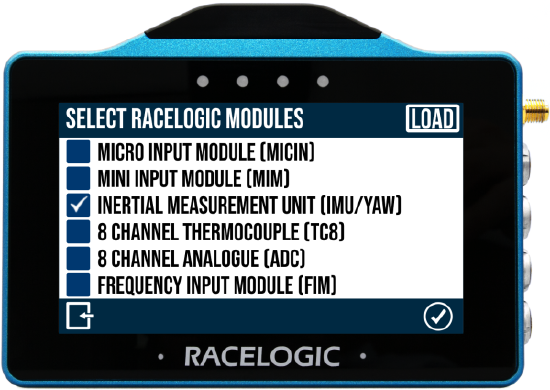
RL ModulesSet the CAN Mode to RL Modules and press Configure. When you select to configure the input from an RL Module, you will first have to select the RL modules you are connecting to. |
 |
|
You have 6 available modules and can choose to connect to one or more. Select them by pressing the respective tick boxes on the left-hand side and pressing the Confirm button to confirm your selection. Press the Cancel button if you want to return to the CAN Mode screen without saving. |
 |
Logged ChannelsWhen you have confirmed the modules you want to use, the Input Modules screen will be displayed. This screen is split into halves, with your selected modules on the left-hand side and the logged channels on the right-hand side. Press on a module on the left-hand side to see the channels it is logging. Press on a channel on the right-hand side to edit it. |
 |
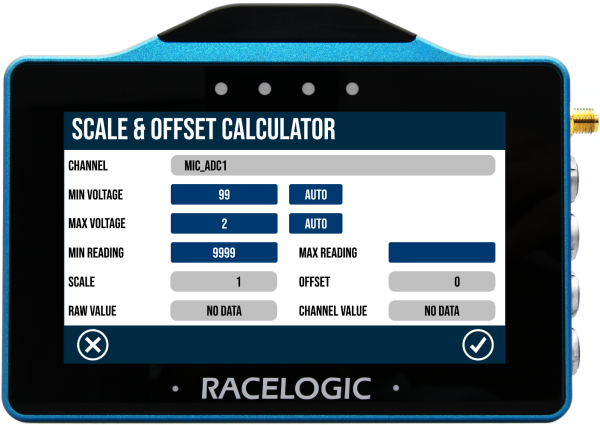
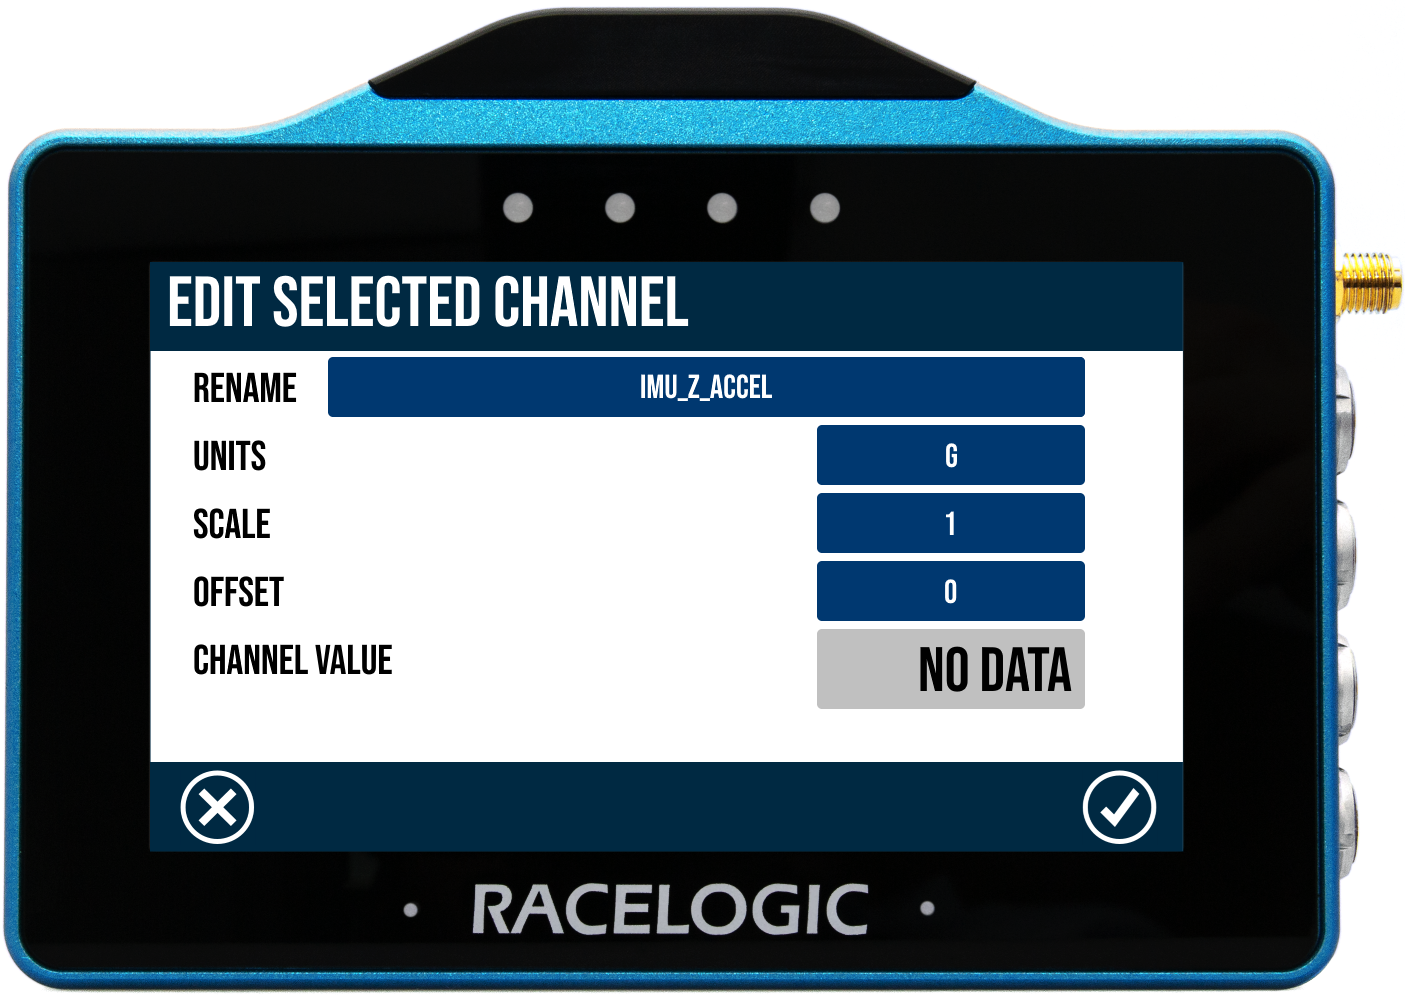
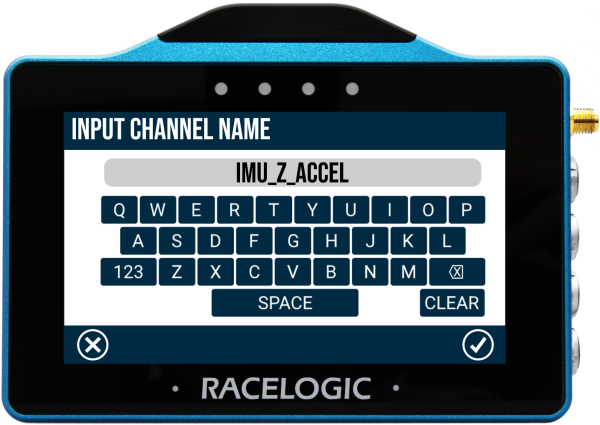
Edit Selected ChannelThis settings screen has relevant information for the selected channel. If you would prefer to use other units of measurement, you can configure the name, unit, scale, and offset for the channel here separately from the global setting on your unit. You can see the live channel value if it is connected and transmitting data. Depending on the selected module, you may get the option to calculate the scale and offset. When reading data from a vehicle using sensor equipment, such as the Micro-Input Module, it is often necessary to convert the data into a more meaningful format, for example converting a voltage from a throttle or brake pedal into something more useful like a percentage pedal press. You can read more about calculating scale and offset here. When you select one of the following modules, you will see a CALC button next to the scale and offset values.
|
 |
 |
 |
|
To complete the configuration, you have to confirm your channel selection on the Input Modules screen. There are two ways to confirm your channel selection:
|
|
|
Note:
|
|
|
IMPORTANT Note:
|
|
Capturing Multiple RL Modules of the Same TypeYou can use Input mode to capture single or multiple CAN modules or if you need to capture multiple RL modules of the same type (in a daisy chain). When setting up a daisy chain, you must:
|
|
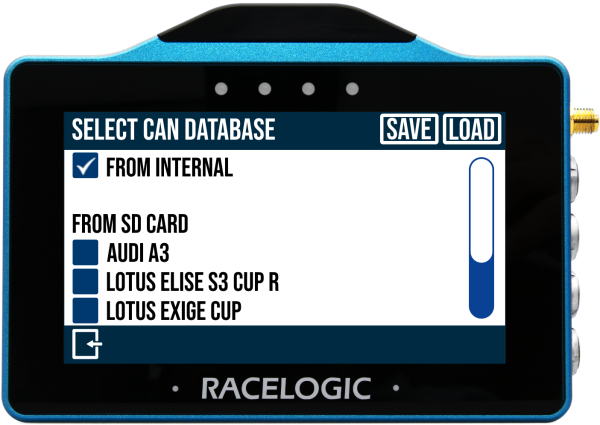
InputWhen you select to configure the port to capture CAN Input, you will first have to select which database you are using to decode incoming data. You will get a list of options and can either choose to use the internal vehicle CAN database or you can load external DBC files from an SD card. |
 |
 |
|
Internal Vehicle DatabaseTo use the internal vehicle database, choose From internal. This will give you a comprehensive list of makes and models with available channels. Make your selection by pressing the respective tick boxes on the left-hand side and pressing the Confirm button to confirm your selection. Press the Exit button if you want to return to the CAN Mode screen without saving. When you have confirmed the Manufacturer and Vehicle/ECU, the Select Channels to Log screen will open. |
From SD CardIf you have DBC files saved to the SD card in your VBOX Touch (in the CAN Databases folder on the root of the SD card), you will see a list of available CAN databases under From SD card. Use the tick boxes on the left-hand side to select the databases you want to use or configure. Press the Confirm button to load the database and see available channels on the Select Channels to Log screen. |
 |
|
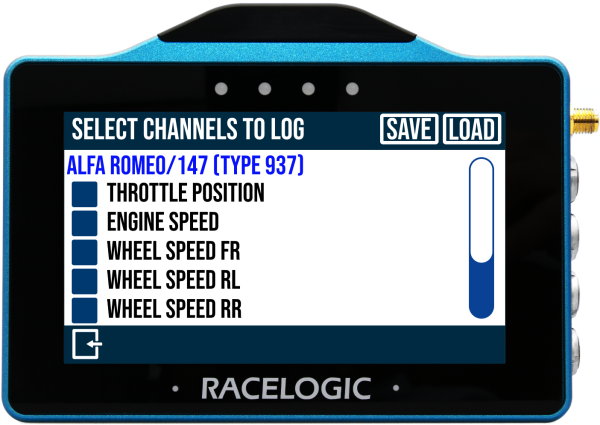
| You will see the name of the chosen database at the top of the page and a list of available channels underneath. | |
| Select a channel by ticking its respective tick box. Press the channel name to open the Edit Selected Channel screen so you can configure the channel. | |
_Details-600px.png?revision=1) |
 |
| Channel from internal database | Channel from SD card |
|
Configure your channel and press the Confirm button to save the configuration. |
|
|
To complete the configuration, you have to confirm your channel selection on the Select Channels to Log screen by exiting the screen. Any channel edits will be confirmed at the same time. |
|
|
Notes:
|
|
|
Load Channel Configuration File You can also load already configured channels from a Channel configuration file on your SD Card. Press Load, select the file you want to load and press Yes. |
|
|
Save Configuration File You can save your current configuration to a Configuration file by clicking Save, giving your file a name and pressing Confirm. |
|
OutputBoth ports have the ability to output GNSS and Lap Timing CAN data from the VBOX Touch. You can export and save the CAN database (to decode) directly from the unit to the SD card, by using the Save Output DBC file function. This option will be available when you select Output as your CAN mode. |
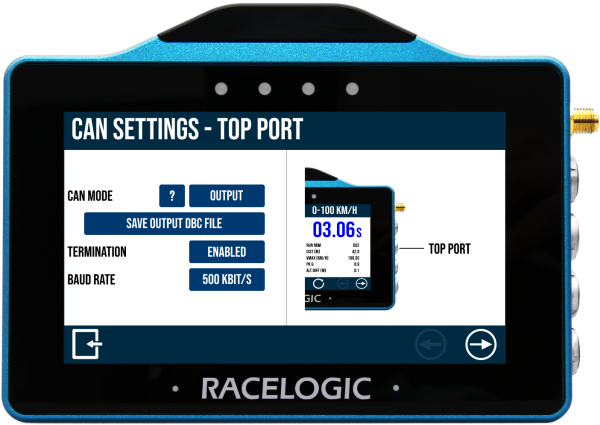 |
Termination and Baud RateIn addition to selecting the CAN mode and the logging channels, you can also Disable/Enable Termination and set the Baud Rate. Note: When you are using the internal CAN database, the termination and baud rate will be set automatically. |
|
| If, at any point, you have any questions or issues regarding CAN capturing on VBOX Touch, please contact Racelogic Support. | |