RACELOGIC Support Centre

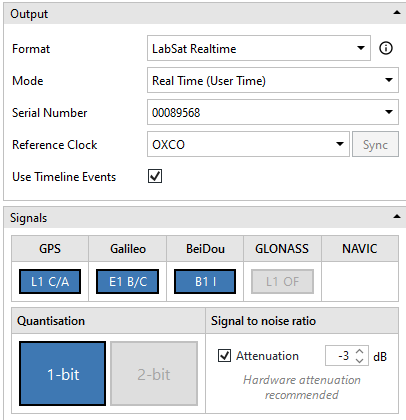
Creating a Real Time Simulation - SatGen 4

This page contains information and steps for the creation of Real time simulations in SatGen 4.
Getting Started 
  1. Make sure that you are connected to the Internet.
  2. Connect the Real Time security dongle to your computer.  Wait for the dongle to activate and the light on it to become red. 
  3. Open the SatGen 4 software.
Configure

Configure a trajectory in either Map mode or Script mode or Import a trajectory file.

Map Mode

Setting the Start Position 

  1. Make sure that Map Mode is selected on the toolbar. 
  2. Navigate to your start location by entering coordinates, an address or a place name in the Location Search bar.
  3. Click on the map to set the first waypoint marker in the location where you wish to start the trajectory. 

Adding Waypoints 

  1. Select the appropriate Routing Mode.
  2. Click on the position on the map where you wish to add your next waypoint marker.
  3. Continue adding waypoints until you are happy with your trajectory.

You can see the information about your waypoints in the Route summary under the Route Options.  

SatGen4_v4.1_Map_600.png


Script Mode

Setting the Start Position 

  1. Click on the Set Start Position button to set the first waypoint marker in the place where you wish to start the trajectory. 
  2. Navigate to your start location by entering coordinates, an address or a place name in the Location Search bar.

Script Commands 

  1. When you have set the starting position and adjusted the settings, you can add commands to the script to edit the trajectory. 
  2. You can use the IntelliPrompt feature to see available commands that you can add to your script to complete your scenario. 
SatGen4_v4.1_Script_600.png


Import
  1. Click on the Import button in the top toolbar.
  2. Select the file type you want to import in the panel on the left-hand side. 
  3. Adjust the import settings if necessary.
  4. Click on the Import button.
SatGen4_v4.1_Import_450.png

The file will be loaded and the trajectory will be plotted on the map in SatGen 4. 

Create
  1. Once you are satisfied with your scenario trajectory, click on the Create tab to specify the output options for your scenario.
  2. Select LabSat Realtime from the Format menu. 
  3. Select the Mode you want to use - User time or Current time.
  4. Select the reference clock you wish to use.
  5. The serial number dropdown will provide a list of serial numbers for connected units.
    If you have multiple units connected to your computer, you must select the serial number for the unit you want to simulate the real-time scenario from. 
  6. Select relevant quantization and attenuation.
  7. Make sure that your LabSat Realtime unit is connected to your computer.  
  8. Click on the Simulate button to confirm the output format and open the Live Output tab.
  9. Select the live output mode you wish to use and check relevant settings for the set mode.
  10. You can use the attenuation sliders to add attenuation to the individual satellites in your simulation.
Create_LabSat_RealTime_Output.png


You can stop the simulation by clicking the Stop button.

  • Was this article helpful?