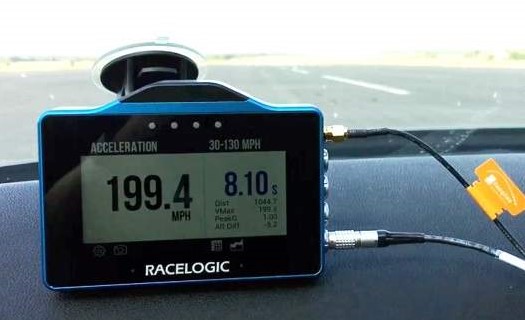
Quick Start guide – VBOX Touch RTK: Accel Mode
Registration
|
Please register your VBOX Touch RTK so that Racelogic can continue to provide you with notifications about the latest software releases and firmware upgrades for your Racelogic product, and offer technical support. Register your device here. |
 |
What is in the box?
When you purchase a VBOX Touch RTK (RLVBTOUCHR), you will find the following items when you open the box:
| Product Code | Quantity | Description |
|---|---|---|
| VBTOUCHR-V1 | 1 | VBOX Touch RTK unit |
| MECH0298SD | 1 | Rubber Overmould for VTS – Black |
| RLCAB010LE | 1 | Cigar Plug Power Supply (RLVBTOUCH, 2 m) |
| RLACS313 | 1 | 8 GB SD Ultima Pro UHS-1 Memory Card |
| RLACS308 | 1 | GPS L1/L2, GLONASS G1/G2/G3, Galileo E1/E5b, and BeiDou B1/B2 GNSS Antenna cable with SMA connector (3 m) |
| ACS318MOUNT | 1 | Swivel Neck Richter Suction Mount |
| RLACS281 | 1 | Plastic Carry Case for VBOX Touch |
| RLCALUKAS | 1 | Certificate of Calibration |
Optional Accessories
| Product Code | Description |
|---|---|
| RLVBACS004 | Brake Pedal Trigger |
| RLVBACS010 | Hand Held Start/Stop Logging Switch |
| RLCAB001 | VBOX PC Serial Cable |
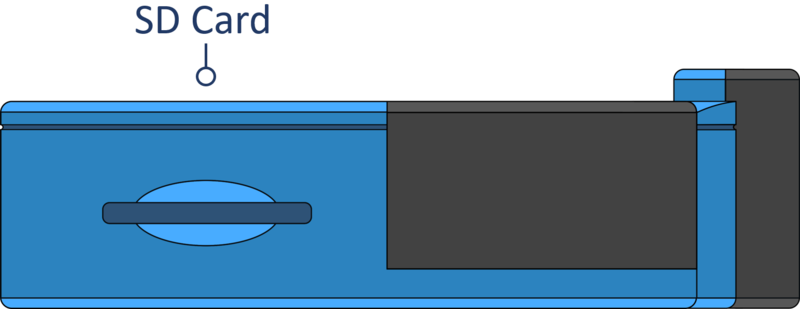
SD Card
VBOX Touch logs data to an SD card. Depending on the Logging Strategy that is set in the General Settings area, the unit will either log continuously or when movement is detected (default). You can find more information on this here.
SD Card Format
VBOX Touch is supplied with an 8 GB SDHC card in a FAT32 file format, which is the only file format supported.
If you are looking to purchase a new SD card, it is recommended that any card used has a write speed of above 7 MB/s (4 MB/s absolute minimum) and a speed class of 10 (4 absolute minimum). Racelogic recommends SD cards from quality brands such as Transcend, SanDisk, Kingston or Lexar to ensure the best results.
IMPORTANT
If an SD card is formatted in the exFAT or NTFS file formats, it will need to be reformatted into a FAT32 file system before it will work with a VBOX Touch unit.
SDHC cards (2 GB to 32 GB)
Supplied or purchased SDHC cards are formatted in the FAT32 file format. This format is supported by VBOX Touch.
SDXC cards (64 GB and above)
Purchased SDXC cards will be formatted in exFAT or NTFS file formats; these formats are not supported by VBOX Touch (please reformat as per instructions below).
SD Card Reformatting
- FAT32 reformatting for media with sizes up to 32 GB can be done directly within Windows by right-clicking on the media and selecting 'Format'.
- If you would like to format media with sizes above 32 GB into a FAT32 file system, this isn't something that can be done directly within Windows as it is not the standard formatting for the file. However, many third-party software programs can be used to reformat media to allow them to work correctly with our products - we can recommend This Tool as a free option from the SD card organisation.
Power
The VBOX Touch RTK unit can be powered by the supplied RLCAB010LE cable connected to a vehicle's 12 V cigar power socket.
On boot up, the VBOX Touch will display a splash screen and automatically look for satellites and media.
The first time that the unit is booted up, the Display Mode screen will be presented. Every time after this, the last used display mode will be opened.
Logging
VBOX Touch logs data via an SD card inserted into the Side of the Unit. Dependent on the Logging Strategy selected within the General Settings area, the unit will either log continuously or when movement is detected (default).
Tapping on the SD Card Icon when green will manually start or stop logging data, overriding the Configured Logging Strategy.
The Record Icon will show when the unit is logging data to the SD card.
If you have come to a stop, but the Record Icon is still on, press the SD Card Icon to stop the logging before removing the card.
Sometimes, due to poor satellite visibility in a garage or close to a building, the box may start recording, even if the car is stationary. Always check the Record Icon before ejecting the card.
IMPORTANT
Do not remove the SD card when the Record Icon is on as you may lose data.
Note: If for some reason the SD card is removed while the unit is still recording, it may need to be repaired using a PC before it can be reused.
Logging Switch
You can also control the logging by using an RLVBACS010 hand-held latching trigger switch (unlatched for logging/ latched for not logging). Continuous Logging Mode should be selected when using the switch. It is connected to the 3-pin Digital In and PPS Connector on the side of the VBOX Touch.
When the trigger switch is connected and latched, it is not possible to use the SD Card Icon to manually start or stop logging data.
Logged Channels
VBOX Touch logs channels to an inserted SD card within a .vbo file, channel information is available below:
- Satellites: This is the number of satellites in use.
- Time: This is UTC since midnight in the form HHMMSS.SS.
- Latitude: Latitude in minutes MMMM.MMMMMMMM +ve = North e.g. 3169.30644410M = 52D, 49M, 18.4S.
- Longitude: Longitude in minutes MMMMM.MMMMMMMM +ve = West e.g. 00040.18164742M = 00D, 40M, 10.9S.
- Velocity: Velocity in km/h.
- Heading: Heading in degrees concerning North.
- Height: Height above sea level in meters based on the model of the earth used by VBOX GNSS engines.
- Vertical velocity: Vertical velocity in km/h. +ve velocity uphill, -ve velocity downhill.
- Long accel: Longitudinal acceleration in g, +ve for forward acceleration.
- Lat accel: Lateral acceleration in g, +ve for acceleration to the left.
- Solution type: Indicator for what the unit is currently using to derive position: 0 = No sats; 1 = Standalone using GNSS only; 2 = DGNSS; 3 = RTK Float (RTK but not full resolution); 4 = RTK Fixed.
- Event 1 time: This is the digital input oversample timer used to interpolate the trigger event time between captured samples.
- Correction age (VBOX Touch RTK only): RTK signal age in seconds, if there is a loss in connection, the value resets at 60 s.
- GPS Sats Used (VBOX Touch RTK only): Number of GPS satellites in use.
- Glonass Sats Used (VBOX Touch RTK only): Number of Glonass satellites in use if selected within the GNSS Selection area within the General Settings menu.
- Beidou Sats Used (VBOX Touch RTK only): Number of Beidou satellites in use if selected within the GNSS Selection area within the General Settings menu.
- Galileo Sats Used (VBOX Touch RTK only): Number of Galileo satellites in use.
You can find more information about the VBO file format here.
Connectors
AntennaIf you are struggling to maintain a stable satellite lock, you can connect the supplied external antenna (RLACS262) to the antenna socket. You should also use the external antenna when you are doing Brake Trigger Tests. You can find more information about the external antenna further down on the page. |
Left Side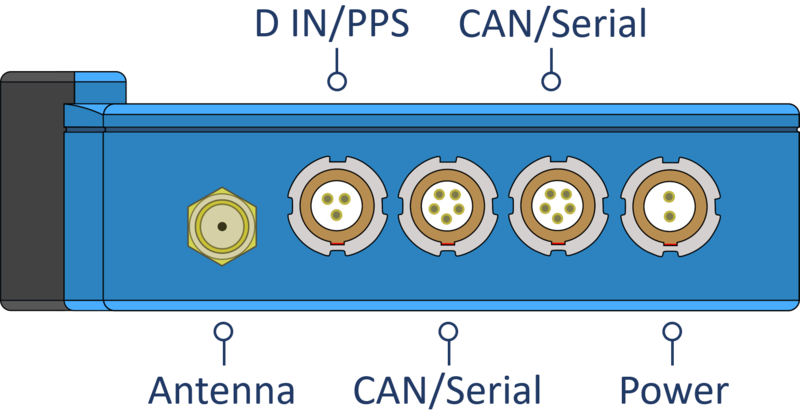 |
D IN/PPSThe Digital In and PPS port can be used for connection to the VBOX Brake Pedal Trigger to provide brake trigger deceleration tests. More information on this is available here. The port can also be used to connect a Hand Held Start/Stop Logging Switch (RLVBACS010) to control the logging of the unit. More information on this is available here. |
|
CAN/Serial (Top)The top CAN/Serial port can be used to output serial information, allowing you to either connect VBOX Touch to VBOX Test Suite via an RLCAB001 and conduct live testing, or output lap timing parameters. You can find more information about the Serial Output settings here. |
Right Side
|
CAN/Serial (Bottom)The bottom CAN/Serial port can be used by VBOX Touch RTK units to receive RTK corrections via an NTRIP Modem or a Telemetry Radio Module with a Static Base Station. You can find more information about RTK input settings here. |
|
| You can find more detailed connector information on the PIN OUTS page. |
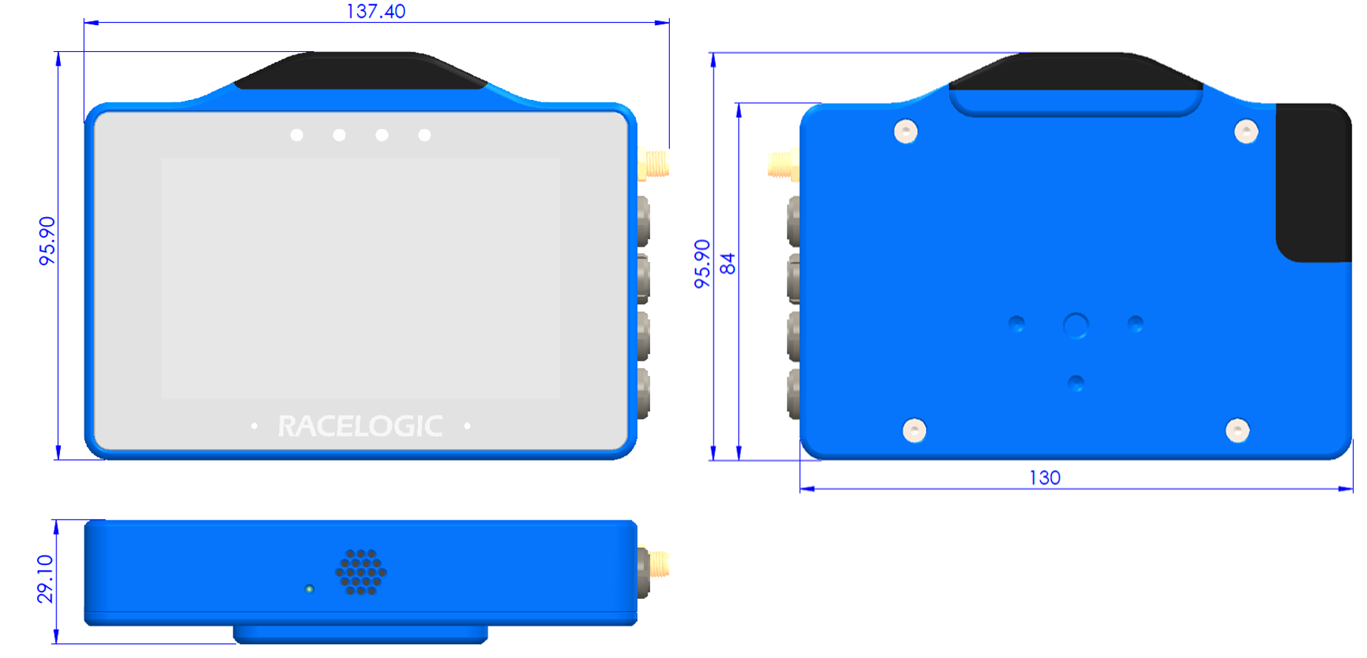
Dimensions
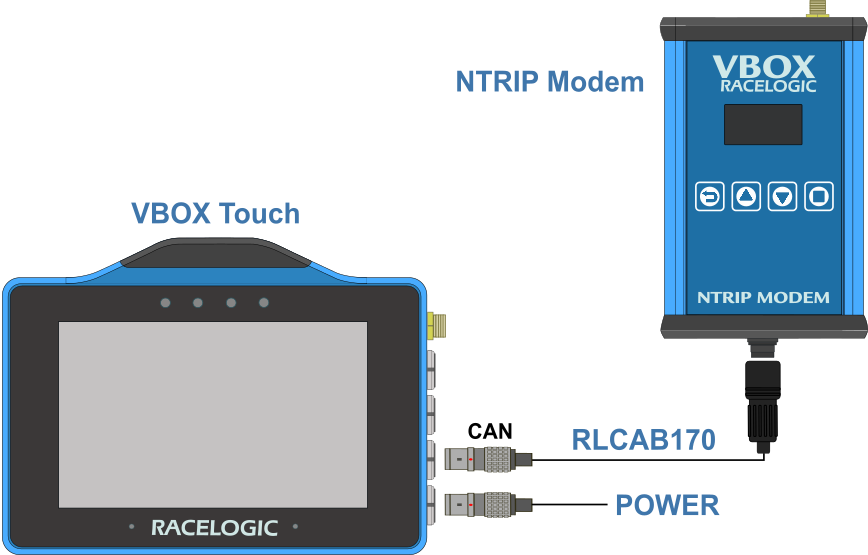
Connection to an NTRIP Modem
Connect the RLCAB170 cable from the bottom Hirose connector on the NTRIP Modem to the bottom CAN/Serial port of the VBOX Touch. Ensure that the NTRIP Modem is correctly configured for use before connecting to the unit.
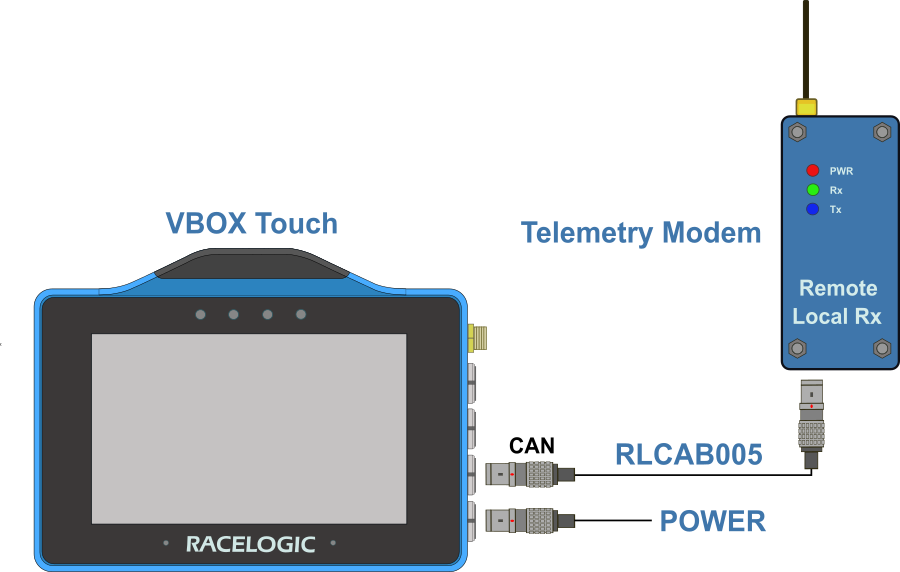
Connection to a Local DGNSS Base Station
VBOX Touch RTK receives RTCM correction data from a telemetry radio module which acts as receiver for information transmitted by the Racelogic DGNSS Base Station. It is connected to the bottom CAN/Serial port of the VBOX Touch via an RLCAB005.
Racelogic also provide solutions to use SATEL radio modems for long range applications on large test sites. The connection to the VBOX will be the same in this instance, however instead of an RLCAB005, an RLCAB096L would be used which has a 15 way D-Sub connector for connection to the SATEL radio modem.
Ensure that the Base Station is correctly configured for use before connecting to the unit.
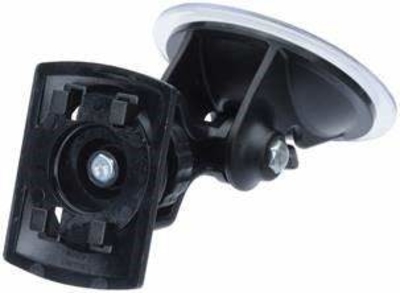
Mounting
VBOX Touch is supplied with a Swivel Neck Richter Suction Mount (RLACS277) for mounting onto a vehicle windscreen. It can also be secured using the ¼ 20 TPI UNC screw thread on the back of the unit.
 |
 |
Satellite Reception
VBOX Touch has an internal patch antenna, meaning that in many circumstances, where the unit has a clear view of the sky without any interference, an additional antenna is not required. However, if you are struggling to maintain a stable satellite lock (indicated by a flashing red satellite icon), an external antenna (RLACS262) is also supplied with the unit which can be used.
IMPORTANT
- If you are conducting Brake Trigger Deceleration Tests, the external antenna should be used.
- If you are intending on receiving RTK corrections with a VBOX Touch RTK unit, the external antenna should be used.
- The first time that the unit is used, it may take up to 10–15 minutes to fully acquire satellites. After this, it will usually take 1–2 minutes to acquire satellites.
External Antenna (If Required)
The placement of the GNSS antenna is crucial to the quality of the data recorded by VBOX Touch. Any metal close to a GNSS antenna can unpredictably disturb the signal due to interference from reflections of weak GNSS signals.
For the best results, use the antenna in the centre of a metal roof at least 5 cm away from any roof bars or radio antennas. Do not mount the antenna close to the edge of the roof as reflections from the ground may interfere with the signals. Avoid the edges as reflections from the A-pillars will cause problems.
Mount the antenna as high up as possible and keep it above any roll bars. Pieces of metal close to and above an antenna will badly disrupt the GNSS signal.
If the vehicle being used does not have a metal roof, then place the GNSS antenna on a flat piece of metal at least 10 cm in diameter. If this is not possible, copper or aluminium foil can be used to create a shaped ground plane underneath the antenna. For example, on a fibreglass roof, mount the antenna on top of the roof, and place some adhesive-backed metal foil underneath, on the inside of the roof.
Acquiring Satellite Lock
Tall buildings or trees can block GNSS signals, causing a reduction in the number and quality of satellites being tracked, leading to inaccurate position measurements and a noisy velocity signal.
GNSS works best in open areas/ Avoid tree-lined roads
GPS Coldstart
If VBOX Touch is struggling to acquire a satellite lock, a GPS coldstart may be required. This may be necessary when the unit hasn’t been used for several days or has dramatically moved location since its last use.
To perform a coldstart, press the COLDSTART button within the Diagnostics Settings menu.
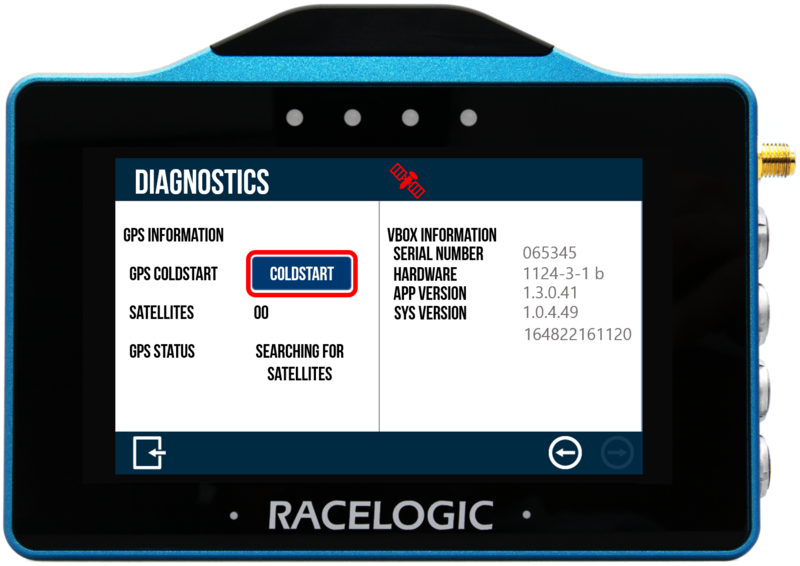
When the button has been pressed, the unit will make an audible sound and a ‘PLEASE WAIT’ message will be displayed on the screen which will count down from 3. The number of satellites will then be displayed as '00' and GPS status will show ‘SEARCHING FOR SATELLITES’ until the satellite lock has been acquired. It will take approximately 25 – 30 seconds for the unit to reacquire the satellite lock.
The 4 LEDs at the top of the unit provide visual feedback dependent on what process is being performed:
| Function | Behaviour | Colour |
|---|---|---|
| Accel/Decel Mode | If Alert at End is enabled, the LEDs will flash green for 0.5 s once the test end criteria are met. |  |
| Lap Timing Mode | The LEDs provide a live reference lap speed comparison (Delta-V). | |
|
The current lap is > 5 km/h quicker than the reference lap The current lap is 2.5 km/h quicker than the reference lap
|
|
|
|
The LEDs will illuminate blue during the process of creating a Reference Lap. |
 |
|
| When loading a Track Database file, the progress of the track database update is displayed via the LEDs; each lit LED will represent 25% of the process with all LEDs extinguishing when the process is complete. |  |
|
| When a Track Layout is changed, the LEDs will briefly flash green twice. | |
|
| When a Finish Line is cleared, the LEDs will briefly flash green twice. | |
|
| When a Standing Start is Enabled or Disabled, the LEDs will briefly flash green twice. | |
|
| Speed Mode | If a Target Speed LED Alert has been set, the LEDs will flash green when the value is reached. | |
| Screenshot | If a screenshot has been saved successfully, the LEDs will illuminate yellow in sequence from left to right to display the progress of writing to the SD card. | |
| Reset | The LEDs will briefly flash green twice when a screen has been reset. | |


VBOX Touch has 4 display modes; Accel, Decel, Lap Timing and Speed. The display modes allow you to conduct a range of performance tests and functions. You can change the display mode by pressing the Mode button at the bottom of the screen.
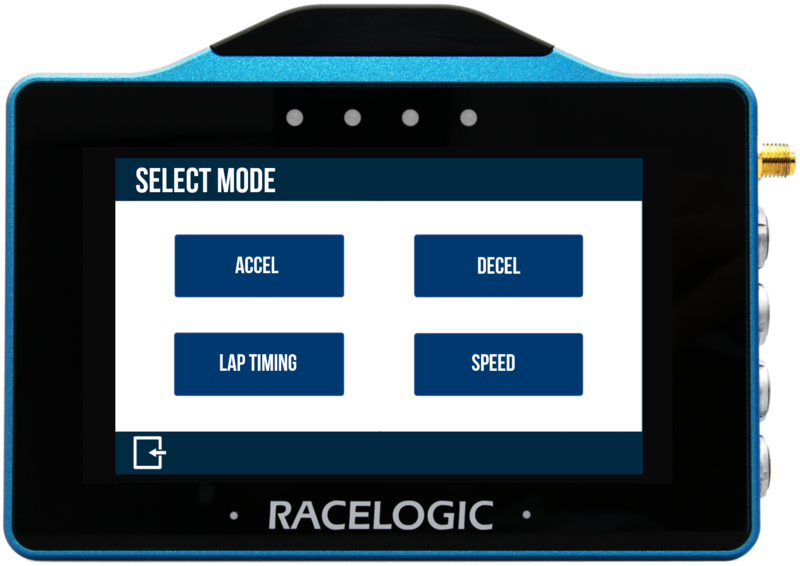
Click on the screens below to find more information on the available modes.
 |
Acceleration Testing
|
Deceleration Testing
|
 |
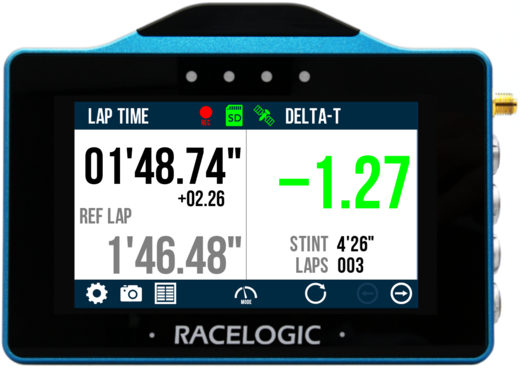 |
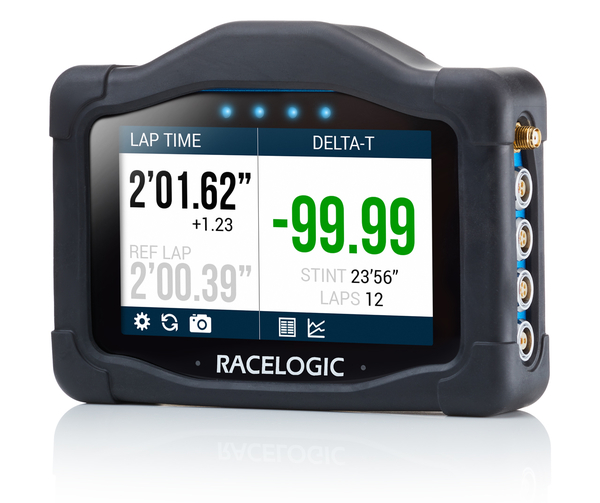
Lap Timing
|
Speed Display
|
 |
Setup
- Connect the power via the Power socket.
- Insert the SD card into the Side of the Unit. The SD Card Icon should display as green as long as the card has free space.
- When the unit has booted, select the Mode Button and press ACCEL if it is not already selected.
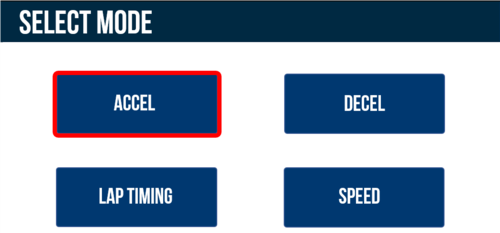
- Select which Accel screen you would like to be shown (Primary, Secondary or Best Result) by selecting the Forward and Back arrows on the bottom right of the screen or by swiping the screen left or right.
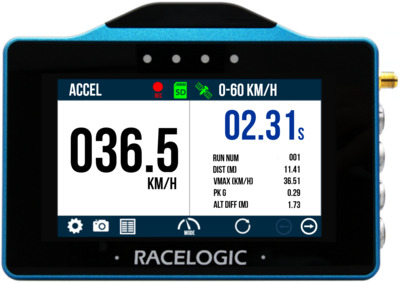 Primary |
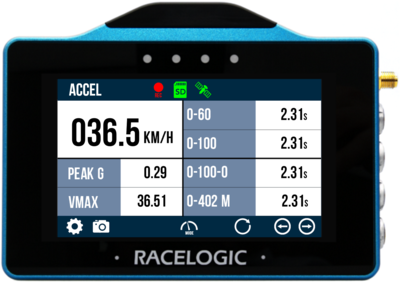 Secondary |
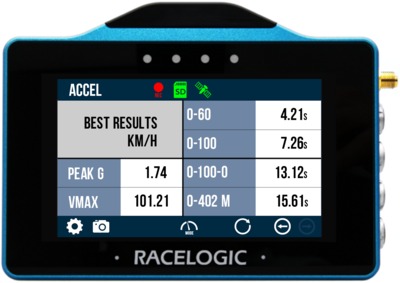 Best Results |
- Select the Settings Button, then the Accel option and choose the Start and End Parameters of the 4 concurrent tests, by default these are 0–60, 0–100, 0–100–0 and 0–¼ mile.
- If you would like an audible and visual alert when the Primary test is completed or the target speed is met within a 0-Speed-0 test, enable Alert at End/Target within the Settings.

- If you would like the tests to start once 1 ft or 0.305 m distance has been covered, enable One Foot Rollout within the Settings.
Note: Cannot be used in conjunction with Slope Correction.

- If you would like to apply DB Scanner slope correction method to the tests, enable Slope Correct within the Settings.
Note: Cannot be used in conjunction with One foot rollout.

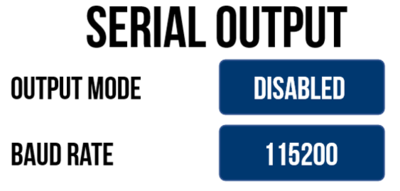
- If you are intending to use the serial output from the top CAN/Serial port to conduct Online Testing with VBOX Test Suite or output lap timing parameters, go to Serial Output within the Serial Port Settings and change the Output Mode to either VBOX Stream (live testing with VBOX Test Suite) or Lap Timing.
Note: Ensure correct hardware connections are made.
- Press the Exit Button to return to the Accel Test screen.
- Take the vehicle outside and wait for the VBOX Touch to gain satellite lock.
Note: The first time that the unit is used, it may take up to 15 minutes to fully acquire satellites. After this, it will usually take 1 to 2 minutes to acquire satellites.
- The unit is now ready to display live Accel Test results.
- By default, VBOX Touch will automatically start recording when travelling over 0.5 km/h, this can be changed within the General Settings.
- Tapping on the SD Card Icon when green will manually start or stop logging data, overriding the Configured Logging Strategy.
-
The Record Icon will show when the unit is logging data to the SD card.
If you have come to a stop, but the Record Icon is still on, press the SD Card Icon to stop the logging before removing the card.
Sometimes, due to poor satellite visibility in a garage or close to a building, the box may start recording, even if the car is stationary. Always check the Record Icon before ejecting the card.
IMPORTANT – The SD card shouldn't be removed when the Record Icon is on as you may lose data.Note: If for some reason the SD card is removed whilst still recording, it may need to be repaired using a PC before it can be reused.
-
A screenshot of what is displayed on the screen can be taken at any time by pressing the Screenshot Button.
-
To reset all test results shown on the current screen, press the Reset Button.
-
When you have finished your testing, completed test results can be viewed by pressing the Results Button.
More information on Accel Mode testing can be found here.
Data Analysis
A recorded session will be saved within the SD card as a .vbo file. This can be later analysed using our next generation of data analysis software VBOX Test Suite.
Further User Instructions
You can find the complete user guide, including the settings and RTK-specific information here.