MFD Touch is a configurable data display that presents live data from a connected VBOX unit.
You can customise how data is displayed, select which parameters are shown, and configure how the unit calculates and presents derived results such as acceleration times or lap timing data.
This page focuses on configuring what the MFD Touch displays and how it behaves.
For details about individual display types, see Data Display Screens.
For details about the available settings, see Settings.
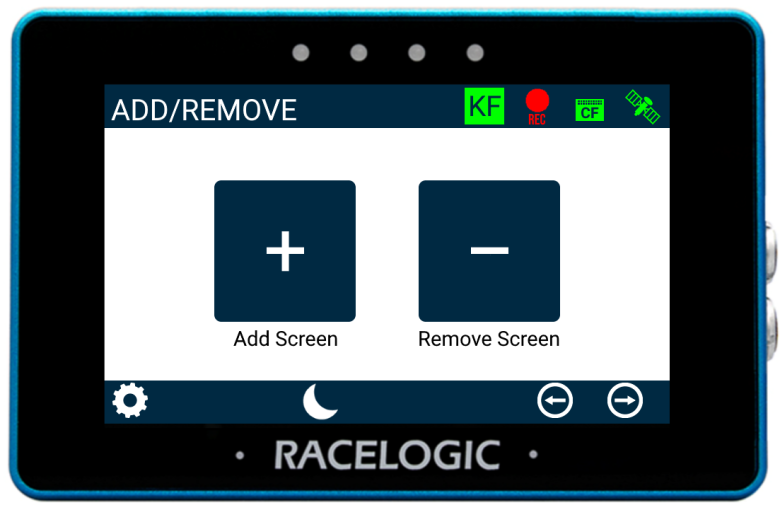
- Go to the Add/Remove screen
(Swipe through display screens until it appears) - Tap Add Screen (+)
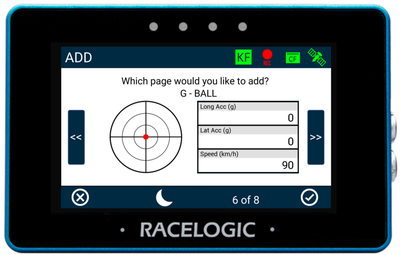
- Select a display type
- Tap Confirm
A countdown is shown while the screen is being added.
Tap the screen before the countdown completes to cancel.


TIP
Use different screens for different activities (e.g. monitoring, acceleration analysis, lap timing).
- Go to the Add/Remove screen
- Tap Remove Screen (-)
- Select the screen you want to remove
- Tap Confirm
IMPORTANT
Data display screens can only be configured directly on the MFD Touch unit. It is not possible to configure screens using the VBOX Setup Software.
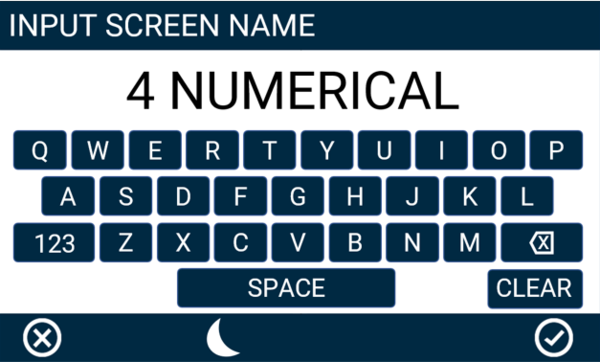
- Long-press or double-tap the screen name
- Enter a new name
- Tap Confirm
IMPORTANT
If an SD card is inserted in the display, the screen name will be retained after a power cycle.
- Open element settings (long-press or double-tap the element or parameter)
- Adjust the required settings
- Tap Exit to return to the screen
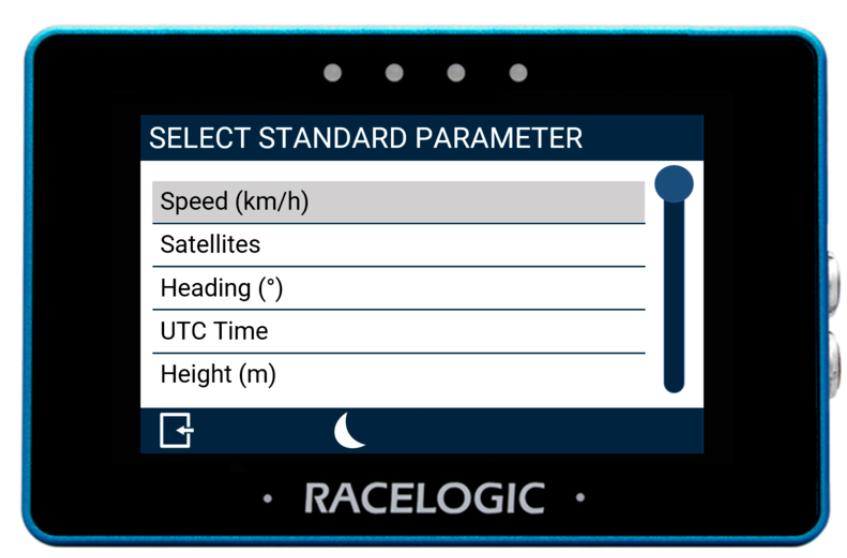
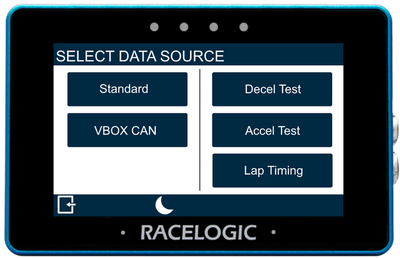
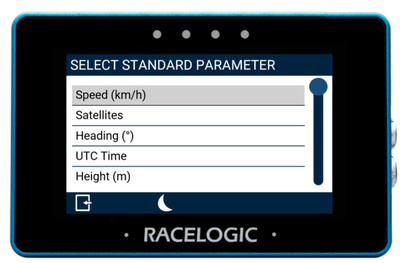
- Open element settings
- Select Parameter (Data section)
- Tap Select
- Choose a data source
- Select a parameter
Use the scroll bar to view all available parameters.

IMPORTANT
If a previously selected CAN channel parameter is no longer available, its values will display as 0 or nil.
The parameter name will be greyed out, and “MISSING PARAMETER” will flash in the header.
- Go to Settings → VBOX Display Settings → General Settings - Units of Measurement
- Select the units you want to use for speed, distance and acceleration data.
If you’re unsure which units to use or how they affect displayed data, see Units and Measurement Settings.
- Go to Settings → VBOX Display Settings → General Settings - Screen Settings
- Set the required screen brightness.
- Go to Settings → VBOX Display Settings → General Settings - Screen Settings
- Set the required brightness for the LEDs on the display.
IMPORTANT
LED brightness level 5 is very bright and may cause glare or discomfort in low-light conditions.
- Go to Settings → VBOX Display Settings → General Settings - Data
- Define if you want the average speed to be calculated from when the minimum speed is detected or continuously from the start of the test.
Use this before starting a new test or session.
- Go to Settings → VBOX Display Settings → General Settings - Data
- Select Reset Session Data to clear session-based values such as:
- average speed
- timers
- calculated results
IMPORTANT
These settings apply across all data display screens and changes affect how data is presented and interpreted.
- Go to Settings → VBOX Display Settings → General Settings - Alerts
Set Up Target Speed Alert(s)
Use this to highlight when a specific speed is reached during testing.
- Enable the required alert type(s)
- Enter the required Target Speed
Set Up Logging Beep
Select this option to enable a notification when the connected VBOX unit starts, stops, or pauses logging.
Configure how MFD Touch calculates and displays results for specific test types.
Go to Settings → Accel Test Settings.
- Select a test type. The available test parameters will vary depending on the test type.
- Define the required test parameters.
Optional Configuration
- Alerts
- One-Foot Rollout
- Save results to SD card
- Go to Settings → Lap Timing Settings
Set Start Gate
- Select Set Start Gate
- Drive to the required location
- Tap the screen
The start gate is used as both start and finish by default.
Optional Configuration
- Separate finish gate
- Split gates (sector timing)
- Alerts
- Gate width (default is 25 m)
- Save results to SD card
IMPORTANT
Lap timing functionality on MFD Touch depends on gate position and vehicle movement.
Set up how deceleration (braking) tests are triggered, measured, and reported.
Go to Settings → Decel Test Settings
Select Test Type
Deceleration test settings are split across two screens:
- one for standard tests (without trigger)
- one for trigger-based tests
Select the correct test type to access the relevant settings screen.
Standard Decel Test (Without Trigger)
Use this for braking tests based on start and end speeds.
- Set the Start Speed
- Set the End Speed
- Enable alerts if required
- Adjust MFDD settings as needed
Trigger Decel Test (With Trigger)
Use this when the test should begin based on a specific trigger condition.
- Set the Minimum Trigger Speed
- Enable alerts if required
- Adjust MFDD settings as needed
Optional configuration
Save Results to SD
NOTES
- Each test type has its own settings screen
- Make sure you are configuring the correct screen for your test
- MFDD settings control how braking performance is calculated
WARNING
To save results from Accel, Decel, or Lap Timing tests:
- Enable Write Results to SD in the settings for the relevant test type
- Insert an SD card into the display
These results will only be saved when both conditions are met.
Set up alerts to notify you during testing and data monitoring.
Alerts on MFD Touch are configured in different places depending on what they relate to.
Use this option to get a notification when a specific speed is reached.
- Go to Settings → VBOX Display Settings → General Settings - Alerts
- Enable Sound Alert and/or LED Alert
- Enter the required Target Speed
Use this to be notified when the connected VBOX starts, stops, or pauses logging.
- Go to Settings → VBOX Display Settings → General Settings - Alerts
- Enable the Logging Beep option
Use this to monitor a specific parameter (e.g. speed, temperature, G-force).
- Open the element settings for the relevant parameter
(long-press or double-tap the element/parameter) - Go to the Alerts section
- Set the trigger condition and value
- Enable and define the required alert type(s): LED alert, buzzer alert, and/or screen alert
Refer to the Alerts Settings for the relevant Data Display Type on the Data Display Screens page for more information about the specific alerts and how you can define them.
Use these alerts to highlight key moments during specific tests. You can find more information about the different alerts on the Settings page.
- Go to Settings → Accel Test Settings.
- Enable the required alert(s).
- Exit the Settings.
- Go to Settings → Decel Test Settings
- Identify the settings for your test setup:
Without Trigger
- Make sure you are on the Decel Test Settings screen
- Enable the required alert(s)
- Exit the Settings
With Trigger
- Make sure you are on the Decel Test Settings - Trigger Only screen
- Enable the required alert(s)
- Exit the Settings
- Go to Settings → Lap Timing Settings → Screen 2
- Enable the required alert(s)
- Exit the Settings